Free Shipping on Domestic Orders $75+

Dell Precision 7750 GPU Replacement

What you need

    1. Dell Precision 7750 GPU Replacement, GPU: step 1, image 1 of 2 Dell Precision 7750 GPU Replacement, GPU: step 1, image 2 of 2
      • Make sure to power off your system using the shutdown option and unplug it from AC power prior to beginning the procedure.

      • Place the laptop face-down on a clean table.

      • Remove the screws using a Phillips #0 screwdriver.

      Ask FixBot

      Add Comment

    2. Dell Precision 7750 GPU Replacement: step 2, image 1 of 1
      • Run a plastic opening pick around the entire laptop until all clasps are disconnected.

      Ask FixBot

      Add Comment

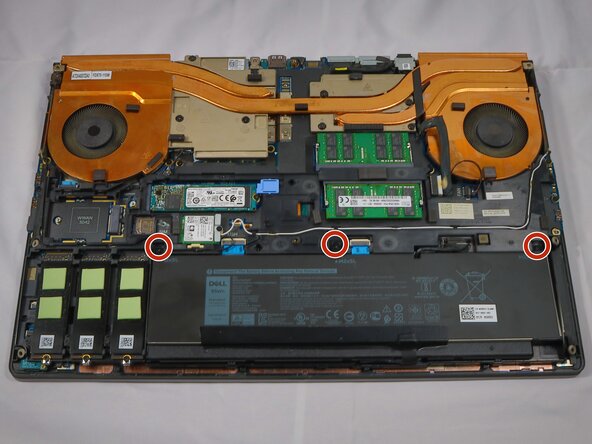
    3. Dell Precision 7750 GPU Replacement: step 3, image 1 of 2 Dell Precision 7750 GPU Replacement: step 3, image 2 of 2
      • Remove three screws from the battery using a Phillips #0 screwdriver.

      Ask FixBot

      Add Comment

    4. Dell Precision 7750 GPU Replacement: step 4, image 1 of 1
      • Remove the battery cable by lifting up and away from the connector.

      Ask FixBot

      Add Comment

    5. Dell Precision 7750 GPU Replacement: step 5, image 1 of 1
      • Lift and remove the battery from the laptop.

      Ask FixBot

      Add Comment

    6. Dell Precision 7750 GPU Replacement: step 6, image 1 of 2 Dell Precision 7750 GPU Replacement: step 6, image 2 of 2
      • Detach the motherboard power connector.

      • Pull the connector in a straight motion to avoid component damage.

      Ask FixBot

      Add Comment

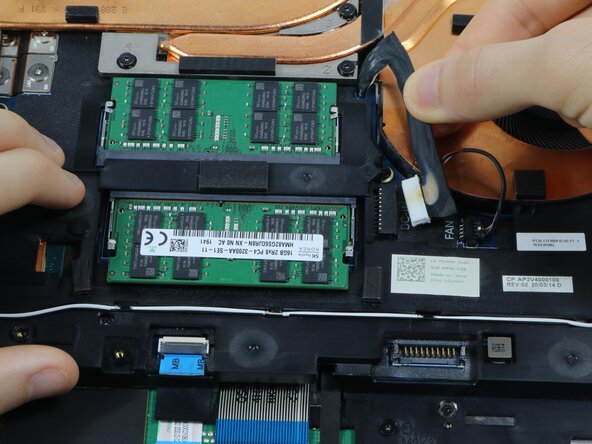
    7. Dell Precision 7750 GPU Replacement: step 7, image 1 of 3 Dell Precision 7750 GPU Replacement: step 7, image 2 of 3 Dell Precision 7750 GPU Replacement: step 7, image 3 of 3
      • Detach the two fan connectors.

      • Pull the connectors in a straight motion to avoid component damage.

      Ask FixBot

      Add Comment

    8. Dell Precision 7750 GPU Replacement: step 8, image 1 of 1
      • Carefully loosen eight screws in numbered order (1-8).

      • Loosening the screws in the numbered order ensures a uniform release of pressure for both the CPU and GPU.

      Ask FixBot

      Add Comment

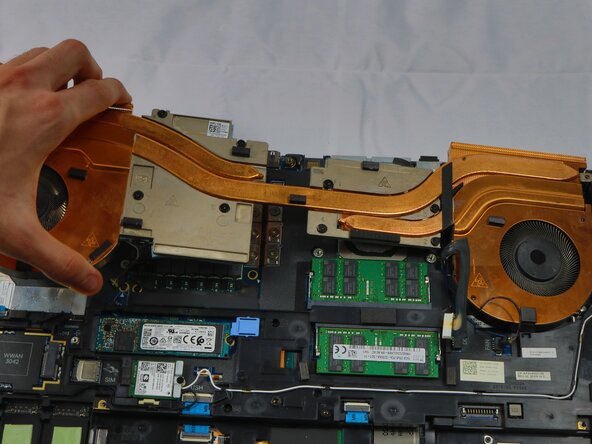
    9. Dell Precision 7750 GPU Replacement: step 9, image 1 of 1
      • Carefully remove the copper heatsink.

      Ask FixBot

      Add Comment

    10. Dell Precision 7750 GPU Replacement: step 10, image 1 of 2 Dell Precision 7750 GPU Replacement: step 10, image 2 of 2
      • Remove eleven screws using a Phillips #0 screwdriver.

      Ask FixBot

      Add Comment

    11. Dell Precision 7750 GPU Replacement: step 11, image 1 of 2 Dell Precision 7750 GPU Replacement: step 11, image 2 of 2
      • Remove the single screw from the Wi-Fi board using a Phillips #0 screwdriver.

      • Disconnect the white and black Wi-Fi antenna cables.

      Ask FixBot

      Add Comment

    12. Dell Precision 7750 GPU Replacement: step 12, image 1 of 2 Dell Precision 7750 GPU Replacement: step 12, image 2 of 2
      • Remove the screw holding the solid state drive.

      • Pull the blue tab backwards to release the solid state drive.

      • Remove the solid state drive.

      Ask FixBot

      Add Comment

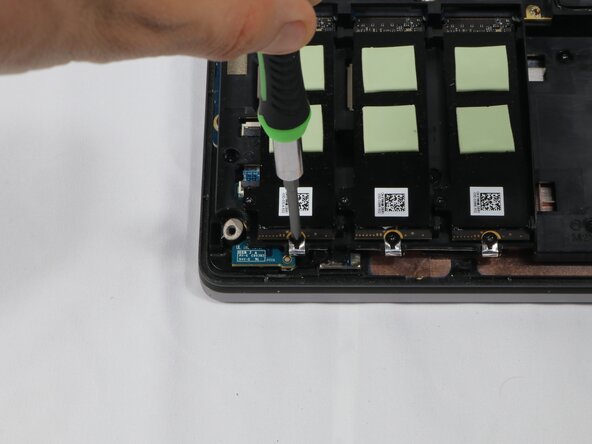
    13. Dell Precision 7750 GPU Replacement: step 13, image 1 of 3 Dell Precision 7750 GPU Replacement: step 13, image 2 of 3 Dell Precision 7750 GPU Replacement: step 13, image 3 of 3
      • Remove six screws holding the M.2 drives using a Phillips #0 screwdriver.

      Ask FixBot

      Add Comment

    14. Dell Precision 7750 GPU Replacement: step 14, image 1 of 1
      • Remove the metal heatsink by lifting by the screw side.

      • The thermal pad will break apart while taking the heatsink off; be careful not to lose parts of the pad or touch it.

      Ask FixBot

      Add Comment

    15. Dell Precision 7750 GPU Replacement: step 15, image 1 of 2 Dell Precision 7750 GPU Replacement: step 15, image 2 of 2
      • Remove nine screws using a Phillips #1 screwdriver.

      Ask FixBot

      Add Comment

    16. Dell Precision 7750 GPU Replacement: step 16, image 1 of 1
      • Disconnect the keyboard lighting ribbon cable.

      • Pull the ribbon cable directly away to avoid component damage.

      Ask FixBot

      Add Comment

    17. Dell Precision 7750 GPU Replacement: step 17, image 1 of 1
      • Disconnect the keyboard ribbon cable.

      • Pull the ribbon cable directly away to avoid component damage.

      Ask FixBot

      Add Comment

    18. Dell Precision 7750 GPU Replacement: step 18, image 1 of 1
      • Remove the antenna cables along the entire upper plastic housing.

      • Take extra care while removing these cables as they are thin and fragile.

      Ask FixBot

      Add Comment

    19. Dell Precision 7750 GPU Replacement: step 19, image 1 of 1
      • Remove the upper plastic mount and place it somewhere until reassembly.

      Ask FixBot

      Add Comment

    20. Dell Precision 7750 GPU Replacement: step 20, image 1 of 1
      • Disconnect the two ribbon cables from the upper motherboard housing.

      Ask FixBot

      Add Comment

    21. Dell Precision 7750 GPU Replacement: step 21, image 1 of 2 Dell Precision 7750 GPU Replacement: step 21, image 2 of 2
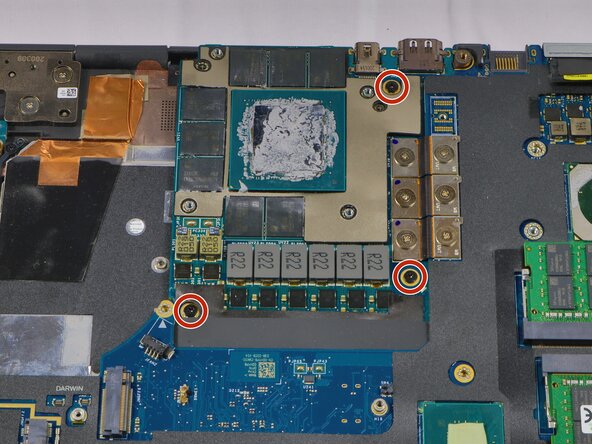
      • Remove three screws from the GPU using a Phillips #0 screwdriver.

      • Take extra care not to unintentionally strip the screw heads, as these three screws are responsible for holding the GPU securely in place.

      Ask FixBot

      Add Comment

    22. Dell Precision 7750 GPU Replacement: step 22, image 1 of 2 Dell Precision 7750 GPU Replacement: step 22, image 2 of 2
      • Remove the PCIe bridge screws using a Phillips #0 screwdriver.

      • Do not, under any circumstance touch the contacts on the PCIe bridge. Finger oils will ruin the contacts, signal quality will degrade significantly.

      Ask FixBot

      Add Comment

    23. Dell Precision 7750 GPU Replacement: step 23, image 1 of 2 Dell Precision 7750 GPU Replacement: step 23, image 2 of 2
      • Disconnect the PW ribbon cable.

      Ask FixBot

      Add Comment

    24. Dell Precision 7750 GPU Replacement: step 24, image 1 of 2 Dell Precision 7750 GPU Replacement: step 24, image 2 of 2
      • Un-clip the cable protection.

      • Disconnect the built-in screen connectors.

      Ask FixBot

      Add Comment

    25. Dell Precision 7750 GPU Replacement: step 25, image 1 of 1
      • Disconnect the SD ribbon cable.

      Ask FixBot

      Add Comment

    26. Dell Precision 7750 GPU Replacement: step 26, image 1 of 2 Dell Precision 7750 GPU Replacement: step 26, image 2 of 2
      • Disconnect the motherboard speaker cable.

      Ask FixBot

      Add Comment

    27. Dell Precision 7750 GPU Replacement: step 27, image 1 of 1
      • Move the laptop chassis off the work area to isolate the motherboard and GPU board.

      Ask FixBot

      Add Comment

    28. Dell Precision 7750 GPU Replacement: step 28, image 1 of 2 Dell Precision 7750 GPU Replacement: step 28, image 2 of 2
      • Invert the motherboard and GPU, then disconnect the GPU power cable.

      Ask FixBot

      Add Comment

    29. Dell Precision 7750 GPU Replacement: step 29, image 1 of 1
      • Separate the GPU from the motherboard and place it on a clean surface.

      • At this point the procedure is complete. To install the new GPU, start here (Step 29) and follow these instructions in reverse order.

      • Steps 30-32 cover removing and applying thermal paste.

      • Apply the new thermal paste after reassembling the machine, but before mounting the heatsink (Step 9).

      Ask FixBot

      Add Comment

    30. Dell Precision 7750 GPU Replacement: step 30, image 1 of 1
      • Use 70% or 90$ isopropyl alcohol (IPA) to remove the old thermal paste from the GPU.

      • I recommend using cotton swabs to clean the GPU. Drench the end of the swab with IPA, then rub the surface of the GPU until the majority of the old thermal paste is removed.

      • Take care not to rub off any of the capacitors at the edge of the GPU die.

      Ask FixBot

      Add Comment

    31. Dell Precision 7750 GPU Replacement: step 31, image 1 of 1
      • A clean GPU should look like this.

      Ask FixBot

      Add Comment

    32. Dell Precision 7750 GPU Replacement: step 32, image 1 of 2 Dell Precision 7750 GPU Replacement: step 32, image 2 of 2
      • GPU: apply new thermal paste in an "x" shape for best results, uniform spread will be applied later when you're screwing the copper heatsink back on.

      • CPU: apply new thermal paste as a "line" for maximum performance, uniform spread will be applied later when you're screwing the copper heatsink back on.

      • Once both the GPU and CPU have new thermal paste, carefully lay the copper heatsink back into place and view Step 8 for reassembly.

      • Step 8: tighten instead of loosen in numbered order (1-8), and make multiple rounds tightening slightly until all eight screws are tight.

      Ask FixBot

      Add Comment

Conclusion

To reassemble your device, follow these instructions in reverse order.

Cancel: I did not complete this guide.

One other person completed this guide.

0 Guide Comments

Add Comment

View Statistics:

Past 24 Hours: 2

Past 7 Days: 25

Past 30 Days: 27

All Time: 57