Free Shipping on Domestic Orders $75+

Dell Precision 7560 Motherboard Replacement

What you need

    1. Dell Precision 7560 Motherboard Replacement, Battery: step 1, image 1 of 3 Dell Precision 7560 Motherboard Replacement, Battery: step 1, image 2 of 3 Dell Precision 7560 Motherboard Replacement, Battery: step 1, image 3 of 3
      • The screws holding the back cover in place can not be removed.

      • Use a Phillips #0 screwdriver to loosen the the eight 5 mm captive screws in the bottom cover.

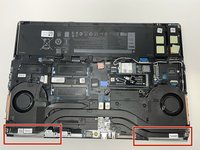
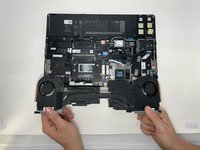
      • Remove the back cover by lifting at the corners.

      Ask FixBot

      Add Comment

    2. Dell Precision 7560 Motherboard Replacement: step 2, image 1 of 3 Dell Precision 7560 Motherboard Replacement: step 2, image 2 of 3 Dell Precision 7560 Motherboard Replacement: step 2, image 3 of 3
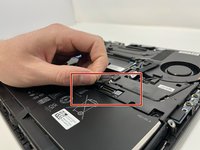
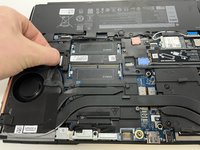
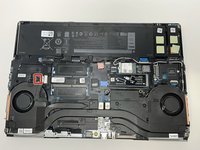
      • Unscrew and remove the five 2 mm screws that secure the battery.

      • Locate the battery connector.

      Ask FixBot

      Add Comment

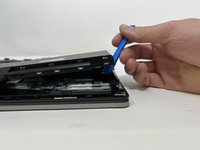
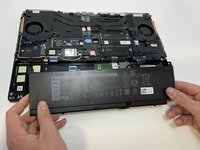
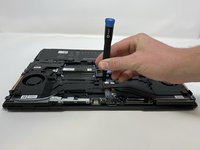
    3. Dell Precision 7560 Motherboard Replacement: step 3, image 1 of 3 Dell Precision 7560 Motherboard Replacement: step 3, image 2 of 3 Dell Precision 7560 Motherboard Replacement: step 3, image 3 of 3
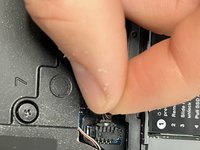
      • Pull the connector towards you to disconnect it.

      • Use your fingers or a plastic opening tool to pry the battery up and remove it from the laptop.

      Ask FixBot

      Add Comment

    1. Dell Precision 7560 Motherboard Replacement, Fan: step 4, image 1 of 2 Dell Precision 7560 Motherboard Replacement, Fan: step 4, image 2 of 2
      • The screws holding the fan in place cannot be fully removed.

      • Loosen the eight captive screws that secure the fan assembly.

      • Each screw is numbered in the order that they should be loosened.

      Ask FixBot

      Add Comment

    2. Dell Precision 7560 Motherboard Replacement: step 5, image 1 of 2 Dell Precision 7560 Motherboard Replacement: step 5, image 2 of 2
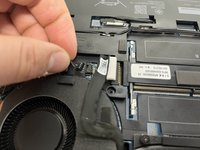
      • Locate connector cable and pull lightly to remove.

      Ask FixBot

      Add Comment

    3. Dell Precision 7560 Motherboard Replacement: step 6, image 1 of 2 Dell Precision 7560 Motherboard Replacement: step 6, image 2 of 2
      • Gently pull the first fan connector from the head until it is removed.

      • The thin wire is prone to damage. Exercise extra caution during removal.

      Ask FixBot

      Add Comment

    4. Dell Precision 7560 Motherboard Replacement: step 7, image 1 of 2 Dell Precision 7560 Motherboard Replacement: step 7, image 2 of 2
      • Gently pull the second fan connector from the head until it is removed.

      • The thin wire is prone to damage. Exercise extra caution during removal.

      Ask FixBot

      Add Comment

    5. Dell Precision 7560 Motherboard Replacement: step 8, image 1 of 2 Dell Precision 7560 Motherboard Replacement: step 8, image 2 of 2
      • Lifting from the bottom, carefully remove the laptop's fans.

      Ask FixBot

      Add Comment

    1. Dell Precision 7560 Motherboard Replacement, Solid-State Drive (SSD): step 9, image 1 of 2 Dell Precision 7560 Motherboard Replacement, Solid-State Drive (SSD): step 9, image 2 of 2
      • Unscrew and remove the two 3 mm screws that secure the solid-state drive.

      Ask FixBot

      Add Comment

    2. Dell Precision 7560 Motherboard Replacement: step 10, image 1 of 2 Dell Precision 7560 Motherboard Replacement: step 10, image 2 of 2
      • Remove the top cover of the Solid State Drive by lifting up from the corners.

      • Notice that the Solid State Drive is located underneath the cover.

      • Pull the Solid State Drive gently towards you from its exposed end to disconnect it.

      • With an appropriate replacement part, exchange the old SSD with a new one.

      Ask FixBot

      Add Comment

    1. Dell Precision 7560 Motherboard Replacement, Motherboard: step 11, image 1 of 3 Dell Precision 7560 Motherboard Replacement, Motherboard: step 11, image 2 of 3 Dell Precision 7560 Motherboard Replacement, Motherboard: step 11, image 3 of 3
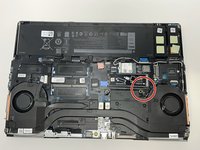
      • Remove the 5 mm screw holding the Wi-Fi card in place using a Phillips #0 screwdriver.

      • Lift to remove the metal overlay.

      • Disconnect the wires attached to the Wi-Fi card.

      • Lift from the sides to remove the Wi-Fi card.

      Ask FixBot

      Add Comment

    2. Dell Precision 7560 Motherboard Replacement: step 12, image 1 of 2 Dell Precision 7560 Motherboard Replacement: step 12, image 2 of 2
      • Remove the 2 mm screws holding the metal frame in place using a Phillips #0 screwdriver.

      • Remove, carefully and completely, any wires running over the frame.

      • Grab securely and lift to remove the metal frame.

      Ask FixBot

      Add Comment

    3. Dell Precision 7560 Motherboard Replacement: step 13, image 1 of 2 Dell Precision 7560 Motherboard Replacement: step 13, image 2 of 2
      • Flip up the metal edge holding down the SD connection.

      • Gently pull to disconnect the connecting strip.

      Ask FixBot

      Add Comment

    4. Dell Precision 7560 Motherboard Replacement: step 14, image 1 of 3 Dell Precision 7560 Motherboard Replacement: step 14, image 2 of 3 Dell Precision 7560 Motherboard Replacement: step 14, image 3 of 3
      • Remove the 5 mm screw holding the metal cap over the wire connection using a Phillips #0 screwdriver.

      • Holding the sides, lift to remove the metal cap.

      • Lift to disconnect the wire bundle.

      Ask FixBot

      Add Comment

    5. Dell Precision 7560 Motherboard Replacement: step 15, image 1 of 3 Dell Precision 7560 Motherboard Replacement: step 15, image 2 of 3 Dell Precision 7560 Motherboard Replacement: step 15, image 3 of 3
      • Using a Phillips #0 screwdriver, remove the eight 2 mm screws holding the motherboard.

      • Flip the motherboard over, exposing the underside.

      • Pull to disconnect the wires leading to the speaker unit.

      Ask FixBot

      Add Comment

    6. Dell Precision 7560 Motherboard Replacement: step 16, image 1 of 1
      • Using both hands, securely lift and remove the motherboard.

      Ask FixBot

      Add Comment

Conclusion

To reassemble your device, follow these instructions in reverse order.

Cancel: I did not complete this guide.

0 Guide Comments

Add Comment

View Statistics:

Past 24 Hours: 4

Past 7 Days: 30

Past 30 Days: 128

All Time: 2,109