
Dell Photo Printer 540 Case Replacement

Jonathan Mintz and 4 other contributors
Last updated on Jan 28, 2014
Views: 1.1K
View statistics:
- Past 24 Hours:
- 5
- Past 7 Days:
- 6
- Past 30 Days:
- 36
- All Time:
- 1,127
Comments: 0
No one has left comments on this guide. Will you be first?
Go to guide commentsCompleted: 0 1
No one has marked this guide "completed." Will you be the first?
1 person has marked this guide "completed." It's you — great job!
Favorites: 1 2
1 person has favorited (and subscribed to) this guide. Will you be next?
2 people have favorited (and subscribed to) this guide — including you!
Better Introduction
Improve this guide by completing or revising its introduction.
What you need
Tools

-
-
-
Use a Phillips #2 screwdriver to remove the three 5.65 mm screws on the bottom panel of the case in a counter-clockwise fashion.
-
-
-
Rotate the device so that it is upright again. Under the LCD Panel there is a 9.62 mm screw, unscrew using a Phillips #2 screwdriver.
-
-
-
-
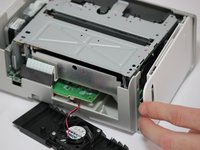
Rotate the photo printer so that the bottom panel faces up once again. Now lift off the bottom panel of the case to access all internal components.
-
-
-
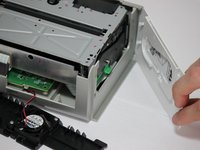
Finally remove the side panel with the ink-cartridge door by holding the right side and pulling backwards with the left side.
-

 Ask FixBot


To reassemble your device, follow these instructions in reverse order.

Team

Cal Poly, Team 14-7, Forte Spring 2012 Member of Cal Poly, Team 14-7, Forte Spring 2012
CPSU-FORTE-S12S14G7
4 Members
72 Guides authored
