Introduction
If the keyboard of your Dell Latitude E7440 is damaged in any form, use this guide to replace the trackpad.
The keyboard is the main input device used in operating the laptop. A damaged or worn out keyboard or a keyboard with missing keys can be a hindrance while using the laptop.
Before using this guide, clean the keyboard using a soft cloth so that it is free of debris.
Before beginning, make sure to power off your laptop completely and disconnect from any external power source.
What you need
-
-
Remove two 3mm screws using the Phillips #0 screwdriver.
-
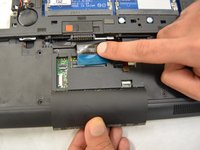
Slide the access door down and remove.
-
-
-
-
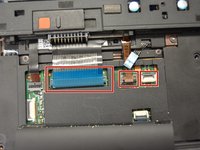
Unplug bottom cables.
-
Remove two 5mm screws using the Phillips #0 screwdriver.
-
-
-
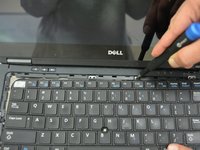
Remove keyboard bezel by using the opening tool to gently pry open the sides.
-
-
-
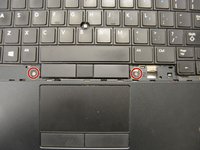
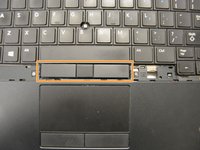
Remove two 2.5mm screws next to the space bar using the Phillips #0 screwdriver.
-
Remove the mouse buttons carefully.
-
-
-
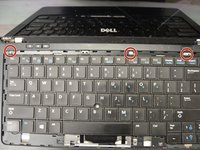
Remove the three 3mm screws that are around the perimeter using the Phillips #0 screwdriver.
-
Slightly jerk the keyboard from one side before pulling it one direction.
-


To reassemble your device, follow these instructions in reverse order.
Cancel: I did not complete this guide.
6 other people completed this guide.

Team

IUPUI, Team S1-G1, Stella Fall 2019 Member of IUPUI, Team S1-G1, Stella Fall 2019
IUPUI-STELLA-F19S1G1
4 Members
3 Guides authored
3 Guide Comments
In Step 3, there are four cables to remove, not three (one more to the left which is not highlighted in the picture).
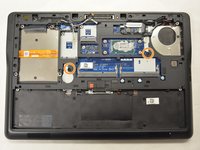
There are also two screws on the bottom labeled with a circled K. One is next to the CMOS battery, the other between the fan and the heatsink. Both of these screws need to be removed before the keyboard is free from the frame. I bent a bad keyboard in very bad ways before I found those screws. Fortunately, it was the keyboard I needed to replace and not a donar from another laptop.