
Dell Latitude E5470 LCD Panel Replacement (Display, not display assembly)

Harvey and 3 other contributors
Last updated on Oct 28, 2024
Views: 10K
View statistics:
- Past 24 Hours:
- 3
- Past 7 Days:
- 29
- Past 30 Days:
- 103
- All Time:
- 10,200
Comments: 5
5 guide comments.
Go to guide commentsCompleted: 5 6
5 people have marked this guide "completed." Will you be next?
6 people have marked this guide "completed." Including you — great job!
Favorites: 1 2
1 person has favorited (and subscribed to) this guide. Will you be next?
2 people have favorited (and subscribed to) this guide — including you!
Community-Contributed Guide
An awesome member of our community made this guide. It was not created by iFixit staff.
Introduction
Go to step 1 ↓How to replace the LCD panel for Dell Latitude E5470 Laptop
What you need
Tools


-
-
-
Loosen the 8 screws on the bottom cover. The screws will remain in the casing, they do not come out all the way.
-
Insert the pick or spudger between the upper and lower casing to release the plastic clips.
-
Attention needed: The clips are easily broken.
 Ask FixBot
-
-
-
To disconnect the battery, pull gently upwards on the tab connector.
-
-
-
-
Using a pick or spudger, gently insert between the LCD back-cover and bezel to release the clips.
-
The bezel is also glued to the LCD panel.
-
Remove slowly to avoid tearing or damaging any components underneath.
-
-
Tool used on this step:Tweezers$4.99
-
Remove the LCD paneland lay it flat on the keyboard.
-
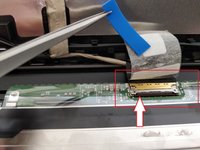
You will be able to see the connector on the back of the LCD panel secured with some adhesive tape and a metal connector.
-
Udsing the tweezers, slowly lift the tape away to reveal the blue sticky protector. Removing the blue pad to see the metal connector underneath.
-
Using a spudger, lift the front of the connector up (highlighted by the white arrow).
-
Pull the cable back to release the cable from the connector.
-
To reassemble, follow the steps in reverse.
-
-



To reassemble your device, follow these instructions in reverse order.
Cancel: I did not complete this guide.
5 other people completed this guide.

5 Guide Comments
Your presentation is perfect
Hello, will this model with touch screen work with non touch replacement LCD?
Damaged touch lcd and was not using touch , want to save some $ by installing not touch lcd..
Thanks - seems that little piece of blue sticky protector was my whole problem, months of a flickering screen, that was temporarily fixed upon pressing on the bottom of the bezel. Upon opening up the screen, it was crooked. So I straightened it, put things back together, and the flickering seems to be gone. Cross my fingers!
