
Dell Latitude 5521 Memory Replacement

Michael Engle and one other contributor
Last updated on Aug 2, 2024
Views: 1.1K
View statistics:
- Past 24 Hours:
- 0
- Past 7 Days:
- 13
- Past 30 Days:
- 67
- All Time:
- 1,066
Comments: 1
1 guide comment.
Go to guide commentsCompleted: 0 1
No one has marked this guide "completed." Will you be the first?
1 person has marked this guide "completed." It's you — great job!
Favorites: 0 1
No one has favorited (and subscribed to) this guide. Will you be the first?
1 person has favorited (and subscribed to) this guide — and that's you!
Bullets!
Better coordination with markups and the color/type of bullets will help make this guide more clear!
Community-Contributed Guide
An awesome member of our community made this guide. It was not created by iFixit staff.
Grammar Police
Embrace your inner English teacher and help improve this guide's grammar!
What you need
Tools
-
Spudger4.9


-
-
-
Loosen the 9 captive Phillips #0 screws from the bottom of the case.
-
Carefully pry open the base cover with your spudger. Work your way around the case slowly, being careful not to damage any of the components inside.
-
Once removed you will have access to the contents of your case.
 Ask FixBot
-
-
-
-
-
-
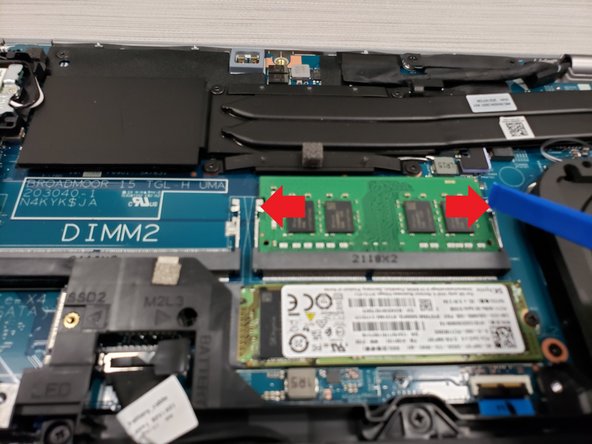
Locate Memory on the mainboard.
-
Gently push the retention clips away from the memory module. Once you have both clips pushed away the memory module will "pop-up" on it's own.
-
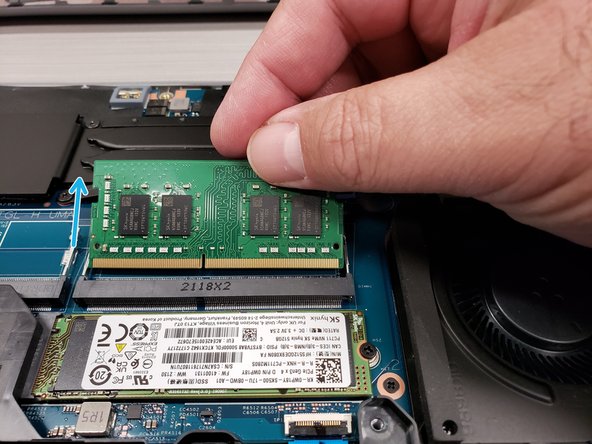
Pull the memory module away from the mainboard.
-
-




To reassemble your device, follow these instructions in reverse order.

1 Guide Comment
Thanks, this helped me! I noted a few things:
1.some of the screws are a little hard to get out, I think because they have lock-tite, it acts as a retainer. They had to be pulled while also unscrewing.
2.I used the iFixit bladed halberd, to pry of the case without breaking the clips. I know it's not as common of a tool, but the ultra thing blade worked well to disengage the clips gently.
3. My single 16GB DIMM wasn't cutting it. All physical memory was exhausted by the time I booted and loaded one Office file. I added a 4GB PC4-2666MHZ I had lying around, and it worked. Mixing and matching isn't recommended, but it worked in my case. Hopefully now I have some breathing room for running apps. PC/Mac vendors should stop selling units with 16GB or less. It simply isn't enough for a modern Mac or Windows (but does work fine for Linux).
