Introduction
A short guide on how to replace the SODIMM RAM on your Dell Latitude 5420. This machine takes DDR4 SODIMMs, it's even conveniently printed on the PCB!
What you need
-
-
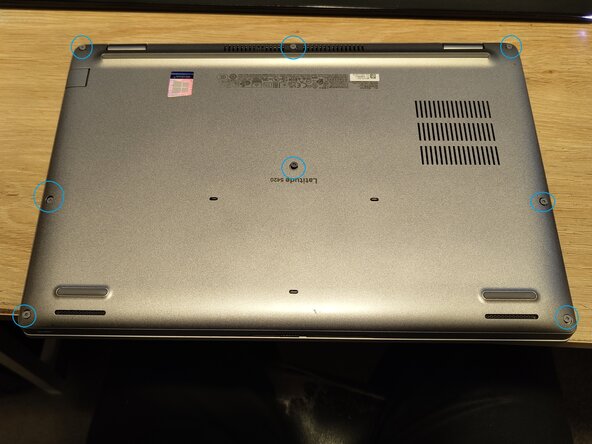
Overall this is a pretty easy cover to remove - there are 8 encapsulated screws to remove, all Philips #0. Start by loosening all 8 of these screws.
 Ask FixBot
-
-
-
After you've loosened all the screws, you should be able to pry underneath the cover between the screen hinges and gently lift the cover and separate the clips that hold the cover on to the main chassis. Once these are removed the cover should pop free.
-
-
-
-
From here you should be presented with a view very similar to this - I'd first recommend removing the battery before proceeding with any other steps, but it's pretty straightforward to remove the CPU cooler to repaste, replace the RAM, replace the WiFi card or to replace the M.2 SSD's from here.
-
-
-
Since you're not opening this just for funsies, you'll likely want to disconnect the battery before proceeding. To do so is pretty straightforward - take a non-metal tool (a plastic spudger preferably) and gently wiggle the battery connector straight up until it's as per the pictures. You can then bend it slightly out of the way.
-
-
-
With the rear cover off the RAM Sticks/slots are immediately visible - same as any SODIMM RAM carrier simply spread the two edge tabs out with your fingers and the sticks will pop up out of the slots. When re-installing, make sure the stick is fully seated in the connector before pressing down and securing under the metal tabs.
-


To reassemble your device, follow these instructions in reverse order.
Cancel: I did not complete this guide.
3 other people completed this guide.
