
Free Shipping on Domestic Orders $75+

Dell Inspiron N4110 Fan Replacement

What you need

  1. Dell Inspiron N4110 Fan Replacement, Battery: step 1, image 1 of 1
    • Make sure the laptop is off and unplugged before starting this step.

    • Locate the battery on the underside of the laptop.

    • Push the two battery clips following the direction of the arrows.

    Ask FixBot

    Add Comment

  2. Dell Inspiron N4110 Fan Replacement: step 2, image 1 of 1
    • Push upward from the base of the battery.

    Ask FixBot

    Add Comment

  3. Dell Inspiron N4110 Fan Replacement: step 3, image 1 of 1
    • Pull battery away from computer until it is fully removed.

    Ask FixBot

    Add Comment

  4. Dell Inspiron N4110 Fan Replacement, Fan: step 4, image 1 of 2 Dell Inspiron N4110 Fan Replacement, Fan: step 4, image 2 of 2
    • Remove the 10 2.5x5 mm screws from the base of the laptop.

    Ask FixBot

    Add Comment

  5. Dell Inspiron N4110 Fan Replacement: step 5, image 1 of 1
    • Unscrew the final 2.5x5 mm screw attached to the cover.

    • This screw is "captive" and does not detach from the cover. Make sure the screw is fully unscrewed before attempting to remove the cover.

    Ask FixBot

    Add Comment

  6. Dell Inspiron N4110 Fan Replacement: step 6, image 1 of 2 Dell Inspiron N4110 Fan Replacement: step 6, image 2 of 2
    • Remove the cover from the laptop.

    Ask FixBot

    Add Comment

  7. Dell Inspiron N4110 Fan Replacement: step 7, image 1 of 2 Dell Inspiron N4110 Fan Replacement: step 7, image 2 of 2
    • Unscrew the 2.5x5 mm screw inside the RAM compartment.

    Ask FixBot

    Add Comment

  8. Dell Inspiron N4110 Fan Replacement: step 8, image 1 of 2 Dell Inspiron N4110 Fan Replacement: step 8, image 2 of 2
    • Remove the disk drive from the side of the computer.

    • There is no need to press the button, the drive will come out.

    Ask FixBot

    Add Comment

  9. Dell Inspiron N4110 Fan Replacement: step 9, image 1 of 2 Dell Inspiron N4110 Fan Replacement: step 9, image 2 of 2
    • Unscrew the two 2x3 mm screws inside the disk drive compartment.

    Ask FixBot

    Add Comment

  10. Dell Inspiron N4110 Fan Replacement: step 10, image 1 of 3 Dell Inspiron N4110 Fan Replacement: step 10, image 2 of 3 Dell Inspiron N4110 Fan Replacement: step 10, image 3 of 3
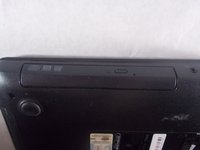
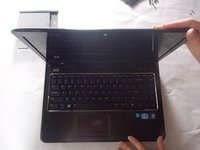
    • Flip the computer over, and open the laptop.

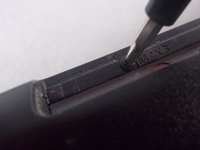
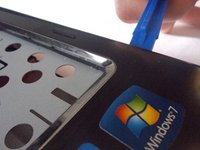
    • Use a plastic opening tool to begin to remove the keyboard.

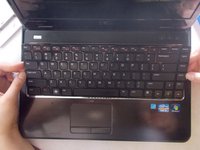
    • Use your hands to finish separating the keyboard from the laptop.

    • This can be a bit challenging, but it will come loose.

    Ask FixBot

    Add Comment

  11. Dell Inspiron N4110 Fan Replacement: step 11, image 1 of 1
    • Lift the black clip from the tan connection for the keyboard.

    • Pull the the connection away from the clip.

    • Move the keyboard away from the laptop.

    • With the keyboard removed, consider this opportunity to more freely clean it out with some compressed air.

    Ask FixBot

    Add Comment

  12. Dell Inspiron N4110 Fan Replacement: step 12, image 1 of 1
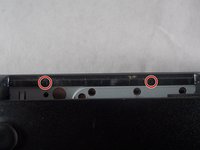
    • Lift the black clips from the tan connections for all 3 locations marked.

    • Remove the connections from the clips.

    Ask FixBot

    Add Comment

  13. Dell Inspiron N4110 Fan Replacement: step 13, image 1 of 1
    • Unscrew the five 2.5x5 mm screws.

    Ask FixBot

    Add Comment

  14. Dell Inspiron N4110 Fan Replacement: step 14, image 1 of 2 Dell Inspiron N4110 Fan Replacement: step 14, image 2 of 2
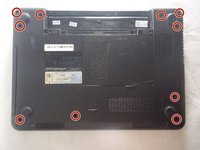
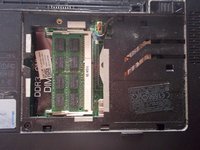
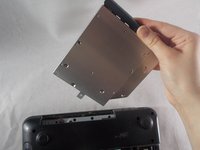
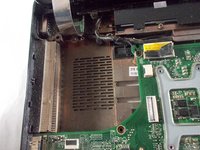
    • Use plastic opening tools to remove base cover.

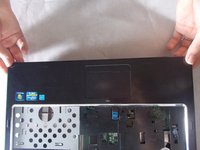
    • Use your hands to fully remove cover from the base.

    • This may be difficult, but it is possible.

    Ask FixBot

    Add Comment

  15. Dell Inspiron N4110 Fan Replacement: step 15, image 1 of 1
    • Disconnect the two cables that connect the speaker and the fan.

    • These can just be pulled out, they do not have clips.

    Ask FixBot

    Add Comment

  16. Dell Inspiron N4110 Fan Replacement: step 16, image 1 of 1
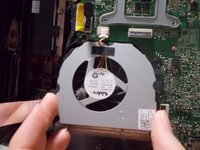
    • Disconnect the ribbon cable over the screw to reveal it. Flip up the latch and pull gently on the ribbon to remove it from the connector.

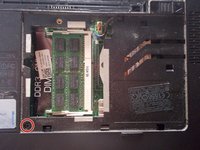
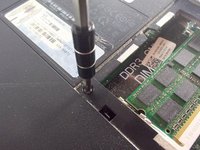
    • Unscrew the 2.5x5 mm screw from the fan.

    Ask FixBot

    Add Comment

  17. Dell Inspiron N4110 Fan Replacement: step 17, image 1 of 2 Dell Inspiron N4110 Fan Replacement: step 17, image 2 of 2
    • Pull up and remove the fan from the laptop.

    Ask FixBot

    Add Comment

Conclusion

To reassemble your device, follow these instructions in reverse order.

Cancel: I did not complete this guide.

5 other people completed this guide.

Olivia

Member since: 03/20/18

818 Reputation

3 Guides authored

Team

1 Guide Comment

Wow! What a great guide. Really made the job easier. Thanks!!!

swtilden - Reply Share

Add Comment

View Statistics:

Past 24 Hours: 3

Past 7 Days: 22

Past 30 Days: 48

All Time: 1,744