
Free Shipping on Domestic Orders $75+

Dell Inspiron E1705 Optical Drive Replacement

What you need

  1. Dell Inspiron E1705 Optical Drive Replacement, Battery: step 1, image 1 of 1
    • Make sure that the computer is turned off and is disconnected from external power source.

    • Turn it upside down and locate the battery release switch.

    Ask FixBot

    Add Comment

  2. Dell Inspiron E1705 Optical Drive Replacement: step 2, image 1 of 2 Dell Inspiron E1705 Optical Drive Replacement: step 2, image 2 of 2
    • While holding the switch in the open position, lift out the battery.

    • If you plan to work on any internal laptop components, press and hold the power button for 5 seconds. This will dissipate any residual charge on the motherboard to prevent electrical shock when you begin to handle it.

    Ask FixBot

    Add Comment

  3. Dell Inspiron E1705 Optical Drive Replacement, Optical Drive: step 3, image 1 of 1
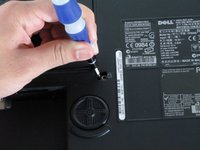
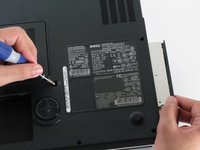
    • Locate and remove the screw shown

    • It is labeled with a lock symbol

    Ask FixBot

    Add Comment

  4. Dell Inspiron E1705 Optical Drive Replacement: step 4, image 1 of 2 Dell Inspiron E1705 Optical Drive Replacement: step 4, image 2 of 2
    • Use the screwdriver to gently push the optical drive out

    Ask FixBot

    Add Comment

Conclusion

To reassemble your device, follow these instructions in reverse order.

Cancel: I did not complete this guide.

3 other people completed this guide.

Evan Fairchild

Member since: 10/05/10

625 Reputation

4 Guides authored

Team

Cal Poly, Team 22-5, Maness Fall 2010 Member of Cal Poly, Team 22-5, Maness Fall 2010

CPSU-MANESS-F10S22G5

4 Members

11 Guides authored

0 Guide Comments

Add Comment

View Statistics:

Past 24 Hours: 2

Past 7 Days: 11

Past 30 Days: 38

All Time: 4,293