
Dell Inspiron E1505 Optical Drive Replacement

Anthony Toscano and 4 other contributors
Last updated on Jul 22, 2022
Views: 1.4K
View statistics:
- Past 24 Hours:
- 3
- Past 7 Days:
- 28
- Past 30 Days:
- 101
- All Time:
- 1,360
Comments: 2
2 guide comments.
Go to guide commentsCompleted: 0 1
No one has marked this guide "completed." Will you be the first?
1 person has marked this guide "completed." It's you — great job!
Favorites: 0 1
No one has favorited (and subscribed to) this guide. Will you be the first?
1 person has favorited (and subscribed to) this guide — and that's you!
Action Shots
Be an action hero! This guide needs images that better demonstrate how to perform specific actions.
What you need
Tools


-
-
-
Before any work can be done ensure that the laptop is powered off.
-
Use either the power button on the computer or issue a shutdown from the operating system.
-
Once the device is off place the laptop on a flat surface and flip it so that the bottom is facing upwards.
 Ask FixBot
-
-
-
Locate the battery release switch on the bottom of the laptop.
-
Once located slide the switch into the unlock position.
-
-
-
Locate the “lip” on the laptop to lift the battery outside of the compartment.
-
Once the battery is out, you will be able to find the replacement part number in order to purchase a new battery.
-
-
-
Once the new battery has been acquired take the battery and place it in the empty battery slot.
-
Slide the switch into the lock position to secure the new battery.
-
-
-
-
-
-
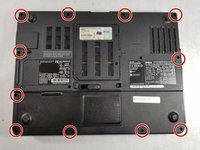
Remove the back panel: Use the screwdriver to remove the screws on the back panel.
-
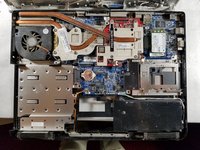
Lift the back panel off the laptop to expose the interior of the laptop.
-
Locate the hard drive.
-
-
-
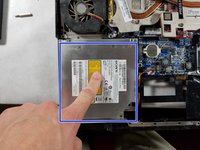
Remove the current optical drive.
-
Look at the model number and order the replacement if needed.
-
Insert the new optical drive in.
-
-



To reassemble your device, follow these instructions in reverse order.

Team

UMass Dartmouth, Team 6-7, Martin Fall 2016 Member of UMass Dartmouth, Team 6-7, Martin Fall 2016
UMASSD-MARTIN-F16S6G7
3 Members
48 Guides authored
2 Guide Comments
@oldturkey03 This guide is showing how to remove the ODD, not the HDD. I was wondering if I should change it. The guide is also incorrect. Only one screw is necessary to remove the ODD. I suppose I should make another and archive this...
@pccheese it's a student guide so leave it alone. Do not archive anything on this. Go ahead and create your guide and then post that as an alternative. I would give the composer of this guide the courtesy and kindly let them know.
