
Free Shipping on Domestic Orders $75+

Dell Inspiron 5570 Back Cover Replacement

What you need

  1. Dell Inspiron 5570 Back Cover Replacement, Unfasten the back cover: step 1, image 1 of 2 Dell Inspiron 5570 Back Cover Replacement, Unfasten the back cover: step 1, image 2 of 2
    • For your safety, discharge the battery below 25% and power down your device before disassembly.

    • Use your Phillips screwdriver to remove the seven screws securing the back cover:

    • Three 5 mm-long screws

    • Four 7.5 mm-long screws

    • Loosen the three captive screws.

  2. Dell Inspiron 5570 Back Cover Replacement, Unclip the front corners: step 2, image 1 of 2 Dell Inspiron 5570 Back Cover Replacement, Unclip the front corners: step 2, image 2 of 2
    • Flip the laptop upright and open the lid so that the keyboard is exposed.

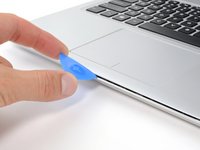
    • Insert an opening pick between the front right corner of the back cover and the chassis.

    • Pry upward to release the retaining clips holding the cover.

    • You'll hear clicks whenever a clip is released.

    • Repeat this procedure for the opposite corner.

  3. Dell Inspiron 5570 Back Cover Replacement, Unclip the front edge: step 3, image 1 of 2 Dell Inspiron 5570 Back Cover Replacement, Unclip the front edge: step 3, image 2 of 2
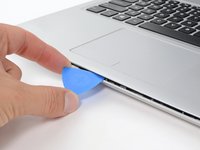
    • Insert an opening pick between the front edge of the back cover and the chassis, near the trackpad.

    • Pry upward to release the clips along the front edge of the laptop.

  4. Dell Inspiron 5570 Back Cover Replacement, Remove the back cover: step 4, image 1 of 3 Dell Inspiron 5570 Back Cover Replacement, Remove the back cover: step 4, image 2 of 3 Dell Inspiron 5570 Back Cover Replacement, Remove the back cover: step 4, image 3 of 3
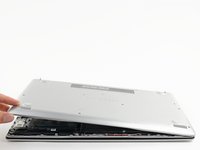
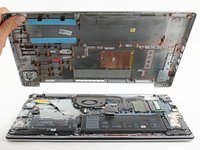
    • Close the screen to the laptop and flip it over.

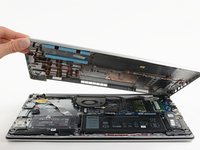
    • Pull the left side of the back cover away from the frame and remove it.

    • If your back cover is stuck to the chassis, use an opening pick to release the clips around the back cover's perimeter.

Conclusion

To reassemble your device, follow these instructions in reverse order.

Take your e-waste to an R2 or e-Stewards certified recycler.

Repair didn’t go as planned? Try some basic troubleshooting, or ask our Dell Inspiron answers community for help.

3 other people completed this guide.

Clay Eickemeyer

Member since: 09/19/22

102,414 Reputation

472 Guides authored

2 Guide Comments

Wie kann ich die unverlierbaren Schrauben aus der alten Bodenplatte entfernen und in die neue einbauen?

Andreas Sonka - Reply Share

Personally I would start loosening the bottom cover while the laptop is upside-down, as the laptop is quite heavy for its size and can make unclipping the clips slightly more difficult.

Tai Lam - Reply Share

Add Comment

View Statistics:

Past 24 Hours: 6

Past 7 Days: 30

Past 30 Days: 100

All Time: 4,021