Free Shipping on Domestic Orders $75+

Dell Inspiron 20 3043 CMOS Battery Replacement

What you need

    1. Dell Inspiron 20 3043 CMOS Battery Replacement, Unscrew the back cover: step 1, image 1 of 1
      • Lay the PC with the back cover facing up on a soft surface.

      • Remove the four Phillips #0 screws on each corner.

      • Do not remove any rubber feet or bumpers. There are no screws located under any of them, and doing so can damage the adhesive holding them on.

      Ask FixBot

      Add Comment

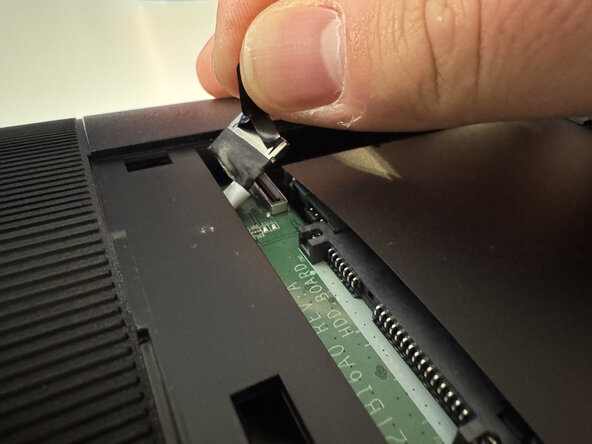
    2. Dell Inspiron 20 3043 CMOS Battery Replacement, Remove the hard drive cover and connector: step 2, image 1 of 2 Dell Inspiron 20 3043 CMOS Battery Replacement, Remove the hard drive cover and connector: step 2, image 2 of 2
      • Remove the hard drive cover using a spudger or your fingernail.

      • Remove the hard drive connector by pulling straight up on the plastic tab.

      • When reassembling, ensure the connector is fully lined up to its port and press straight down on the connector. Uneven pressure or not inserting the connector straight can damage the connector and/or port.

      Ask FixBot

      Add Comment

    3. Dell Inspiron 20 3043 CMOS Battery Replacement, Remove the hard drive: step 3, image 1 of 2 Dell Inspiron 20 3043 CMOS Battery Replacement, Remove the hard drive: step 3, image 2 of 2
      • Remove the four Phillips #0 screws securing the hard drive to the body.

      • Lift and remove the hard drive from the PC.

      Ask FixBot

      Add Comment

    4. Dell Inspiron 20 3043 CMOS Battery Replacement, Detach the back cover: step 4, image 1 of 2 Dell Inspiron 20 3043 CMOS Battery Replacement, Detach the back cover: step 4, image 2 of 2
      • Insert a spudger under the gap below the kickstand. Pry up to release the back cover from its clips.

      • If this is the first time the back cover is being removed, the clips can be pretty tight, and loosened clips can reattach when pressure is removed. Use an opening pick to keep the cover separate from the body while you loosen the other sides.

      • Do not lift the back cover completely off when fully detached. There are cables connected to the back cover.

      Ask FixBot

      Add Comment

    5. Dell Inspiron 20 3043 CMOS Battery Replacement, Remove hard drive connector cable: step 5, image 1 of 2 Dell Inspiron 20 3043 CMOS Battery Replacement, Remove hard drive connector cable: step 5, image 2 of 2
      • Lift the back cover away from you and hold the cover perpendicular, like a book. Fish the hard drive connector cable through the opening in the hard drive compartment.

      • Officially, the control buttons board should be removed to fully separate the back cover from the body. However, the back cover can be laid down next to the top of the body with enough slack in the cable to repair without removing the board.

      Ask FixBot

      Add Comment

    6. Dell Inspiron 20 3043 CMOS Battery Replacement, Remove the WLAN card: step 6, image 1 of 3 Dell Inspiron 20 3043 CMOS Battery Replacement, Remove the WLAN card: step 6, image 2 of 3 Dell Inspiron 20 3043 CMOS Battery Replacement, Remove the WLAN card: step 6, image 3 of 3
      • Disconnect the white and black antenna cables connected to the WLAN card.

      • Remove these cables extremely carefully, as the connectors holding them are very small and delicate. Removal can cause the connectors to completely desolder from the WLAN card.

      • Unscrew the one Phillips #0 screw securing the WLAN card to the body.

      • Remove the WLAN card by pulling straight back from the connector.

      Ask FixBot

      Add Comment

    7. Dell Inspiron 20 3043 CMOS Battery Replacement, Remove the hard drive cable: step 7, image 1 of 2 Dell Inspiron 20 3043 CMOS Battery Replacement, Remove the hard drive cable: step 7, image 2 of 2
      • Remove the hard drive cable by pulling straight up on the plastic tab.

      • When reassembling, ensure the connector is fully lined up to its port and press straight down on the connector. Uneven pressure or not inserting the connector straight can damage the connector and/or port.

      Ask FixBot

      Add Comment

    8. Dell Inspiron 20 3043 CMOS Battery Replacement, Remove the display backlight cable: step 8, image 1 of 2 Dell Inspiron 20 3043 CMOS Battery Replacement, Remove the display backlight cable: step 8, image 2 of 2
      • Using tweezers or your fingernails, remove the display backlight cable by pulling straight back on the plastic connector.

      Ask FixBot

      Add Comment

    9. Dell Inspiron 20 3043 CMOS Battery Replacement, Remove the display cable: step 9, image 1 of 2 Dell Inspiron 20 3043 CMOS Battery Replacement, Remove the display cable: step 9, image 2 of 2
      • Remove the display cable by pulling straight up on the plastic tab.

      • When reassembling, ensure the connector is fully lined up to its port and press straight down on the connector. Uneven pressure or not inserting the connector straight can damage the connector and/or port.

      Ask FixBot

      Add Comment

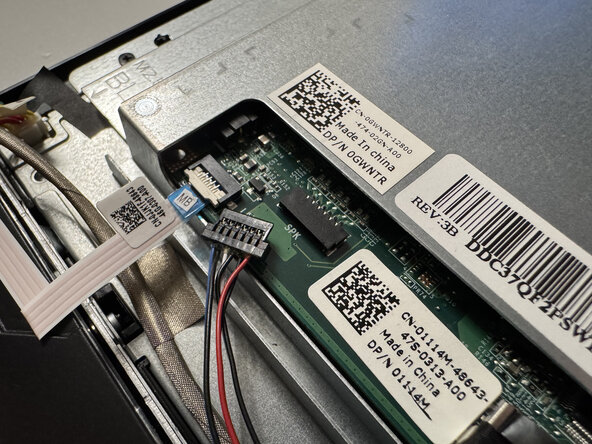
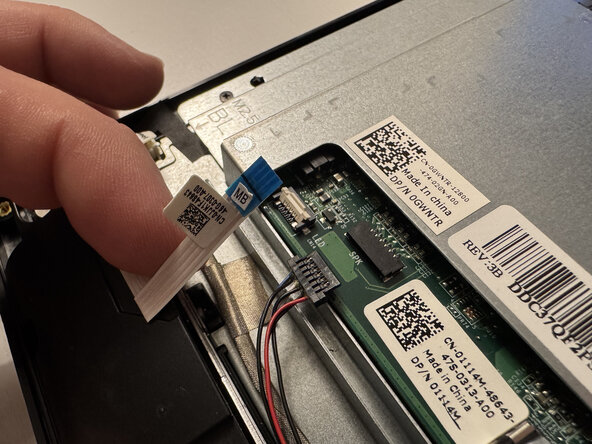
    10. Dell Inspiron 20 3043 CMOS Battery Replacement, Remove the speaker cable and power status light cable: step 10, image 1 of 3 Dell Inspiron 20 3043 CMOS Battery Replacement, Remove the speaker cable and power status light cable: step 10, image 2 of 3 Dell Inspiron 20 3043 CMOS Battery Replacement, Remove the speaker cable and power status light cable: step 10, image 3 of 3
      • Using tweezers or your fingernails, remove the speaker cable by pulling straight back on the plastic connector.

      • Using a spudger or your fingernail, lift the connector latch on the power status light cable. Remove by pulling straight back on the ribbon cable.

      Ask FixBot

      Add Comment

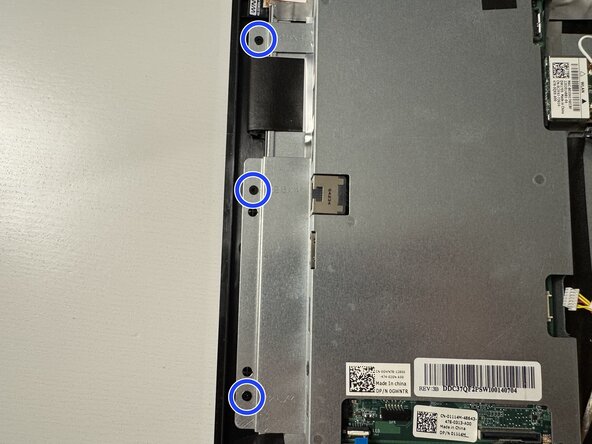
    11. Dell Inspiron 20 3043 CMOS Battery Replacement, Detach and flip the system board: step 11, image 1 of 2 Dell Inspiron 20 3043 CMOS Battery Replacement, Detach and flip the system board: step 11, image 2 of 2
      • Remove the three Phillips #0 screws holding the bracket to the body.

      • Flip the system board clockwise to reveal the underside of the board.

      • There may be tape holding the bracket to the body. This tape can be removed and replaced or stuck back on after repair.

      Ask FixBot

      Add Comment

    12. Dell Inspiron 20 3043 CMOS Battery Replacement, Remove the CMOS battery connector: step 12, image 1 of 2 Dell Inspiron 20 3043 CMOS Battery Replacement, Remove the CMOS battery connector: step 12, image 2 of 2
      • Using tweezers or your fingernails, pull the CMOS battery connector straight back from its connector.

      Ask FixBot

      Add Comment

    13. Dell Inspiron 20 3043 CMOS Battery Replacement, Remove the CMOS battery: step 13, image 1 of 1
      • Using a spudger, carefully separate the double-sided tape holding the CMOS battery to the system board.

      • The double-sided tape is foam and will most likely be damaged when pried off. When replacing, carefully scrape and clean the old tape off of the system board and replace with new double-sided tape.

      Ask FixBot

      Add Comment

    14. Dell Inspiron 20 3043 CMOS Battery Replacement, Finish: step 14, image 1 of 1
      • Replace the dead battery with a suitable replacement that has the correct connector.

      • The connector attached to the battery are two metal prongs adhered to both sides of a CR2032 button cell battery. This is all hidden under the black plastic wrap around the battery. Unofficially, these prongs could be transferred to any standard CR2032 battery and secured with electrical tape or another type of adhesive.

      Ask FixBot

      Add Comment

Conclusion

To reassemble your device, follow these instructions in reverse order.

Cancel: I did not complete this guide.

PumaGator

Member since: 06/21/22

364 Reputation

2 Guides authored

0 Guide Comments

Add Comment

View Statistics:

Past 24 Hours: 0

Past 7 Days: 10

Past 30 Days: 26

All Time: 87