
Dell Inspiron 1525 Central Control Cover Replacement

Miroslav Djuric and 2 other contributors
Last updated on Nov 13, 2015
Views: 4.2K
View statistics:
- Past 24 Hours:
- 2
- Past 7 Days:
- 22
- Past 30 Days:
- 98
- All Time:
- 4,241
Comments: 0
No one has left comments on this guide. Will you be first?
Go to guide commentsCompleted: 4 5
4 people have marked this guide "completed." Will you be next?
5 people have marked this guide "completed." Including you — great job!
Favorites: 9 10
9 people have favorited (and subscribed to) this guide. Will you be next?
10 people have favorited (and subscribed to) this guide — including you!
Introduction
Go to step 1 ↓Use this guide to help you replace the Central Control Cover on a Dell Inspiron 1525.
What you need
Tools

-
-
-
Slide the battery release switch away from the lock symbol until you hear the battery click.
-
Slide the battery towards the back of the laptop until it comes free.
-
-
-
-
Remove the two 4.00 mm Phillips #1 screws from the battery tray.
-
-
-
Insert the flat end of a spudger into the slot on the right side of the central control cover and pry it up.
-
Carefully pull the central control cover up along its edges.
-
-
-
-
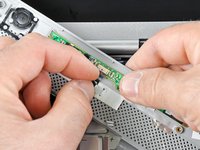
Peel back the silver tape securing the ribbon cable to the cover.
-
Pull the small brown latch on the ribbon cable connector out.
-
Disconnect the ribbon cable to completely free the central control cover.
-
-

 Ask FixBot









To reassemble your device, follow these instructions in reverse order.
Cancel: I did not complete this guide.
4 other people completed this guide.

