
Free Shipping on Domestic Orders $75+

Dell Inspiron 1521 Keyboard Replacement

What you need

  1. Dell Inspiron 1521 Keyboard Replacement, Battery: step 1, image 1 of 1
    • Rotate the laptop so its bottom is facing up.

    Ask FixBot

    Add Comment

  2. Dell Inspiron 1521 Keyboard Replacement: step 2, image 1 of 3 Dell Inspiron 1521 Keyboard Replacement: step 2, image 2 of 3 Dell Inspiron 1521 Keyboard Replacement: step 2, image 3 of 3
    • Identify the lock mechanisms holding the battery in place.

    • Slide each button outward with your fingers to disengage the battery.

    • Pull the battery off with your hand to separate it from the laptop.

    Ask FixBot

    Add Comment

  3. Dell Inspiron 1521 Keyboard Replacement, Keyboard: step 3, image 1 of 3 Dell Inspiron 1521 Keyboard Replacement, Keyboard: step 3, image 2 of 3 Dell Inspiron 1521 Keyboard Replacement, Keyboard: step 3, image 3 of 3
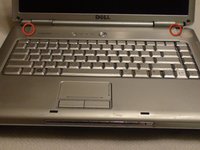
    • Find the two small indentations of the sides of the panel covering the power button.

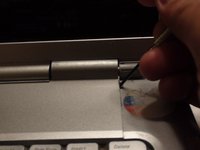
    • Pry up both sides of the panel by sticking the plastic opener tool in each indentation and prying up.

    Ask FixBot

    Add Comment

  4. Dell Inspiron 1521 Keyboard Replacement: step 4, image 1 of 1
    • Now that the panel is loose simply pull the panel off with your hand.

    Ask FixBot

    Add Comment

  5. Dell Inspiron 1521 Keyboard Replacement: step 5, image 1 of 3 Dell Inspiron 1521 Keyboard Replacement: step 5, image 2 of 3 Dell Inspiron 1521 Keyboard Replacement: step 5, image 3 of 3
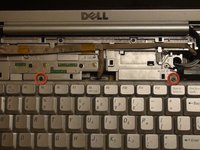
    • Locate the two 5 mm Phillips #1 screws holding down the keyboard that were underneath the panel.

    • Remove these screws with a Phillips #1 screwdriver.

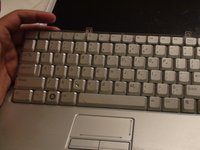
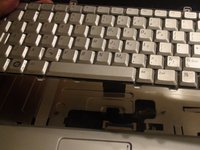
    • With the screws removed pull the keyboard up with your hand.

    Ask FixBot

    Add Comment

  6. Dell Inspiron 1521 Keyboard Replacement: step 6, image 1 of 3 Dell Inspiron 1521 Keyboard Replacement: step 6, image 2 of 3 Dell Inspiron 1521 Keyboard Replacement: step 6, image 3 of 3
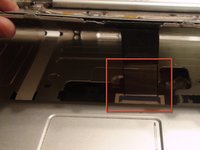
    • Locate the connector that links the keyboard to the laptop.

    • Gently pull the connector toward the screen of the laptop with your figers to disconnect it.

    Ask FixBot

    Add Comment

Conclusion

To reassemble your device, follow these instructions in reverse order.

Cancel: I did not complete this guide.

One other person completed this guide.

Nikolaus Powell

Member since: 09/20/12

426 Reputation

3 Guides authored

Team

Cal Poly, Team 15-47, Forte Fall 2012 Member of Cal Poly, Team 15-47, Forte Fall 2012

CPSU-FORTE-F12S15G47

5 Members

9 Guides authored

0 Guide Comments

Add Comment

View Statistics:

Past 24 Hours: 2

Past 7 Days: 6

Past 30 Days: 42

All Time: 2,360