Introduction
This guide will be helpful for those who want to replace their hard drive.
What you need
-
-
Look on the bottom of the computer. Locate the 2 screws. (Picture 1)
-
Using the Phillips 00 Screwdriver, unscrew both screws, and remove the bottom cover. The bottom cover can be hard to pull off, so you may need to pry it off with a pry tool.
 Ask FixBot
-
-
-
-
Remove the 4 - M2.5 x 5mm screws.
-
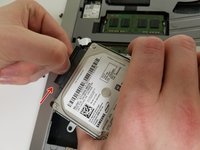
Using the tab, lift the Hard Drive out of the laptop. (picture 3)
-
-
-
After lifting the Hard Drive, unplug the Hard Drive connector.
-
Now the hard drive is ready to be replaced.
-


To reassemble your device, follow these instructions in reverse order.
Cancel: I did not complete this guide.
6 other people completed this guide.
Team

University of North Texas, Team S7-G4, Thomas Fall 2017 Member of University of North Texas, Team S7-G4, Thomas Fall 2017
UNT-THOMAS-F17S7G4
4 Members
9 Guides authored