Free Shipping on Domestic Orders $75+

Dell Inspiron 15-3531 Fan Replacement

What you need

    1. Dell Inspiron 15-3531 Fan Replacement, Battery: step 1, image 1 of 3 Dell Inspiron 15-3531 Fan Replacement, Battery: step 1, image 2 of 3 Dell Inspiron 15-3531 Fan Replacement, Battery: step 1, image 3 of 3
      • Remove the battery to avoid electrical discharge while working with this system.

      • Flip the laptop over.

      • Slide the latches toward the edges to unlock the battery.

      • Lift the battery out of the laptop.

      Ask FixBot

      Add Comment

    1. Dell Inspiron 15-3531 Fan Replacement, Motherboard: step 2, image 1 of 3 Dell Inspiron 15-3531 Fan Replacement, Motherboard: step 2, image 2 of 3 Dell Inspiron 15-3531 Fan Replacement, Motherboard: step 2, image 3 of 3
      • Loosen the two screws on the access panel using the PH1 head screwdriver.

      • Pry the access panel open with the spudger.

      Ask FixBot

      Add Comment

    2. Dell Inspiron 15-3531 Fan Replacement: step 3, image 1 of 3 Dell Inspiron 15-3531 Fan Replacement: step 3, image 2 of 3 Dell Inspiron 15-3531 Fan Replacement: step 3, image 3 of 3
      • Remove the memory card by pulling apart the latches holding it in place.

      Ask FixBot

      Add Comment

    3. Dell Inspiron 15-3531 Fan Replacement: step 4, image 1 of 1
      • Remove the nine 8.65mm screws holding the backplate to the laptop using the PH0 head screwdriver.

      • Remove the four 1.22 mm screws holding the backplate to the laptop using the PH0 head screwdriver.

      Ask FixBot

      Add Comment

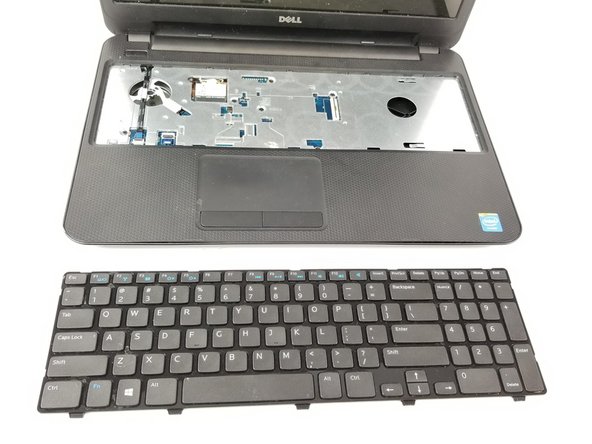
    4. Dell Inspiron 15-3531 Fan Replacement: step 5, image 1 of 3 Dell Inspiron 15-3531 Fan Replacement: step 5, image 2 of 3 Dell Inspiron 15-3531 Fan Replacement: step 5, image 3 of 3
      • Depress (push in, not down) the five tabs at the top of the keyboard and the two on each side of the keyboard using a flat head screwdriver.

      • Pry the keyboard from the laptop using the spudger.

      • Be careful when lifting out the keyboard because there is a cable connecting it to the laptop.

      Ask FixBot

      Add Comment

    5. Dell Inspiron 15-3531 Fan Replacement: step 6, image 1 of 3 Dell Inspiron 15-3531 Fan Replacement: step 6, image 2 of 3 Dell Inspiron 15-3531 Fan Replacement: step 6, image 3 of 3
      • Lift the latch holding down the cable using a flat head screwdriver.

      • Slide the cable out.

      • This will free the keyboard from the laptop.

      Ask FixBot

      Add Comment

    6. Dell Inspiron 15-3531 Fan Replacement: step 7, image 1 of 3 Dell Inspiron 15-3531 Fan Replacement: step 7, image 2 of 3 Dell Inspiron 15-3531 Fan Replacement: step 7, image 3 of 3
      • Disengage both antenna (black and white) cables by lifting them up using the spudger.

      • Unscrew the one 8.65 mm screw holding the wireless card.

      • Remove the wireless card.

      Ask FixBot

      Add Comment

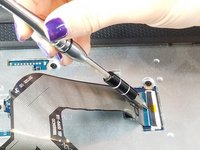
    7. Dell Inspiron 15-3531 Fan Replacement: step 8, image 1 of 2 Dell Inspiron 15-3531 Fan Replacement: step 8, image 2 of 2
      • Lift the locking tab with the spudger and pull the cable form the locking tab.

      • Repeat with the second locking tab.

      Ask FixBot

      Add Comment

    8. Dell Inspiron 15-3531 Fan Replacement: step 9, image 1 of 1
      • Remove the four 8.65 mm screws underneath the keyboard plate.

      • Remove the three 1.22 mm small screws underneath the keyboard plate.

      Ask FixBot

      Add Comment

    9. Dell Inspiron 15-3531 Fan Replacement: step 10, image 1 of 3 Dell Inspiron 15-3531 Fan Replacement: step 10, image 2 of 3 Dell Inspiron 15-3531 Fan Replacement: step 10, image 3 of 3
      • Separate the palmrest from the base of the laptop using the spudger to loosen the palmrest along the edges.

      • Make sure to remove all the screws, especially the inconspicuous 8.65 mm screw next to the hard drive.

      Ask FixBot

      Add Comment

    10. Dell Inspiron 15-3531 Fan Replacement: step 11, image 1 of 3 Dell Inspiron 15-3531 Fan Replacement: step 11, image 2 of 3 Dell Inspiron 15-3531 Fan Replacement: step 11, image 3 of 3
      Tool used on this step:
      Tweezers
      $4.99
      Buy
      • Remove the cables on the upper left side of the laptop using flat tweezers.

      • Remove the cable from the upper right hand corner.

      Ask FixBot

      Add Comment

    11. Dell Inspiron 15-3531 Fan Replacement: step 12, image 1 of 2 Dell Inspiron 15-3531 Fan Replacement: step 12, image 2 of 2
      • Remove the speaker cable.

      • Remove cable on the right-hand side.

      Ask FixBot

      Add Comment

    12. Dell Inspiron 15-3531 Fan Replacement: step 13, image 1 of 1
      • Unscrew the one 8.65 mm screw holding the motherboard in place with a PH0 size head screwdriver.

      • Remove the motherboard.

      Ask FixBot

      Add Comment

    1. Dell Inspiron 15-3531 Fan Replacement, Fan: step 14, image 1 of 2 Dell Inspiron 15-3531 Fan Replacement, Fan: step 14, image 2 of 2
      • Turn over the motherboard.

      • Disconnect the fan power cable.

      • Remove the 8.65 mm screw holding the fan casing to the laptop frame using a PH0 head screwdriver.

      Ask FixBot

      Add Comment

Conclusion

To reassemble your device, follow these instructions in reverse order.

Cancel: I did not complete this guide.

One other person completed this guide.

Kody Dahlke

Member since: 02/15/18

742 Reputation

5 Guides authored

Team

USF Tampa, Team S1-G5, Leahy Spring 2018 Member of USF Tampa, Team S1-G5, Leahy Spring 2018

USFT-LEAHY-S18S1G5

5 Members

60 Guides authored

0 Guide Comments

Add Comment

View Statistics:

Past 24 Hours: 1

Past 7 Days: 6

Past 30 Days: 28

All Time: 1,172