
Dell Inspiron 15 7579 Fan Replacement

Richard Parker and 4 other contributors
Last updated on Mar 3, 2022
Views: 576
View statistics:
- Past 24 Hours:
- 3
- Past 7 Days:
- 17
- Past 30 Days:
- 61
- All Time:
- 576
Comments: 0
No one has left comments on this guide. Will you be first?
Go to guide commentsCompleted: 0 1
No one has marked this guide "completed." Will you be the first?
1 person has marked this guide "completed." It's you — great job!
Favorites: 0 1
No one has favorited (and subscribed to) this guide. Will you be the first?
1 person has favorited (and subscribed to) this guide — and that's you!
Introduction
Go to step 1 ↓This guide will give detailed instructions and photos to replace the fan inside a Dell Inspiron 15 7579. This replacement will resolve overheating issues caused directly by the fan. Hazards include exposure of the motherboard and operating with small electrical wires that cannot sustain large amounts of force.
What you need
Tools


-
-
-
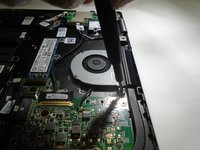
Insert metal spudger into a gap in between the back panel and the back of the screen.
-
Pry off the back panel using the metal spudger as a lever, and remove the back panel by lifting the rest off by hand.
-
-
-
-
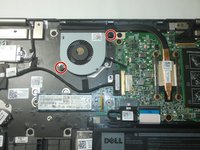
Remove the two 7.9 mm screws from the fan with a Phillips #0 screwdriver.
-
-
-

 Ask FixBot





To reassemble your device, follow these instructions in reverse order.

Team

The Citadel Military College of South Carolina, Team 2-11, Eggleston Fall 2021 Member of The Citadel Military College of South Carolina, Team 2-11, Eggleston Fall 2021
CMCSC-EGGLESTON-F21S2G11
3 Members
36 Guides authored
