Introduction
This guide will provide information needed to replace your Dell Inspiron 13-7359 hard drive. You will need a phillips #0 screwdriver and a small plastic spudger.
What you need
-
-
-
Flip your device over so the back cover is facing you.
-
Using a Phillips #0 Screwdriver, remove the ten 7mm screws holding the back cover in place.
 Ask FixBot
-
-
-
Insert a plastic opening and run it along the edge of the back cover. Do this until the entire back cover can be removed.
-
-
-
-
-
-
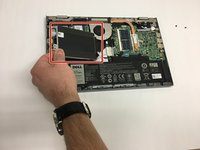
Unscrew and remove the 2 of the 3mm Phillips head screws holding the hard drive in place.
-
-
-
Lift and hold the hard drive in your left hand.
-
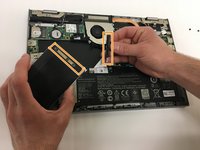
Use your right hand to grab hold of the black wire connector attached on the right of the hard drive.
-
Carefully pull the connector away from the hard drive to completely disconnect from the laptop.
-
-


To reassemble your device, follow these instructions in reverse order.
Cancel: I did not complete this guide.
6 other people completed this guide.

Team

Baylor, Team S1-G6, Johnson Spring 2018 Member of Baylor, Team S1-G6, Johnson Spring 2018
BU-JOHNSON-S18S1G6
3 Members
60 Guides authored
