
Dell AC511 Front Panel Replacement

William Cook and 2 other contributors
Last updated on Jun 24, 2024
Views: 1.6K
View statistics:
- Past 24 Hours:
- 6
- Past 7 Days:
- 29
- Past 30 Days:
- 103
- All Time:
- 1,646
Comments: 0
No one has left comments on this guide. Will you be first?
Go to guide commentsCompleted: 1 2
1 person has marked this guide "completed." Will you be next?
2 people have marked this guide "completed." Including you — great job!
Favorites: 0 1
No one has favorited (and subscribed to) this guide. Will you be the first?
1 person has favorited (and subscribed to) this guide — and that's you!
Better Introduction
Improve this guide by completing or revising its introduction.
Introduction
Go to step 1 ↓Taking off the front panel is a requirement for replacing any part inside or around the speaker, and if improperly done may lead to damage to the speaker or self.
What you need
Tools


-
-
-
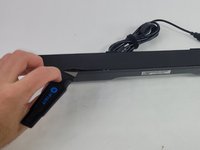
Use a Jimmy to peel off the screen stuck to the front of the speaker.
-
Start from any corner and use the Jimmy to get under the screen. Once one side lifts up, you can use your fingers to peel the rest off.
 Ask FixBot
-
-
-
-
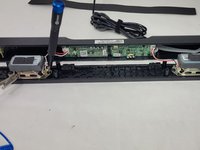
Lift the front panel off of the rest of the device.
-
Remove the 4 mm screws from the speakers using a JIS #1 screwdriver.
-
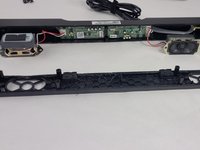
Remove the front panel from the device.
-
-




To reassemble your device, follow these instructions in reverse order.
Cancel: I did not complete this guide.
One other person completed this guide.

Team

UMass Dartmouth, Team 4-6, Shaddix Spring 2024 Member of UMass Dartmouth, Team 4-6, Shaddix Spring 2024
UMASSD-SHADDIX-S24S4G6
4 Members
72 Guides authored
