Free Shipping on Domestic Orders $75+

Dell 1350cnw Printing LED Board Replacement

What you need

  1. Dell 1350cnw Printing LED Board Replacement, Unclip front top band: step 1, image 1 of 2 Dell 1350cnw Printing LED Board Replacement, Unclip front top band: step 1, image 2 of 2
    • Insert prying tool behind each end of the plastic strip. Pry outwards to unclip and pull the ends forwards away from the printer.

    • Note - Unclipping the right-hand end requires opening the toner cover for access.

    Ask FixBot

    Add Comment

  2. Dell 1350cnw Printing LED Board Replacement, Unclip front top band: step 2, image 1 of 2 Dell 1350cnw Printing LED Board Replacement, Unclip front top band: step 2, image 2 of 2
    • Insert prying tool between the front band and top cover of the printer, and pry forwards to release the clips holding the top edge in place.

    Ask FixBot

    Add Comment

  3. Dell 1350cnw Printing LED Board Replacement, Remove front top band: step 3, image 1 of 1
    • Tilt the top of the front band away from the printer and lift away to remove.

    Ask FixBot

    Add Comment

  4. Dell 1350cnw Printing LED Board Replacement, Remove left-side top band: step 4, image 1 of 3 Dell 1350cnw Printing LED Board Replacement, Remove left-side top band: step 4, image 2 of 3 Dell 1350cnw Printing LED Board Replacement, Remove left-side top band: step 4, image 3 of 3
    • Unclip the back end of the plastic trim by prying away from the printer back panel.

    • Pull the trim piece towards the back of the printer.

    • Tilt the top edge away from the printer and lift away to remove.

    Ask FixBot

    Add Comment

  5. Dell 1350cnw Printing LED Board Replacement, Remove control panel module: step 5, image 1 of 3 Dell 1350cnw Printing LED Board Replacement, Remove control panel module: step 5, image 2 of 3 Dell 1350cnw Printing LED Board Replacement, Remove control panel module: step 5, image 3 of 3
    • Pry up front edge of the control panel module to unclip.

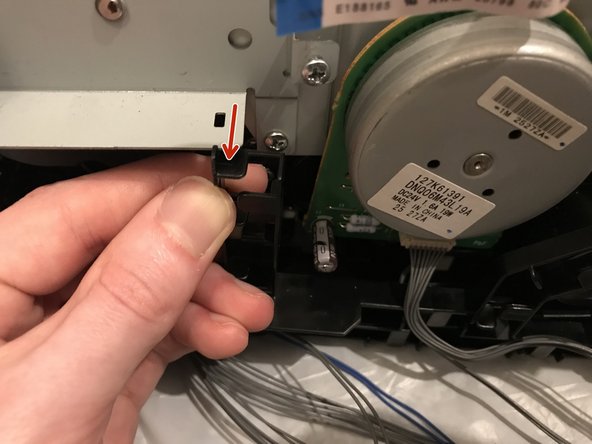
    • Lift up front edge and pull module forwards slightly to unhook rear edge.

    • Pull out cable connector to unplug the display/ control panel module.

    Ask FixBot

    Add Comment

  6. Dell 1350cnw Printing LED Board Replacement, Remove front cover: step 6, image 1 of 1
    • Remove the front lower flap by carefully bending in the middle and pulling out the locating pins one end at a time.

    Ask FixBot

    Add Comment

  7. Dell 1350cnw Printing LED Board Replacement, Remove front cover: step 7, image 1 of 1
    • Remove both 7mm phillips screws securing the front cover in place.

    Ask FixBot

    Add Comment

  8. Dell 1350cnw Printing LED Board Replacement, Remove front cover: step 8, image 1 of 3 Dell 1350cnw Printing LED Board Replacement, Remove front cover: step 8, image 2 of 3 Dell 1350cnw Printing LED Board Replacement, Remove front cover: step 8, image 3 of 3
    • Unclip the three clips along each end of the front cover by prying outwards and forwards with a prying tool as shown.

    Ask FixBot

    Add Comment

  9. Dell 1350cnw Printing LED Board Replacement, Remove front cover: step 9, image 1 of 1
    • Slide out the bottom edge away from the printer and pull the front cover down away from the top edge to remove.

    Ask FixBot

    Add Comment

  10. Dell 1350cnw Printing LED Board Replacement, Remove top cover: step 10, image 1 of 2 Dell 1350cnw Printing LED Board Replacement, Remove top cover: step 10, image 2 of 2
    • Undo both the 5mm M3 phillips screws holding the top cover brackets to the chassis.

    Ask FixBot

    Add Comment

  11. Dell 1350cnw Printing LED Board Replacement, Remove top cover: step 11, image 1 of 2 Dell 1350cnw Printing LED Board Replacement, Remove top cover: step 11, image 2 of 2
    • Pull the top cover brackets forwards off the metal frame and lift up to loosen the front edge of the top cover.

    Ask FixBot

    Add Comment

  12. Dell 1350cnw Printing LED Board Replacement, Remove top cover: step 12, image 1 of 1
    • Pry the top cover clip off the locating peg at the back of the printer, and lift up the top cover corner.

    Ask FixBot

    Add Comment

  13. Dell 1350cnw Printing LED Board Replacement, Remove top cover: step 13, image 1 of 1
    • Pry apart the back edge of the top cover and the back cover of the printer to unclip the top cover.

    Ask FixBot

    Add Comment

  14. Dell 1350cnw Printing LED Board Replacement, Remove top cover: step 14, image 1 of 1
    • Lift up the top cover from the control panel corner, pulling towards the back right-hand corner.

    • Note - The top cover should unclip from the back corner with the corner/side piece still attached.

    Ask FixBot

    Add Comment

  15. Dell 1350cnw Printing LED Board Replacement, Remove side cover: step 15, image 1 of 3 Dell 1350cnw Printing LED Board Replacement, Remove side cover: step 15, image 2 of 3 Dell 1350cnw Printing LED Board Replacement, Remove side cover: step 15, image 3 of 3
    • Unclip the back edge of the side cover by prying away from the printer back panel.

    • Pull the top of the side panel away from the printer.

    • Lift up the printer from underneath to release the bottom clips, and the side panel drops away from the printer.

    Ask FixBot

    Add Comment

  16. Dell 1350cnw Printing LED Board Replacement, Unplug WiFi module: step 16, image 1 of 1
    • Pull out the WiFi module plug from the USB/Ethernet board to disconnect.

    Ask FixBot

    Add Comment

  17. Dell 1350cnw Printing LED Board Replacement, Remove WiFi module: step 17, image 1 of 2 Dell 1350cnw Printing LED Board Replacement, Remove WiFi module: step 17, image 2 of 2
    • Unscrew the 7mm phillips screw holding the WiFi module to the printer and remove the WiFi module.

    Ask FixBot

    Add Comment

  18. Dell 1350cnw Printing LED Board Replacement, Unplug cables: step 18, image 1 of 3 Dell 1350cnw Printing LED Board Replacement, Unplug cables: step 18, image 2 of 3 Dell 1350cnw Printing LED Board Replacement, Unplug cables: step 18, image 3 of 3
    • Lift up the locking tab to unclip and release the flat flex data cable.

    • Gently pull the flat flex cable out from from the connector.

    Ask FixBot

    Add Comment

  19. Dell 1350cnw Printing LED Board Replacement, Unplug cables: step 19, image 1 of 1
    • Pull the smaller flat flex cable out from its connector to remove, and repeat for the remaining two connectors.

    Ask FixBot

    Add Comment

  20. Dell 1350cnw Printing LED Board Replacement, Remove USB/Ethernet board: step 20, image 1 of 3 Dell 1350cnw Printing LED Board Replacement, Remove USB/Ethernet board: step 20, image 2 of 3 Dell 1350cnw Printing LED Board Replacement, Remove USB/Ethernet board: step 20, image 3 of 3
    • Unscrew the 4mm M3 phillips screw holding the USB connector to the rear cover plate.

    • Unscrew the four 5mm M3 phillips screws holding the USB/Ethernet board to the bracket and remove the board from the printer.

    Ask FixBot

    Add Comment

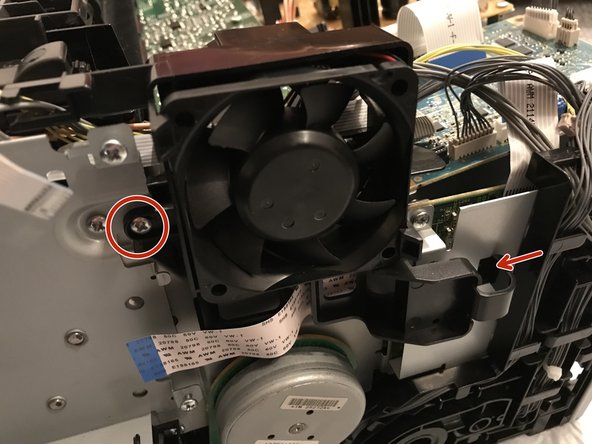
  21. Dell 1350cnw Printing LED Board Replacement, Unscrew fan bracket: step 21, image 1 of 1
    • Unscrew the 5mm M3 phillips screw from the fan bracket.

    • Unhook the retaining clip on the lower right-hand side of the fan bracket to loosen from the printer.

    Ask FixBot

    Add Comment

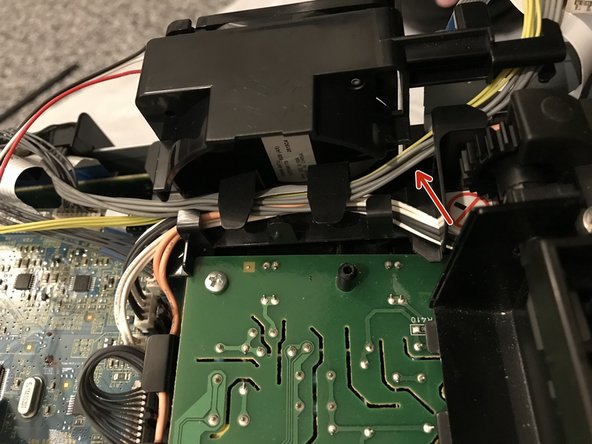
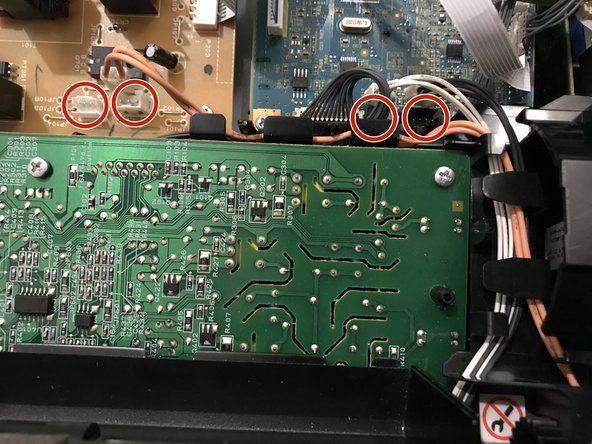
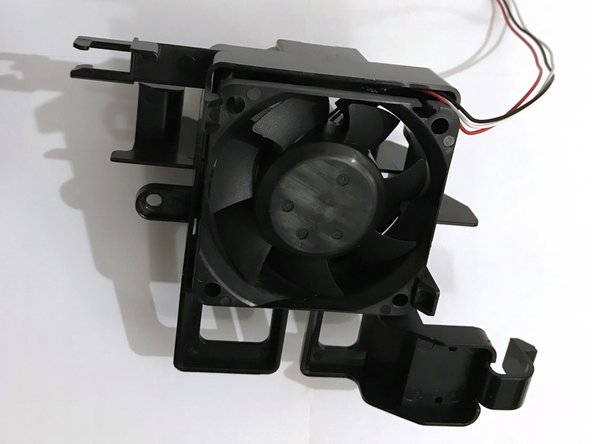
  22. Dell 1350cnw Printing LED Board Replacement, Remove fan bracket: step 22, image 1 of 3 Dell 1350cnw Printing LED Board Replacement, Remove fan bracket: step 22, image 2 of 3 Dell 1350cnw Printing LED Board Replacement, Remove fan bracket: step 22, image 3 of 3
    • De-route the cables from the USB/Ethernet board and remove from the harness on the back of the fan shroud.

    • Pull out the four circled cable connectors to unplug, and de-route the remaining cables from the wiring harness.

    • Lift away the fan/bracket assembly from the printer to remove.

    Ask FixBot

    Add Comment

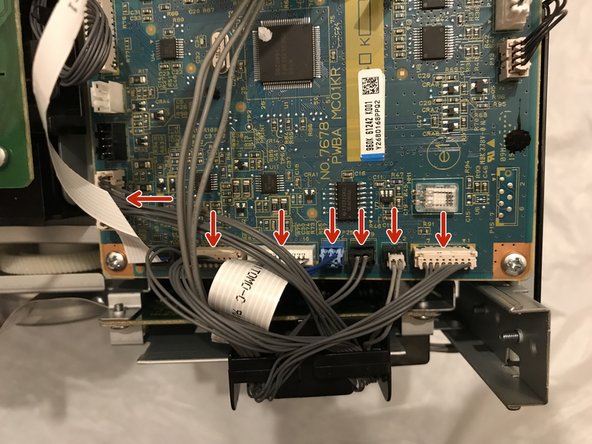
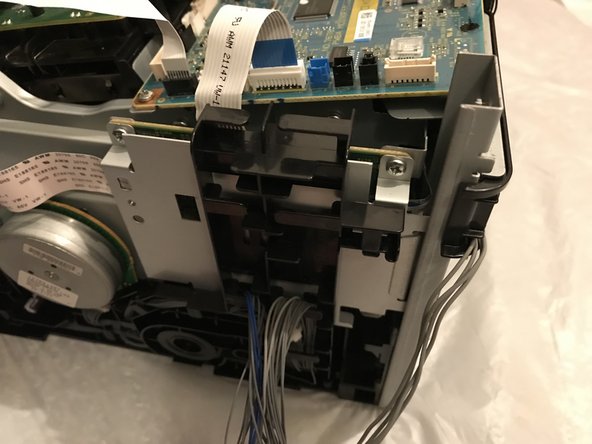
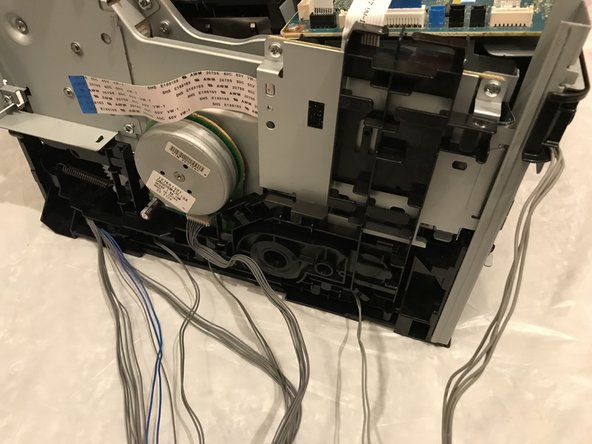
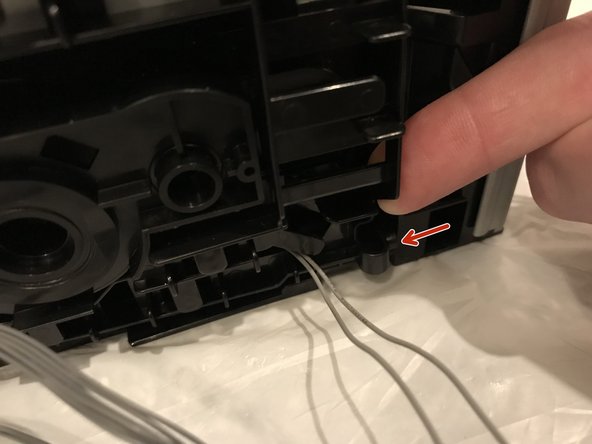
  23. Dell 1350cnw Printing LED Board Replacement, De-route cables: step 23, image 1 of 3 Dell 1350cnw Printing LED Board Replacement, De-route cables: step 23, image 2 of 3 Dell 1350cnw Printing LED Board Replacement, De-route cables: step 23, image 3 of 3
    • Pull out all the indicated cable plugs from the main control board.

    • De-route all the cables from the wiring harness on the side of the printer.

    Ask FixBot

    Add Comment

  24. Dell 1350cnw Printing LED Board Replacement, Remove side cable bracket: step 24, image 1 of 3 Dell 1350cnw Printing LED Board Replacement, Remove side cable bracket: step 24, image 2 of 3 Dell 1350cnw Printing LED Board Replacement, Remove side cable bracket: step 24, image 3 of 3
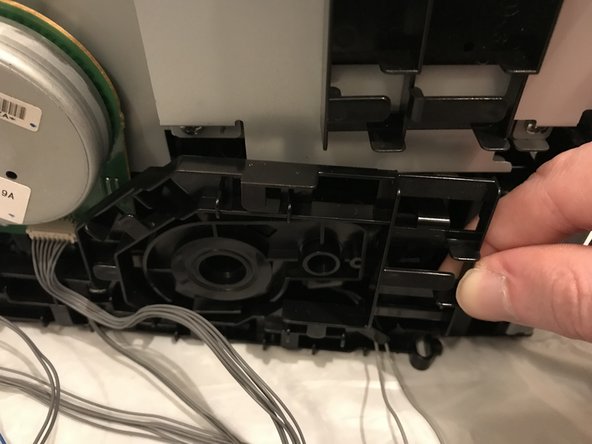
    • Push in the retaining pin on the lower right-hand corner of the lower cable bracket, pulling the bracket out slightly away from the printer.

    • Push down the retaining pin on the top left of the cable bracket, and pull down and out from under the USB/Ethernet board support bracket.

    • Pull the cable bracket away from the printer.

    Ask FixBot

    Add Comment

  25. Dell 1350cnw Printing LED Board Replacement, Unplug 3-core cable: step 25, image 1 of 2 Dell 1350cnw Printing LED Board Replacement, Unplug 3-core cable: step 25, image 2 of 2
    • Pull out the 3-pin connector beneath the main drive motor to unplug.

    • Feed this cable through the cable bracket to separate and remove the cable bracket.

    Ask FixBot

    Add Comment

  26. Dell 1350cnw Printing LED Board Replacement, Remove cover plate: step 26, image 1 of 2 Dell 1350cnw Printing LED Board Replacement, Remove cover plate: step 26, image 2 of 2
    • Pull out the flat flex cable to remove from the top of the image output board.

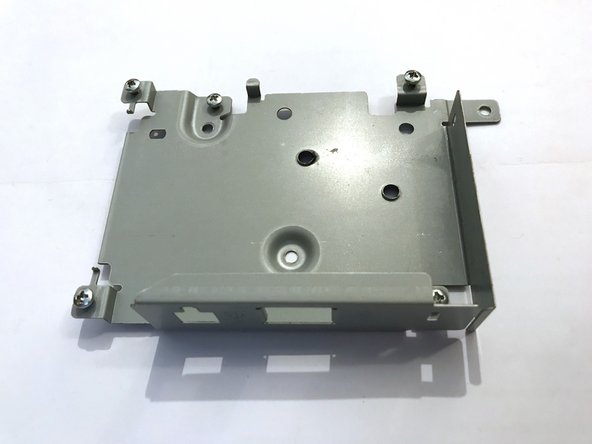
    • Unscrew the four 5mm M3 phillips screws at the corners of the image output board over plate.

    Ask FixBot

    Add Comment

  27. Dell 1350cnw Printing LED Board Replacement, Remove flat flex cables: step 27, image 1 of 3 Dell 1350cnw Printing LED Board Replacement, Remove flat flex cables: step 27, image 2 of 3 Dell 1350cnw Printing LED Board Replacement, Remove flat flex cables: step 27, image 3 of 3
    • Flip up the retaining bar on each of the five flat flex cable connectors and gently lift out the cable to remove.

    Ask FixBot

    Add Comment

  28. Dell 1350cnw Printing LED Board Replacement, Remove USB/Ethernet board bracket: step 28, image 1 of 2 Dell 1350cnw Printing LED Board Replacement, Remove USB/Ethernet board bracket: step 28, image 2 of 2
    • Unscrew the three 5mm M3 phillips screws holding the USB/Ethernet board bracket to the printer, and remove the bracket.

    Ask FixBot

    Add Comment

  29. Dell 1350cnw Printing LED Board Replacement, Remove small gear carrier: step 29, image 1 of 3 Dell 1350cnw Printing LED Board Replacement, Remove small gear carrier: step 29, image 2 of 3 Dell 1350cnw Printing LED Board Replacement, Remove small gear carrier: step 29, image 3 of 3
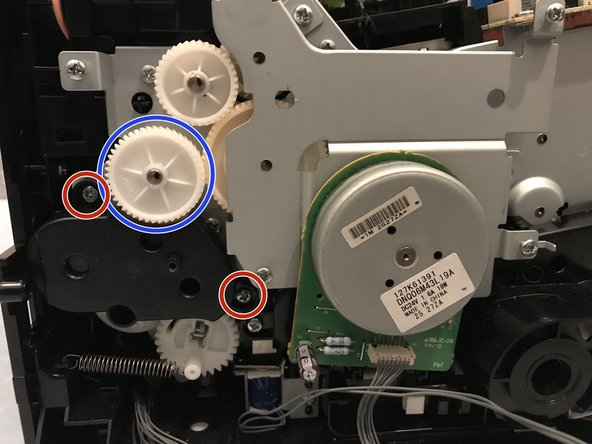
    • Pull off the 30mm gear cog.

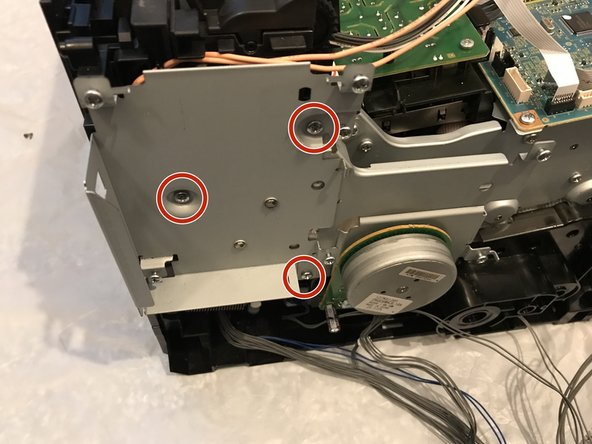
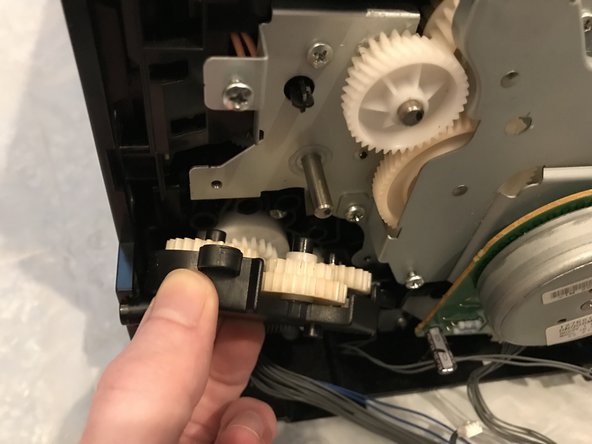
    • Unscrew both the 5mm M3 phillips screws holding the small gear carrier assembly in place.

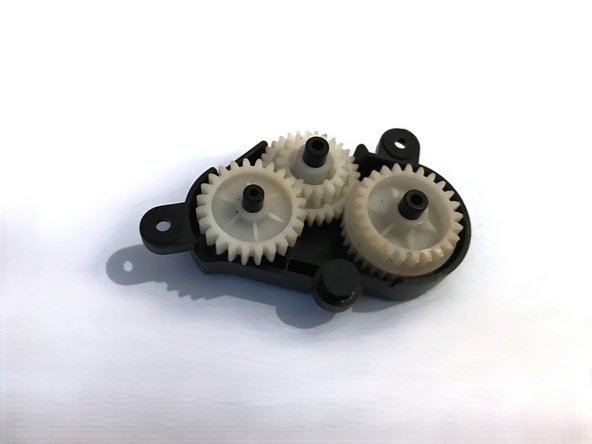
    • Tilt the gear carrier away from the printer and remove.

    • Tilting the top edge away first as shown helps stop the gears falling off when removing this part.

    Ask FixBot

    Add Comment

  30. Dell 1350cnw Printing LED Board Replacement, Remove motor assembly: step 30, image 1 of 3 Dell 1350cnw Printing LED Board Replacement, Remove motor assembly: step 30, image 2 of 3 Dell 1350cnw Printing LED Board Replacement, Remove motor assembly: step 30, image 3 of 3
    • Unscrew the two 5mm M4 phillips screws.

    • Unscrew the 7mm phillips screw.

    • Pull off the 25mm gear. (This usually allows the adjacent gear (green arrow, behind the outer bracket) to come off with the motor/ drive assembly; if it doesn't, this gear can be put back on afterwards).

    • Pull away the main drive motor/gear assembly from the printer to remove.

    • The 25mm drive gear (yellow arrow) and 30mm gear (orange arrow) can be replaced once the motor assembly is removed.

    Ask FixBot

    Add Comment

  31. Dell 1350cnw Printing LED Board Replacement, Remove back cover: step 31, image 1 of 1
    • Remove the four 7mm phillips screws holding the rear cover to the printer.

    Ask FixBot

    Add Comment

  32. Dell 1350cnw Printing LED Board Replacement, Unplug sensor cable: step 32, image 1 of 2 Dell 1350cnw Printing LED Board Replacement, Unplug sensor cable: step 32, image 2 of 2
    • Pull out the connector for the rear cover sensor from the power supply board.

    • De-route the light pink coloured pair of sensor cables and remove from the wiring harness.

    Ask FixBot

    Add Comment

  33. Dell 1350cnw Printing LED Board Replacement, Remove back cover: step 33, image 1 of 1
    • Unclip the rear cover opposite the de-routed cables by prying away from the rest of the printer using a prying tool.

    • The rear cover can now be removed from the printer.

    Ask FixBot

    Add Comment

  34. Dell 1350cnw Printing LED Board Replacement, Remove toners & outer cover: step 34, image 1 of 2 Dell 1350cnw Printing LED Board Replacement, Remove toners & outer cover: step 34, image 2 of 2
    • Remove the four toner cartridges from the printer.

    • Slide the outer cover towards the back of the printer to pull out the locating pins and remove.

    Ask FixBot

    Add Comment

  35. Dell 1350cnw Printing LED Board Replacement, Remove inner cover: step 35, image 1 of 1
    • Before proceeding with removing this part, it's worth ensuring the printer is on a wipeable surface or plastic dust sheet, especially if a large amount of loose toner dust is present, as this will tend to make a mess otherwise!

    • Remove the six 7mm phillips screws holding the toner compartment inner cover to the printer.

    Ask FixBot

    Add Comment

  36. Dell 1350cnw Printing LED Board Replacement, Remove inner cover: step 36, image 1 of 3 Dell 1350cnw Printing LED Board Replacement, Remove inner cover: step 36, image 2 of 3 Dell 1350cnw Printing LED Board Replacement, Remove inner cover: step 36, image 3 of 3
    • Unplug the three connectors for the toner control/ data cables (two from the control board and one from the power supply board) by pulling the connector up from the board.

    • De-route and remove these cables from the front cable guide.

    • Unplug the fuser unit power cable by squeezing the top of the retaining clip and pulling the connectors up from the power supply board.

    • De-route the fuser unit power cable from the cable guide on the back of the inner toner cover.

    Ask FixBot

    Add Comment

  37. Dell 1350cnw Printing LED Board Replacement, Remove inner cover: step 37, image 1 of 3 Dell 1350cnw Printing LED Board Replacement, Remove inner cover: step 37, image 2 of 3 Dell 1350cnw Printing LED Board Replacement, Remove inner cover: step 37, image 3 of 3
    • Push down on the power switch retaining bracket to release the cover from the switch.

    • Pull the toner compartment inner cover away from the printer, taking care to lift the cover over the springs passing through it (otherwise these may drop more toner dust), to remove the toner inner cover assembly.

    Ask FixBot

    Add Comment

  38. Dell 1350cnw Printing LED Board Replacement, Remove outer gear carrier: step 38, image 1 of 3 Dell 1350cnw Printing LED Board Replacement, Remove outer gear carrier: step 38, image 2 of 3 Dell 1350cnw Printing LED Board Replacement, Remove outer gear carrier: step 38, image 3 of 3
    • Unscrew the three 5mm M4 phillips screws.

    • Unscrew the two 7mm phillips screws.

    • Pull the outer gear carrier assembly away from the printer to remove.

    Ask FixBot

    Add Comment

  39. Dell 1350cnw Printing LED Board Replacement, Remove solenoid: step 39, image 1 of 3 Dell 1350cnw Printing LED Board Replacement, Remove solenoid: step 39, image 2 of 3 Dell 1350cnw Printing LED Board Replacement, Remove solenoid: step 39, image 3 of 3
    • Unscrew the 7mm phillips screw holding the solenoid in place.

    • Pull the solenoid bracket off the mounting pins to remove from the printer.

    Ask FixBot

    Add Comment

  40. Dell 1350cnw Printing LED Board Replacement, Remove control board: step 40, image 1 of 2 Dell 1350cnw Printing LED Board Replacement, Remove control board: step 40, image 2 of 2
    • Unplug all remaining cables from the control board.

    • Unscrew the four 5mm M3 phillips screws from the corners.

    • Lift out the PCB to remove.

    Ask FixBot

    Add Comment

  41. Dell 1350cnw Printing LED Board Replacement, Remove main gear carrier: step 41, image 1 of 2 Dell 1350cnw Printing LED Board Replacement, Remove main gear carrier: step 41, image 2 of 2
    • Unscrew the two 5mm M3 phillips screws.

    • Unscrew the six 7mm phillips screws (the top left one is hidden behind the 25mm gear in the photo).

    • Unscrew the two 5mm M4 phillips screws.

    • Pull away the gear carrier to remove from the printer.

    Ask FixBot

    Add Comment

  42. Dell 1350cnw Printing LED Board Replacement, Remove power supply board: step 42, image 1 of 3 Dell 1350cnw Printing LED Board Replacement, Remove power supply board: step 42, image 2 of 3 Dell 1350cnw Printing LED Board Replacement, Remove power supply board: step 42, image 3 of 3
    • Push in the retaining clip and pull out the AC input power connector from the power supply board.

    • Pull out the 4-pin output power connector from the opposite end of the board.

    • Unscrew the four 5mm M3 phillips screws and lift the power supply board up from the printer.

    Ask FixBot

    Add Comment

  43. Dell 1350cnw Printing LED Board Replacement, Remove front cable bracket: step 43, image 1 of 3 Dell 1350cnw Printing LED Board Replacement, Remove front cable bracket: step 43, image 2 of 3 Dell 1350cnw Printing LED Board Replacement, Remove front cable bracket: step 43, image 3 of 3
    • Unscrew the 5mm M4 phillips screw attaching the mains earth cable to the chassis.

    • Unscrew the 5mm M3 phillips screw at each end of the cable bracket.

    • Pull the bracket away from the printer to remove.

    Ask FixBot

    Add Comment

  44. Dell 1350cnw Printing LED Board Replacement, De-route rear cover cables: step 44, image 1 of 3 Dell 1350cnw Printing LED Board Replacement, De-route rear cover cables: step 44, image 2 of 3 Dell 1350cnw Printing LED Board Replacement, De-route rear cover cables: step 44, image 3 of 3
    • De-route the CTD/ADC sensor cables from within the rear cover of the printer.

    • Pull through the cable and connector.

    Ask FixBot

    Add Comment

  45. Dell 1350cnw Printing LED Board Replacement, Unscrew core printing assembly: step 45, image 1 of 2 Dell 1350cnw Printing LED Board Replacement, Unscrew core printing assembly: step 45, image 2 of 2
    • Unscrew the pair of 7mm phillips screws on each side of the core printing assembly.

    Ask FixBot

    Add Comment

  46. Dell 1350cnw Printing LED Board Replacement, Lift out core printing assembly: step 46, image 1 of 2 Dell 1350cnw Printing LED Board Replacement, Lift out core printing assembly: step 46, image 2 of 2
    • Pull forward the front frame slightly away from the core printing assembly.

    • Lift up the core printing assembly from the front edge first, and lift away from the rest of the printer to remove.

    Ask FixBot

    Add Comment

  47. Dell 1350cnw Printing LED Board Replacement, Unhook end springs: step 47, image 1 of 2 Dell 1350cnw Printing LED Board Replacement, Unhook end springs: step 47, image 2 of 2
    • Lift up and unhook the spring at each end of the toner roller unit.

    Ask FixBot

    Add Comment

  48. Dell 1350cnw Printing LED Board Replacement, Unclip flat flex cable: step 48, image 1 of 1
    • Lift out any flat flex cables required to access the toner roller unit being removed.

    Ask FixBot

    Add Comment

  49. Dell 1350cnw Printing LED Board Replacement, Unclip & remove toner roller: step 49, image 1 of 3 Dell 1350cnw Printing LED Board Replacement, Unclip & remove toner roller: step 49, image 2 of 3 Dell 1350cnw Printing LED Board Replacement, Unclip & remove toner roller: step 49, image 3 of 3
    • Use a prying tool or small flat-bladed screwdriver to lift up the retaining clip at either end of the toner roller unit, and lift off the toner roller from the printing assembly.

    Ask FixBot

    Add Comment

  50. Dell 1350cnw Printing LED Board Replacement, Disconnect cable: step 50, image 1 of 1
    • Lift up the retaining bar on the flat flex connector and lift out the cable.

    Ask FixBot

    Add Comment

  51. Dell 1350cnw Printing LED Board Replacement, Remove LED board: step 51, image 1 of 3 Dell 1350cnw Printing LED Board Replacement, Remove LED board: step 51, image 2 of 3 Dell 1350cnw Printing LED Board Replacement, Remove LED board: step 51, image 3 of 3
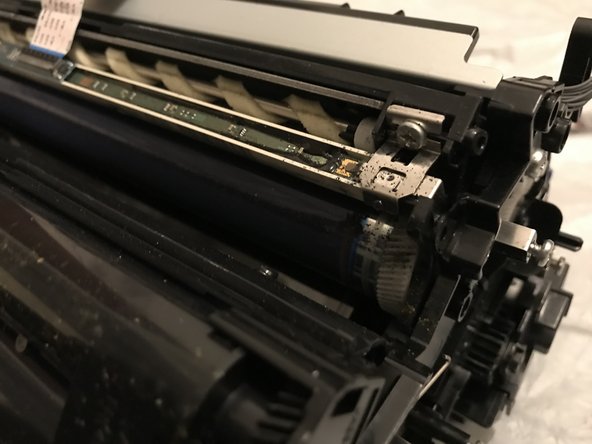
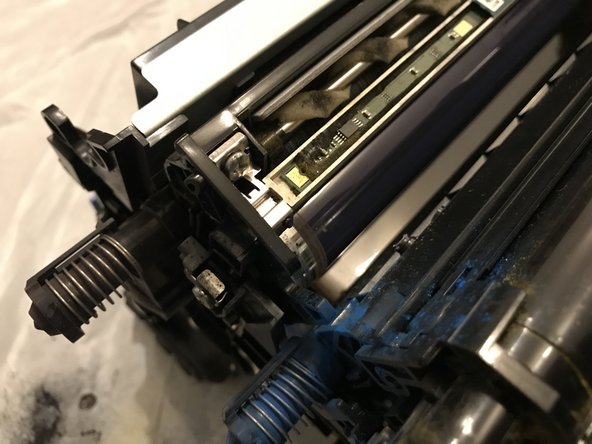
    • Unscrew the 7mm phillips screw holding the bracket at either end of the PCB.

    • Unclip the brackets and lift away the LED board.

    • Removing or replacing this part will slightly misalign the printing output for that colour, which can be fixed by carrying out the alignment/ calibration process in the printer settings.

    Ask FixBot

    Add Comment

Conclusion

To reassemble your device, follow these instructions in reverse order.

Cancel: I did not complete this guide.

Jac

Member since: 10/08/24

2,728 Reputation

21 Guides authored

0 Guide Comments

Add Comment

View Statistics:

Past 24 Hours: 0

Past 7 Days: 3

Past 30 Days: 12

All Time: 127