
DYMO LabelManager 160 Keyboard Replacement

Matthew Jenkins and 6 other contributors
Last updated on Jan 13, 2025
Views: 2.9K
View statistics:
- Past 24 Hours:
- 4
- Past 7 Days:
- 33
- Past 30 Days:
- 133
- All Time:
- 2,875
Comments: 3
3 guide comments.
Go to guide commentsCompleted: 3 4
3 people have marked this guide "completed." Will you be next?
4 people have marked this guide "completed." Including you — great job!
Favorites: 1 2
1 person has favorited (and subscribed to) this guide. Will you be next?
2 people have favorited (and subscribed to) this guide — including you!
Better Introduction
Improve this guide by completing or revising its introduction.
Introduction
Go to step 1 ↓If the DYMO LabelManager 160's keys are unresponsive, you may need to replace the keypad. This guide provides the replacement steps.
What you need
Parts

-
-
-
Remove the compartment cover to reveal the batteries. Remove the 6 old batteries.
-
-
-
-
To open the cartridge compartment, simply lift on the front of the device.
-
-
-
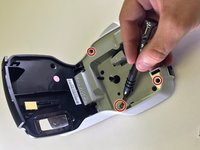
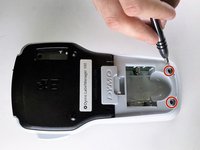
Using a Phillips #0 screwdriver, remove the four 1.3mm screws from the cartridge compartment and two 1.2mm screws from the battery compartment.
-
-
-
-
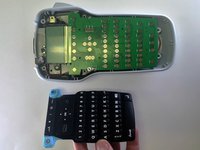
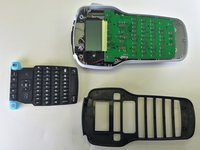
Using a spudger or other tool, lift and remove the front of the device. This should be done all around the device to ensure the two parts split correctly.
-
-

 Ask FixBot




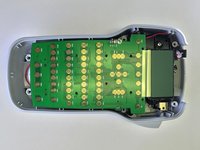
To reassemble your device, follow these instructions in reverse order.
Cancel: I did not complete this guide.
3 other people completed this guide.

Team

University of Alabama, Team 1-4, Sydow campbell Spring 2016 Member of University of Alabama, Team 1-4, Sydow campbell Spring 2016
UA-SYDOW CAMPBELL-S16S1G4
4 Members
48 Guides authored
3 Guide Comments
Group 9: Over all looks great. Screwdriver at top of page should be under tools not parts.
In Step 4 the screws in the second picture 2x 1.2mm should be circled in orange and should be a separate bullet with appropriate coloring.
Possibly add a picture using the spudger, so the user knows exactly where they need to pry.
Fantastic lighting and clear pictures!
Where do I get a replacement key boars
Where did you obtain the parts from as I am having difficulty
