
Free Shipping on Domestic Orders $75+

DXO ONE OLED screen replacement

  1. DXO ONE OLED screen replacement, Preparations: step 1, image 1 of 1
    • Before you begin, please ensure that the camera lens cap has been slid up to the top of the lens and that the camera is turned off.

    Ask FixBot

    Add Comment

  2. DXO ONE OLED screen replacement, Remove the outer casing screws: step 2, image 1 of 2 DXO ONE OLED screen replacement, Remove the outer casing screws: step 2, image 2 of 2
    • Open the protective cover at the back of the camera to prepare for the next step.

    • Remove the memory card (if any) from the camera, then use a Phillips screwdriver to remove the 2.5mm screw located in the center.

    Ask FixBot

    Add Comment

  3. DXO ONE OLED screen replacement, Remove the outer casing: step 3, image 1 of 3 DXO ONE OLED screen replacement, Remove the outer casing: step 3, image 2 of 3 DXO ONE OLED screen replacement, Remove the outer casing: step 3, image 3 of 3
    • Insert the tip of the pry bar into the gap in the casing and slide it around to loosen the latch.

    • It is recommended to use this type of plastic pry bar instead of a crowbar.

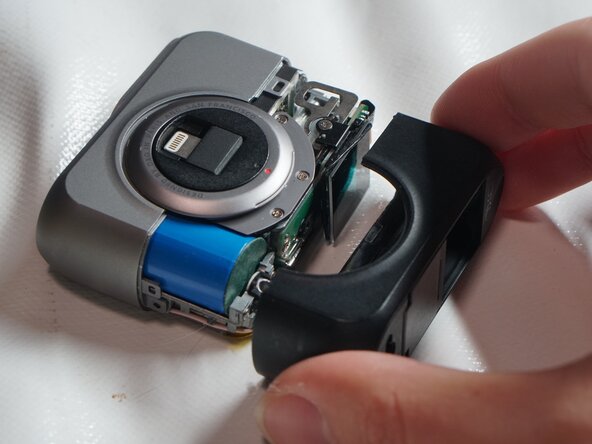
    • Gently shake the black plastic casing while pulling it backward.

    • Remove the black plastic casing

    Ask FixBot

    Add Comment

  4. DXO ONE OLED screen replacement, Remove the ribbon cable: step 4, image 1 of 3 DXO ONE OLED screen replacement, Remove the ribbon cable: step 4, image 2 of 3 DXO ONE OLED screen replacement, Remove the ribbon cable: step 4, image 3 of 3
    • Use a Phillips screwdriver to remove the 3mm screws from the side bracket of the OLED screen.

    • Raise the OLED screen.

    • Use a plastic pry bar to open the clips securing the ribbon cable.

    • The ribbon cable is very fragile; please be careful not to apply too much force when handling it.

    Ask FixBot

    Add Comment

  5. DXO ONE OLED screen replacement: step 5, image 1 of 3 DXO ONE OLED screen replacement: step 5, image 2 of 3 DXO ONE OLED screen replacement: step 5, image 3 of 3
    • Use tweezers to pull the ribbon cable out of the clip.

    • Remove the two 3mm screws located on the circuit board.

    • Insert the plastic pry bar into the gap shown in the picture to separate the circuit board from the clip below.

    • Please note that there is a WiFi antenna connection cable between the circuit board and the clip; please be careful when separating the clip.

    Ask FixBot

    Add Comment

  6. DXO ONE OLED screen replacement, Remove the screen: step 6, image 1 of 3 DXO ONE OLED screen replacement, Remove the screen: step 6, image 2 of 3 DXO ONE OLED screen replacement, Remove the screen: step 6, image 3 of 3
    • Use a plastic pry bar to pry open the clips on the black ribbon cable.

    • Use tweezers to remove the black ribbon cable.

    • Remove the OLED screen

    Ask FixBot

    Add Comment

Conclusion

When reassembling your equipment, please follow the reverse order of the instructions.

Cancel: I did not complete this guide.

One other person completed this guide.

Special thanks to these translators:

zh en

100%

Jun Huang Lin (小強) is helping us fix the world! Want to contribute?
Start translating ›

Eternalcat

Member since: 11/27/25

723 Reputation

3 Guides authored

0 Guide Comments

Add Comment

View Statistics:

Past 24 Hours: 1

Past 7 Days: 19

Past 30 Days: 60

All Time: 238