Introduction
Often, a Cuisinart CPT-180 Toaster is damaged because some crumbs don't fall into the tray and instead attach to other parts of the toaster. This can misalign or damage the lever mechanism of your toaster. If your Cuisinart CPT-180 toaster lever is stuck or broken, this could be the case. This guide shows you how to access and clean the toaster lever to restore normal use.
This repair takes little disassembly, but a lot of patience. Be gentle with all wires and cables. Before starting, unplug the device to prevent electrical damage.
What you need
-
-
Place paper towels under your toaster to catch the crumbs and make clean up easier at the end.
-
Turn the toaster so the back is facing towards you
-
Slide the crumb trays out from the bottom of the toaster.
-
Clean the crum trays using soap and water.
-
Dry them with paper towels.
 Ask FixBot
-
-
-
Flip your toaster upside down to access the bottom cover.
-
Use a Phillips #00 screwdriver to remove the 10.0 mm screws from the corners of the bottom cover.
-
-
-
Place the toaster on its back side.
-
Carefully and slowly, slide the top of the toaster off.
-
Look for the wire bundles connected to the inside of the dials.
-
-
-
-
If your cable connectors are still attached after removing the toaster case, use needle-nose pliers to unplug the connectors from their sockets.
-
Repeat for both cable connectors and both sides.
-
-
-
Use paper towels, soap, and water to clean away all crumbs or substances attached to your spring and lever pole.
-
Repeat the steps for both levers.
-
-
-
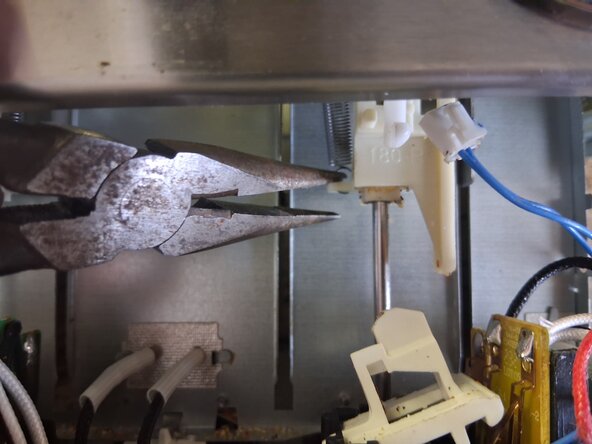
After cleaning, use your needle-nose pliers to manually push the lever pole and spring into their connection points. Ensure they are securely attached, and the lever pole slides smoothly.
-
Repeat the step for both sides.
-
-
-
After inspecting the lever components, carefully put the shell of the toaster back on and place it right-side up. (Full reassembly of the wires, cables, and screws isn't needed for this step)
-




To reassemble your device, follow these instructions in reverse order (Minus the cleaning). Take your e-waste to an R2 or e-Stewards certified recycler.
Cancel: I did not complete this guide.
One other person completed this guide.

Team

CSU Los Angeles, Team 7-14, Grodsky Spring 2026 Member of CSU Los Angeles, Team 7-14, Grodsky Spring 2026
CSULA-GRODSKY-S26S7G14
1 Member
2 Guides authored
