Free Shipping on Domestic Orders $75+

Craig Electronics CMP773 Battery Replacement

Views: 651

View statistics:

Past 24 Hours:
2
Past 7 Days:
15
Past 30 Days:
67
All Time:
651
Comments: 0

No one has left comments on this guide. Will you be first?

Go to guide comments
Completed: 0

No one has marked this guide "completed." Will you be the first?

Favorites: 0

No one has favorited (and subscribed to) this guide. Will you be the first?

Time Required: 10 - 15 minutes
Difficulty: Moderate
Craig Electronics CMP773 Battery Replacement

Introduction

Go to step 1 ↓

If your Craig Electronics CMP773 battery is failing and needs replaced, this replacement guide will inform you of the steps to take when performing the replacement. Make sure you have the right tools before beginning this procedure.

What you need

Tools

    1. Craig Electronics CMP773 Battery Replacement, Battery: step 1, image 1 of 1
      • Remove the two 3.2 mm PH000 screws near the charging port.

      Ask FixBot

      Add Comment

    2. Craig Electronics CMP773 Battery Replacement: step 2, image 1 of 1
      • Pry the back cover from the device along the bottom edge.

      Ask FixBot

      Add Comment

    3. Craig Electronics CMP773 Battery Replacement: step 3, image 1 of 1
      • Continue prying along the edge of the device until the back cover is free.

      Ask FixBot

      Add Comment

    4. Craig Electronics CMP773 Battery Replacement: step 4, image 1 of 1
      • Pry the battery free from the device using a plastic opening tool.

      Ask FixBot

      Add Comment

    5. Craig Electronics CMP773 Battery Replacement: step 5, image 1 of 1
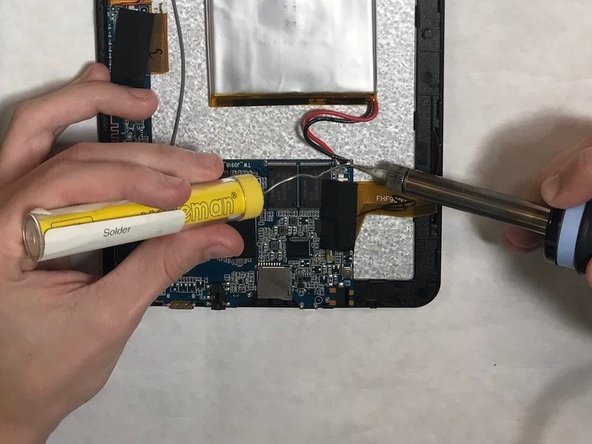
      • Desolder the faulty battery wires.

      Ask FixBot

      Add Comment

    6. Craig Electronics CMP773 Battery Replacement: step 6, image 1 of 1
      • Solder the replacement battery wires to the circuit board.

      Ask FixBot

      Add Comment

    7. Craig Electronics CMP773 Battery Replacement: step 7, image 1 of 1
      • Apply adhesive between the replacement battery and the device before installation.

      Ask FixBot

      Add Comment

Conclusion

Once the above steps have been successfully competed, power on the device. Enjoy your newly replaced battery.

Cancel: I did not complete this guide.

Jacob Hampton

Member since: 03/26/18

145 Reputation

1 Guide authored

Team

IUPUI, Team S1-G5, Harley Spring 2018 Member of IUPUI, Team S1-G5, Harley Spring 2018

IUPUI-HARLEY-S18S1G5

6 Members

48 Guides authored

0 Guide Comments

Add Comment

View Statistics:

Past 24 Hours: 2

Past 7 Days: 15

Past 30 Days: 67

All Time: 651