Introduction
Use this guide to replace, repair, or clean a heating surface on a Corning PC-351 laboratory hot plate. The heating surface is the metal plate through which the heating coil conducts heat through to warm any object placed on it. Over time this plate may become warped through repeated usage, dented by any impacts, or soiled by dirt and chemicals. In this case, removing the heating plate from the device is necessary for cleaning or installing a new plate to prevent uneven heating.
Safety first! Before proceeding with this guide, please ensure the hot plate is unplugged and cooled down. In addition, ensure all the dials on the device are set to 'off.' You don't need special tools or technical knowledge to complete this repair.
What you need
-
-
-
Flip the hot plate over so that the heating surface is facing downwards.
 Ask FixBot
-
-
-
Remove the four bottom panel 3 x 12 mm screws with a Phillips #2 screwdriver.
-
Detach the bottom panel.
-
-
-
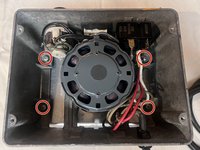
Remove the four heating surface 3 x 16 mm screws with a Phillips #2 screwdriver.
-
-
-
-
Detach the heating surface lead wire connectors (the white wires) from the power supply with a pair of needle nose pliers.
-
-
-
Separate the hot plate body from the damaged or dirty heating surface and place the new heating surface below the body.
-
-
-
Connect the new hot plate heating surface lead wire connectors (the white wires).
-
Carefully thread the left lead wire connector below the heating coil.
-
-
-
Fasten the four hot plate heating surface 3 x 16 mm screws using a Phillips #2 screwdriver.
-
-
-
Attach the bottom panel and fasten the bottom panel 3 x 12 MM screws using a Phillips #2 screwdriver.
-
-
-
Flip the hot plate right side up, so that the heating surface is now facing upwards.
-
-




To reassemble your device, follow instructions after step 6. Thank you for reading our guide, and we hope you found it helpful!

