
Compaq Mini 110 RAM Replacement

alea and 15 other contributors
Last updated on Dec 21, 2022
Views: 7.1K
View statistics:
- Past 24 Hours:
- 2
- Past 7 Days:
- 14
- Past 30 Days:
- 93
- All Time:
- 7,083
Comments: 1
1 comment on steps.
Completed: 3 4
3 people have marked this guide "completed." Will you be next?
4 people have marked this guide "completed." Including you — great job!
Favorites: 2 3
2 people have favorited (and subscribed to) this guide. Will you be next?
3 people have favorited (and subscribed to) this guide — including you!
Introduction
Go to step 1 ↓RAM, or random access memory, is short-term storage for your Compaq Mini 110. RAM is used by your processor for immediate use as-needed, unlike long-term files written to a hard disk drive. If your computer has slowed considerably or you’re looking for a boost, replacing/upgrading the RAM is a fairly simple and inexpensive first step. The Compaq Mini 110 laptop comes standard with 1GB of RAM and cannot be upgraded past a maximum of 1GB with its one (DDR2) slots.
What you need
Parts


Tools

-
-
-
Locate the battery and the battery tabs on the bottom of the Compaq Mini.
 Ask FixBot
-
-
-
-
-
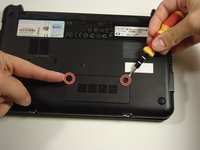
Use a Philips #0 screwdriver to unscrew the two screws covering the memory compartment on the bottom of the laptop and remove the cover.
-
-
-




To reassemble your device, follow these instructions in reverse order.
Cancel: I did not complete this guide.
3 other people completed this guide.

Team

Cal Poly, Team 22-2, Maness Fall 2010 Member of Cal Poly, Team 22-2, Maness Fall 2010
CPSU-MANESS-F10S22G2
6 Members
180 Guides authored
