Free Shipping on Domestic Orders $75+

Compaq Evo N1000v Floppy Drive Replacement

What you need

    1. Compaq Evo N1000v Floppy Drive Replacement, LED Cover: step 1, image 1 of 1
      • Flip the laptop over with the rear panel facing forward.

      Ask FixBot

      Add Comment

    2. Compaq Evo N1000v Floppy Drive Replacement: step 2, image 1 of 1
      • Using a TR8 Torx screwdriver, remove the two T8 Torx screws that secure the LED cover to the base enclosure.

      Ask FixBot

      Add Comment

    3. Compaq Evo N1000v Floppy Drive Replacement: step 3, image 1 of 1
      • Flip the laptop back over with the front facing forward. Open the screen.

      Ask FixBot

      Add Comment

    4. Compaq Evo N1000v Floppy Drive Replacement: step 4, image 1 of 1
      • Locate the F1 and F2 keys near the top left corner of the keyboard.

      Ask FixBot

      Add Comment

    5. Compaq Evo N1000v Floppy Drive Replacement: step 5, image 1 of 1
      • While holding the F1 and F2 keys, insert a spudger between the keys into the notch in the LED cover. Lift up.

      Ask FixBot

      Add Comment

    6. Compaq Evo N1000v Floppy Drive Replacement: step 6, image 1 of 1
      • Locate the Scroll and Pause keys near the top right corner of the keyboard.

      Ask FixBot

      Add Comment

    7. Compaq Evo N1000v Floppy Drive Replacement: step 7, image 1 of 1
      • While holding the Scroll and Pause keys, insert a spudger between the keys into the notch in the LED cover. Lift up.

      Ask FixBot

      Add Comment

    8. Compaq Evo N1000v Floppy Drive Replacement: step 8, image 1 of 2 Compaq Evo N1000v Floppy Drive Replacement: step 8, image 2 of 2
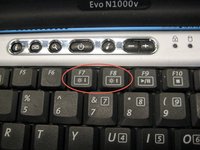
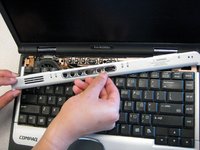
      • Insert a spudger between the F7 and F8 keys. Lift up to remove the LED cover.

      Ask FixBot

      Add Comment

    1. Compaq Evo N1000v Floppy Drive Replacement, Keyboard: step 9, image 1 of 1
      • Lift the back edge of the keyboard and pull towards the screen.

      Ask FixBot

      Add Comment

    2. Compaq Evo N1000v Floppy Drive Replacement: step 10, image 1 of 1
      • Pull the cable and lift up to release.

      Ask FixBot

      Add Comment

    3. Compaq Evo N1000v Floppy Drive Replacement: step 11, image 1 of 1
      • Remove the keyboard.

      Ask FixBot

      Add Comment

    1. Compaq Evo N1000v Floppy Drive Replacement, Palm Rest: step 12, image 1 of 1
      • Close the laptop and flip it so the rear panel is facing up.

      Ask FixBot

      Add Comment

    2. Compaq Evo N1000v Floppy Drive Replacement: step 13, image 1 of 1
      • Using the TR8 Torx screwdriver, remove the six screws from the back case.

      Ask FixBot

      Add Comment

    3. Compaq Evo N1000v Floppy Drive Replacement: step 14, image 1 of 1
      • Remove the battery.

      • Remove the screw from the metal support on the case edge with a Torx T8 screwdriver.

      • Flip the laptop over again so the top is facing up.

      • Open the laptop screen and face it towards you.

      Ask FixBot

      Add Comment

    4. Compaq Evo N1000v Floppy Drive Replacement: step 15, image 1 of 1
      • Lift the the palm rest up from the front edge of the laptop and swing it towards the screen.

      • Be gentle as it is connected by some cables.

      Ask FixBot

      Add Comment

    5. Ask FixBot

      Add Comment

    6. Compaq Evo N1000v Floppy Drive Replacement: step 17, image 1 of 1
      • Disconnect the second ribbon cable.

      Ask FixBot

      Add Comment

    7. Compaq Evo N1000v Floppy Drive Replacement: step 18, image 1 of 1
      • Remove the palm rest.

      Ask FixBot

      Add Comment

      • Locate and remove the three screws shown in picture.

      Ask FixBot

      Add Comment

    1. Compaq Evo N1000v Floppy Drive Replacement: step 20, image 1 of 1
      • Lift up and remove floppy drive from the palm rest.

      Ask FixBot

      Add Comment

Conclusion

To reassemble your device, follow these instructions in reverse order. Take your e-waste to an R2 or e-Stewards certified recycler.

Cancel: I did not complete this guide.

Alex Hernandez

Member since: 04/14/10

49 Reputation

4 Guides authored

Team

Cal Poly, Team 29-74, Johann Spring 2010 Member of Cal Poly, Team 29-74, Johann Spring 2010

CPSU-JOHANN-S10S29G74

3 Members

84 Guides authored

0 Guide Comments

Add Comment

View Statistics:

Past 24 Hours: 2

Past 7 Days: 12

Past 30 Days: 34

All Time: 3,867