Free Shipping on Domestic Orders $75+

Coby DVD209 4-Pin Ribbon Cable Replacement

What you need

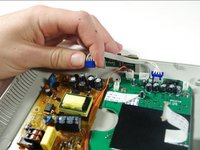
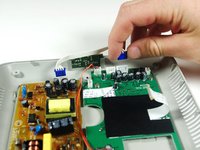
  1. Coby DVD209 4-Pin Ribbon Cable Replacement, The bottom portion of the DVD player: step 1, image 1 of 3 Coby DVD209 4-Pin Ribbon Cable Replacement, The bottom portion of the DVD player: step 1, image 2 of 3 Coby DVD209 4-Pin Ribbon Cable Replacement, The bottom portion of the DVD player: step 1, image 3 of 3
    Tool used on this step:
    Tweezers
    $4.99
    Buy
    • Press the eject button to view the laser inside.

    • Using the blue plastic tool and the tweezers, remove the ribbon cable.

    Ask FixBot

    Add Comment

  2. Coby DVD209 4-Pin Ribbon Cable Replacement: step 2, image 1 of 3 Coby DVD209 4-Pin Ribbon Cable Replacement: step 2, image 2 of 3 Coby DVD209 4-Pin Ribbon Cable Replacement: step 2, image 3 of 3
    • Remove the six 1cm screws on the bottom of the device with the Phillips #1 screwdriver.

    • Do not lift the top of the DVD player too quickly because there are wires attached on the inside.

    • Pry the top of the device open from the right side where the buttons are located.

    Ask FixBot

    Add Comment

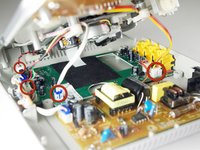
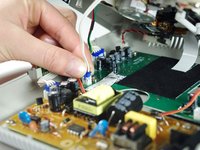
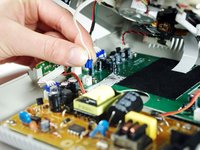
  3. Coby DVD209 4-Pin Ribbon Cable Replacement: step 3, image 1 of 3 Coby DVD209 4-Pin Ribbon Cable Replacement: step 3, image 2 of 3 Coby DVD209 4-Pin Ribbon Cable Replacement: step 3, image 3 of 3
    • When pulling the ribbon cables out, make sure not to pull by the wires, as this can cause damage to them.

    • Pinch the plastic adapter with two fingers to remove the wires circled in red from the circuit board.

    Ask FixBot

    Add Comment

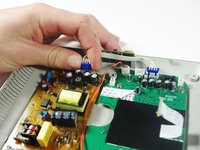
  4. Coby DVD209 4-Pin Ribbon Cable Replacement, 4-Pin Ribbon Cable: step 4, image 1 of 3 Coby DVD209 4-Pin Ribbon Cable Replacement, 4-Pin Ribbon Cable: step 4, image 2 of 3 Coby DVD209 4-Pin Ribbon Cable Replacement, 4-Pin Ribbon Cable: step 4, image 3 of 3
    • Position the DVD player so that the power and AVI ports are facing you.

    • Pull the white cable with the blue adapters off of the circuit boards.

    Ask FixBot

    Add Comment

Conclusion

To reassemble your device, follow these instructions in reverse order.

Cancel: I did not complete this guide.

One other person completed this guide.

Yufay Chow

Member since: 01/23/12

92 Reputation

4 Guides authored

Team

Cal Poly, Team 10-36, Amido Winter 2012 Member of Cal Poly, Team 10-36, Amido Winter 2012

CPSU-AMIDO-W12S10G36

4 Members

7 Guides authored

0 Guide Comments

Add Comment

View Statistics:

Past 24 Hours: 0

Past 7 Days: 6

Past 30 Days: 36

All Time: 1,373