Free Shipping on Domestic Orders $75+

Cherry Gentix 4K Maus - Disassembly

What you need

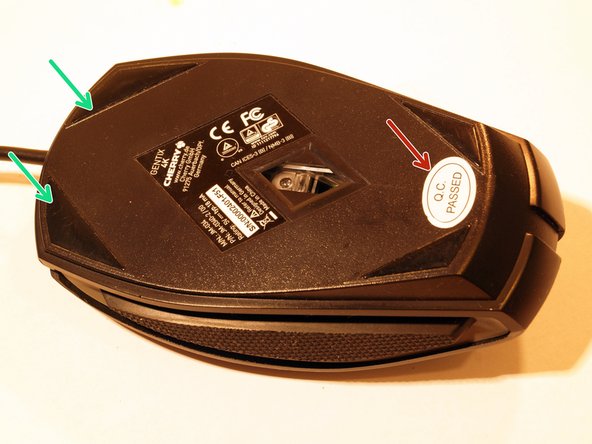
  1. Cherry Gentix 4K Maus - Disassembly, Mouse: step 1, image 1 of 3 Cherry Gentix 4K Maus - Disassembly, Mouse: step 1, image 2 of 3 Cherry Gentix 4K Maus - Disassembly, Mouse: step 1, image 3 of 3
    • Remove the "Q.C. Passed" Sticker to have access to the Phillips screw below.

    • Pull of the two upper mouse feet. It's enough to just remove half of the mouse feet to get to the screws.

    • It is useful to pull of the mouse feet with the adhesive film.

    Ask FixBot

    Add Comment

  2. Cherry Gentix 4K Maus - Disassembly: step 2, image 1 of 1
    • Remove the three Phillips screws.

    Ask FixBot

    Add Comment

  3. Cherry Gentix 4K Maus - Disassembly: step 3, image 1 of 3 Cherry Gentix 4K Maus - Disassembly: step 3, image 2 of 3 Cherry Gentix 4K Maus - Disassembly: step 3, image 3 of 3
    • Lift the upper part of the mouse.

    • Fold the upper and the lower part back like a book and put it aside.

    Ask FixBot

    Add Comment

  4. Cherry Gentix 4K Maus - Disassembly: step 4, image 1 of 3 Cherry Gentix 4K Maus - Disassembly: step 4, image 2 of 3 Cherry Gentix 4K Maus - Disassembly: step 4, image 3 of 3
    • Loose the plug with the flat end of a spudger.

    • Pull the plug.

    Ask FixBot

    Add Comment

  5. Cherry Gentix 4K Maus - Disassembly: step 5, image 1 of 3 Cherry Gentix 4K Maus - Disassembly: step 5, image 2 of 3 Cherry Gentix 4K Maus - Disassembly: step 5, image 3 of 3
    • Lift the two side parts and put it aside.

    Ask FixBot

    Add Comment

  6. Cherry Gentix 4K Maus - Disassembly: step 6, image 1 of 2 Cherry Gentix 4K Maus - Disassembly: step 6, image 2 of 2
    • Loose the plug with the flat end of a spudger.

    • Pull the plug.

    Ask FixBot

    Add Comment

  7. Cherry Gentix 4K Maus - Disassembly: step 7, image 1 of 3 Cherry Gentix 4K Maus - Disassembly: step 7, image 2 of 3 Cherry Gentix 4K Maus - Disassembly: step 7, image 3 of 3
    • There are two plasic clips. Loose the left plastic clip very carefully.

    • Fold the board up from the left side.

    • Take out the board and put it aside.

    Ask FixBot

    Add Comment

  8. Cherry Gentix 4K Maus - Disassembly: step 8, image 1 of 2 Cherry Gentix 4K Maus - Disassembly: step 8, image 2 of 2
    • Move the mouse wheel a bit to the right.

    • Take the mouse wheel out of the guide forks.

    Ask FixBot

    Add Comment

  9. Cherry Gentix 4K Maus - Disassembly: step 9, image 1 of 2 Cherry Gentix 4K Maus - Disassembly: step 9, image 2 of 2
    • Reference picture of the board.

    Ask FixBot

    Add Comment

  10. Cherry Gentix 4K Maus - Disassembly: step 10, image 1 of 3 Cherry Gentix 4K Maus - Disassembly: step 10, image 2 of 3 Cherry Gentix 4K Maus - Disassembly: step 10, image 3 of 3
    • Remove the four Phillips Screws.

    • Remove the weight.

    • Remove the board.

    Ask FixBot

    Add Comment

  11. Cherry Gentix 4K Maus - Disassembly, optional for cleaning: step 11, image 1 of 1
    • Have a look at the plastic clips

    • Plastic clips for the black upper part for clicking.

    • Plastic clips for the DPI button.

    Ask FixBot

    Add Comment

  12. Cherry Gentix 4K Maus - Disassembly: step 12, image 1 of 2 Cherry Gentix 4K Maus - Disassembly: step 12, image 2 of 2
    • Insert the flat end of the spudger into the gap between the two halves on the left and right. The rear plastic clips should then release automatically.

    Ask FixBot

    Add Comment

  13. Cherry Gentix 4K Maus - Disassembly: step 13, image 1 of 3 Cherry Gentix 4K Maus - Disassembly: step 13, image 2 of 3 Cherry Gentix 4K Maus - Disassembly: step 13, image 3 of 3
    • Loose the plastic clips in the middle.

    • Insert the spudger from the left and right side between both parts. The plastic clips should release automatically form their rest postion.

    • Alle plastic clips are now released.

    Ask FixBot

    Add Comment

  14. Cherry Gentix 4K Maus - Disassembly: step 14, image 1 of 1
    • Insert the flat end of a spudger into the gap between the two parts.

    • Increase the gap all around until the pieces fall apart.

    Ask FixBot

    Add Comment

  15. Cherry Gentix 4K Maus - Disassembly: step 15, image 1 of 2 Cherry Gentix 4K Maus - Disassembly: step 15, image 2 of 2
    • Unlock the two plastic clips.

    • Use the flat end of a spudger to lift and remove the DPI button.

    Ask FixBot

    Add Comment

  16. Cherry Gentix 4K Maus - Disassembly: step 16, image 1 of 1
    • Overview of all parts.

    Ask FixBot

    Add Comment

Conclusion

Reverse the steps to reassemble your device.

Cancel: I did not complete this guide.

One other person completed this guide.

Special thanks to these translators:

de en

100%

Xare is helping us fix the world! Want to contribute?
Start translating ›

Xare

Member since: 05/15/24

2,749 Reputation

10 Guides authored

0 Guide Comments

Add Comment

View Statistics:

Past 24 Hours: 1

Past 7 Days: 24

Past 30 Days: 111

All Time: 2,086