Free Shipping on Domestic Orders $75+

Charge 3 Touch Screen Assembly Replacement

What you need

    1. Charge 3 Touch Screen Assembly Replacement, Touch Screen Assembly: step 1, image 1 of 3 Charge 3 Touch Screen Assembly Replacement, Touch Screen Assembly: step 1, image 2 of 3 Charge 3 Touch Screen Assembly Replacement, Touch Screen Assembly: step 1, image 3 of 3
      • It is recommended to let the battery discharge before starting. It's a precaution to prevent the battery from catching fire if punctured.

      • Remove both T2 screws

      • Slide off the plastic piece by lifting out and then up

      • Slide plastic and spring assembly off the rail

      • Do this on both sides

      Ask FixBot

      Add Comment

    2. Charge 3 Touch Screen Assembly Replacement: step 2, image 1 of 3 Charge 3 Touch Screen Assembly Replacement: step 2, image 2 of 3 Charge 3 Touch Screen Assembly Replacement: step 2, image 3 of 3
      • I've performed this on a few Fitbits where the adhesive was worn out enough that with a light amount of prying the touch screen assembly lifts right up

      • A hairdryer on high should work you may have to use it for longer

      • Heat the glass screen with heat gun to soften the adhesives

      • Insert a razor blade between the glass and the body

      • Keep going around the rim of the display until loose

      Ask FixBot

      Add Comment

    3. Charge 3 Touch Screen Assembly Replacement: step 3, image 1 of 1
      • This is how close those cables get to the edge underneath the Fitbit letters so be careful

      Ask FixBot

      Add Comment

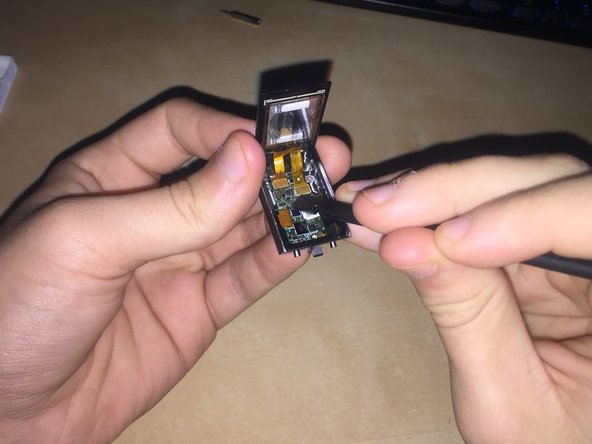
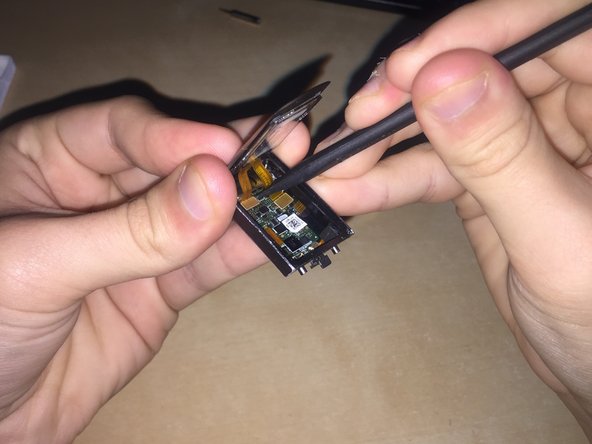
    4. Charge 3 Touch Screen Assembly Replacement: step 4, image 1 of 3 Charge 3 Touch Screen Assembly Replacement: step 4, image 2 of 3 Charge 3 Touch Screen Assembly Replacement: step 4, image 3 of 3
      • Lift the display then battery up gently

      • The battery is attached with a little bit of adhesive so lift gently

      • Remove battery connector

      Ask FixBot

      Add Comment

    5. Charge 3 Touch Screen Assembly Replacement: step 5, image 1 of 2 Charge 3 Touch Screen Assembly Replacement: step 5, image 2 of 2
      • Remove two P2 screws

      • Remove T2 screw

      • Liftoff metal shield

      • I found flipping the device and letting the shield fall out was easier

      Ask FixBot

      Add Comment

    6. Charge 3 Touch Screen Assembly Replacement: step 6, image 1 of 3 Charge 3 Touch Screen Assembly Replacement: step 6, image 2 of 3 Charge 3 Touch Screen Assembly Replacement: step 6, image 3 of 3
      • Liftoff both display connectors

      • Remove Display Assembly

      Ask FixBot

      Add Comment

      • Connect The new screen (basically step 6 in reverse)

      • This step can be a bit fiddly to get right

      • Then perform the step 5 in reverse to put the metal shield back in

      Ask FixBot

      Add Comment

    7. Charge 3 Touch Screen Assembly Replacement: step 8, image 1 of 2 Charge 3 Touch Screen Assembly Replacement: step 8, image 2 of 2
      • Reconnect battery connector

      • if the battery wasn't dead before repair it should turn on now

      • Put the battery back in place

      • When I was replacing the screen I also replaced the battery that's why the battery changed.

      Ask FixBot

      Add Comment

    8. Charge 3 Touch Screen Assembly Replacement: step 9, image 1 of 1
      • Add a thin layer of E-6000 glue around the casing

      • Make sure to cover the entire surface that makes contact with the screen to keep the device waterproof

      Ask FixBot

      Add Comment

    9. Charge 3 Touch Screen Assembly Replacement: step 10, image 1 of 2 Charge 3 Touch Screen Assembly Replacement: step 10, image 2 of 2
      • Flip down the screen and remove any extra glue that squeezes out

      • Take a rubber band and wrap it around the device, this will ensure the display stays in place until the glue cures

      • With the rubber bands on go to step 1 and reverse the steps to reinstall the band release

      • The glue will take between 24 and 72 hours to fully cure

      Ask FixBot

      Add Comment

      • When the glue is fully cured remove the rubber bands

      • And voila you now have a repaired Fitbit Charge 3

      Ask FixBot

      Add Comment

Conclusion

Thanks to ShellingRook27's Original Dissasembly I Was Able to Make this Guide And Bring a new life to my old device.

Cancel: I did not complete this guide.

2 other people completed this guide.

Supper Simon

Member since: 03/18/23

464 Reputation

2 Guides authored

0 Guide Comments

Add Comment

View Statistics:

Past 24 Hours: 2

Past 7 Days: 17

Past 30 Days: 53

All Time: 1,148