
Cat5e RJ-45 Keystone Jack Replacement

Austin Olin and one other contributor
Last updated on Jan 6, 2021
Views: 10K
View statistics:
- Past 24 Hours:
- 5
- Past 7 Days:
- 52
- Past 30 Days:
- 243
- All Time:
- 10,125
Comments: 2
2 comments on steps.
Completed: 6 7
6 people have marked this guide "completed." Will you be next?
7 people have marked this guide "completed." Including you — great job!
Favorites: 0 1
No one has favorited (and subscribed to) this guide. Will you be the first?
1 person has favorited (and subscribed to) this guide — and that's you!
Featured Student Guide
This guide has been the hard work of our awesome students and is found to be exceptionally cool by the iFixit staff.
Introduction
Go to step 1 ↓Use this guide to either replace a faulty Cat5e RJ-45 Keystone Jack, or install a new one onto a Cat5e ethernet cable.
A Cat5e RJ-45 Keystone Jack is used to connect two different ethernet cords together and extend LAN network coverage across long distances. Cat5e RJ-45 Keystone Jacks essentially act as female ports for ethernet cables to connect to. Faulty Cat5e RJ-45 Keystone Jacks cause unstable wired network connections. In some cases, severed wires within Cat5e RJ-45 Keystone Jacks cause wired network connections to fail completely.
This guide does not require any special skills to complete. Make sure to disconnect the Cat5e ethernet cable from any power sources before replacing and installing the Cat5e RJ-45 Keystone Jack.
Before using this guide, make sure to try and isolate the problem to the Cat5e RJ-45 Keystone Jack, as problems can also exist within ethernet cables and ethernet cable connectors. If you are encountering problems with your Cat5e ethernet cable, you can look for solutions here, or perhaps look into replacement options.
What you need
Parts
Tools

-
-
-
Using utility scissors, cut in a circular motion around the jacket of the Cat5e ethernet cable until it is separated from the rest of the cable.
-
Slide the disconnected jacket off of the ethernet cable.
 Ask FixBot
-
-
-
Using your utility scissors, cut a small inlet into the edge of the remaining ethernet jacket.
-
Using both sides of the cut inlet, peel the jacket around 3-4 inches further into the ethernet cable to expose more wiring.
-
Once the jacket is peeled, cut off the remainder of the peeled jacket with utility scissors.
-
-
-
Turn the RJ-45 Keystone Jack on its side and examine the color coding provided.
-
Align each pair of wires with the designated color coding on the RJ-45 Keystone Jack.
-
-
-
Using the appropriate wiring scheme, align each individual wire into the designated slot on the RJ-45 Keystone Jack.
-
There are two different wiring schemes available. These are labeled as scheme A and scheme B on the RJ-45 Keystone Jack. Make sure that the same wiring scheme is used on both ends of the Cat5e ethernet cord. If the other end's scheme is unknown, use wiring scheme B as it is the most common.
-
-
-
Align the other four wires into the designated slots on the other side of the Cat5e RJ-45 Keystone Jack.
-
-
-
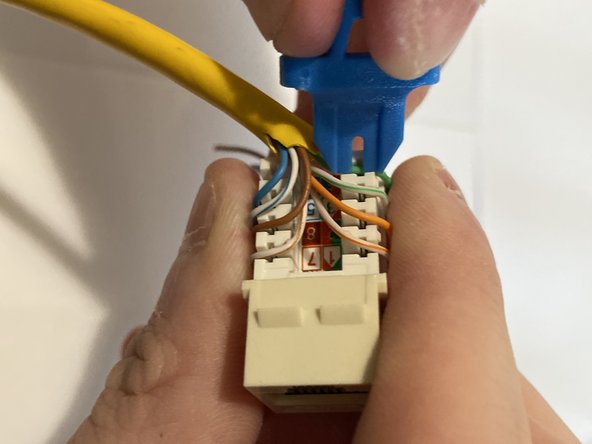
Using a punch down tool, force each individual wire deep into the base of the appropriate slots on the RJ-45 Keystone Jack.
-
-
-
-
Once each wire is placed into the correct slots, use your punch down tool a second time in order to ensure that each wire is connected securely to the RJ-45 Keystone Jack.
-
-
-
Using utility scissors, cut off any external wiring on the outside of the RJ-45 Keystone Jack.
-
-
-
Align the plastic covering over the exposed wiring within the RJ-45 Keystone Jack.
-
Push the plastic covering against the RJ-45 Keystone Jack until it clicks into place.
-
-






Your device is now ready for use.
Cancel: I did not complete this guide.
6 other people completed this guide.

Team

Linn Benton Community College, Team S1-G13, Johnson Fall 2020 Member of Linn Benton Community College, Team S1-G13, Johnson Fall 2020
LBCC-JOHNSON-F20S1G13
1 Member
12 Guides authored
