
Casio CTK-501 Buttons Replacement

Jimmy Winne and 6 other contributors
Last updated on Jun 21, 2022
Views: 2.8K
View statistics:
- Past 24 Hours:
- 3
- Past 7 Days:
- 20
- Past 30 Days:
- 105
- All Time:
- 2,792
Comments: 0
No one has left comments on this guide. Will you be first?
Go to guide commentsCompleted: 2 3
2 people have marked this guide "completed." Will you be next?
3 people have marked this guide "completed." Including you — great job!
Favorites: 2 3
2 people have favorited (and subscribed to) this guide. Will you be next?
3 people have favorited (and subscribed to) this guide — including you!
Missing Steps
Oops! This guide is currently missing one or more important steps.
Step Trimmer
This guide has unnecessary steps. Trim them to be more concise!
Introduction
Go to step 1 ↓If your Casio CTK-501 has a malfunction with the buttons, then this guide will teach you how to replace a button.
The button will allow for better quality sound to perform. The functions of the Casio CTK-501 buttons are to play/pause, stop, rewind, fast forward, and be on with the right or left side. It also helps in the rhythm and tone of the music with also being able to control the volume. Not having one of these buttons functioning can get in the way of playing music on your keyboard.
Before reading this guide make sure that the buttons are the cause of an issue to your Casio CTK-501. Before you start, make sure you unplug the power cord. At the end of this guide, you will have your Casio CTK-501 working better than ever!
What you need
Tools


-
-
-
Flip the keyboard over so that the bottom is facing up.
-
Remove the twenty-seven 12 mm screws from the dark-grey panel using a Phillips #2 screwdriver.
 Ask FixBot
-
-
-
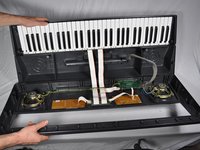
Flip open the top half of the keyboard.
-
Set the keyboard onto the bottom half with the internal parts facing up.
-
-
-
-
-
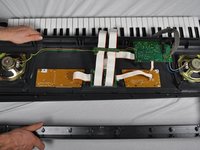
Remove the nine screws from the brown circuit board that has an attached ribbon, with a #0 Phillips.
-
-
-




To reassemble your device, follow these instructions in reverse order.
Cancel: I did not complete this guide.
2 other people completed this guide.

Team

Cal Poly, Team 9-16, Amido Fall 2012 Member of Cal Poly, Team 9-16, Amido Fall 2012
CPSU-AMIDO-F12S9G16
4 Members
72 Guides authored
