Free Shipping on Domestic Orders $75+

Canon PowerShot SD1400 IS Screen Replacement

What you need

  1. Canon PowerShot SD1400 IS Screen Replacement, Screen: step 1, image 1 of 3 Canon PowerShot SD1400 IS Screen Replacement, Screen: step 1, image 2 of 3 Canon PowerShot SD1400 IS Screen Replacement, Screen: step 1, image 3 of 3
    • Remove the 2.0 mm Phillips screws on both sides of the camera using the Phillips #00 screwdriver.

    • There will be 4 total screws that need to be removed, 2 on each side.

    Ask FixBot

    Add Comment

  2. Canon PowerShot SD1400 IS Screen Replacement: step 2, image 1 of 1
    • Remove the 4.0 mm Phillips screw located on the bottom of the camera.

    Ask FixBot

    Add Comment

  3. Canon PowerShot SD1400 IS Screen Replacement: step 3, image 1 of 1
    • Remove the front face panel of the camera.

    • The face can be removed by hand with a firm pressure. If one point of the face is stuck to the body, ensure that there is not a screw remaining at that position to hold it in place.

    Ask FixBot

    Add Comment

  4. Canon PowerShot SD1400 IS Screen Replacement: step 4, image 1 of 1
    • Remove the rear panel of the camera.

    Ask FixBot

    Add Comment

  5. Canon PowerShot SD1400 IS Screen Replacement: step 5, image 1 of 1
    • Remove the panel of buttons by hand.

    Ask FixBot

    Add Comment

  6. Canon PowerShot SD1400 IS Screen Replacement: step 6, image 1 of 1
    • Remove the 3.0 mm Phillips copper colored screw from the top of the camera.

    Ask FixBot

    Add Comment

  7. Canon PowerShot SD1400 IS Screen Replacement: step 7, image 1 of 1
    • Remove the 3.0 mm Phillips silver screw from the rear face of the camera, located on the upper right corner.

    Ask FixBot

    Add Comment

  8. Canon PowerShot SD1400 IS Screen Replacement: step 8, image 1 of 1
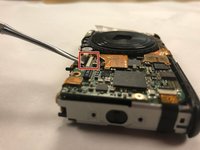
    • Using the plastic spudger, pry the golden film on the front face of the camera off of the microchip.

    • Once removed, a silver screw will be visible from underneath the golden film.

    Ask FixBot

    Add Comment

  9. Canon PowerShot SD1400 IS Screen Replacement: step 9, image 1 of 1
    • Remove the 3.0 mm Phillips silver screw using the screwdriver.

    Ask FixBot

    Add Comment

  10. Canon PowerShot SD1400 IS Screen Replacement: step 10, image 1 of 2 Canon PowerShot SD1400 IS Screen Replacement: step 10, image 2 of 2
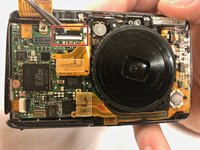
    • Using the metal spudger, carefully pry the small black tab away from the brown film end of the golden film.

    • Once released, the small black tab will point straight away from the front face of the camera.

    • After releasing the tab, the golden film will no longer be secured to the front face of the camera.

    Ask FixBot

    Add Comment

  11. Canon PowerShot SD1400 IS Screen Replacement: step 11, image 1 of 1
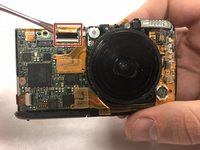
    • Unplug the small chip from the face of the camera by carefully inserting the metal spudger underneath the cluster of red wires visible. Then lift the cluster of wires upwards, parallel to the front face of the camera.

    Ask FixBot

    Add Comment

  12. Canon PowerShot SD1400 IS Screen Replacement: step 12, image 1 of 1
    • You can now remove the top panel from the camera using your hands with firm pressure.

    Ask FixBot

    Add Comment

  13. Canon PowerShot SD1400 IS Screen Replacement: step 13, image 1 of 2 Canon PowerShot SD1400 IS Screen Replacement: step 13, image 2 of 2
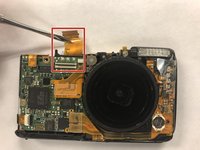
    • Insert the metal spudger underneath the golden film on the front face

    • Lift the golden film on the front face of the camera up and away from its connection

    Ask FixBot

    Add Comment

  14. Canon PowerShot SD1400 IS Screen Replacement: step 14, image 1 of 1
    • Remove the screen by sliding the golden film out of the channel and pulling the screen away from the camera.

    Ask FixBot

    Add Comment

Conclusion

To reassemble your device, follow these instructions in reverse order.

Cancel: I did not complete this guide.

4 other people completed this guide.

Braxton Beal

Member since: 01/30/18

702 Reputation

3 Guides authored

Team

Baylor, Team S1-G3, Johnson Spring 2018 Member of Baylor, Team S1-G3, Johnson Spring 2018

BU-JOHNSON-S18S1G3

3 Members

4 Guides authored

0 Guide Comments

Add Comment

View Statistics:

Past 24 Hours: 2

Past 7 Days: 6

Past 30 Days: 83

All Time: 1,400