
Canon PowerShot G3 Flash Capacitor Replacement

Ryan Riales and 2 other contributors
Last updated on May 23, 2019
Views: 1.5K
View statistics:
- Past 24 Hours:
- 2
- Past 7 Days:
- 19
- Past 30 Days:
- 103
- All Time:
- 1,492
Comments: 1
1 guide comment.
Go to guide commentsCompleted: 0 1
No one has marked this guide "completed." Will you be the first?
1 person has marked this guide "completed." It's you — great job!
Favorites: 0 1
No one has favorited (and subscribed to) this guide. Will you be the first?
1 person has favorited (and subscribed to) this guide — and that's you!
Action Shots
Be an action hero! This guide needs images that better demonstrate how to perform specific actions.
Missing Details
Some of this guide's details are missing. Help users by adding tools, difficulty, or time.
Introduction
Go to step 1 ↓The flash of the Canon PowerShot G3 camera is operated by the discharge of a capacitor. A capacitor is an energy storing device that stores a charge between two conducting plates. Before the capacitor can discharge, it must be charged by the battery.
Note:
1.) There are many screws to be removed before you can reach the capacitor.
2.) To install a new capacitor you must know how to solder wires to the capacitor.
3.) Do not continue unless you have a magnetic pad to place the screws and a soldering iron.
What you need
Tools


-
-
-
Start to remove all of the screws around the camera: from the front, back, sides, and bottom.
 Ask FixBot
-
-
-
Once the screws have been removed, Remove the back panel. The panel should be able to be removed by hand.
-
-
-
Next remove the front panel and right side panels (the left side is part of the front).
-
-
-
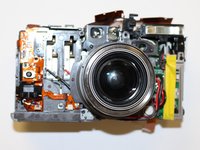
The front of camera should now resemble the picture shown.
-
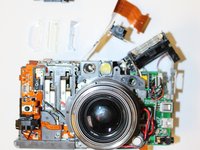
To remove the circuit ribbon (the brown strips) pull them out of the plastic pieces they are connected to.
-
-
-
-
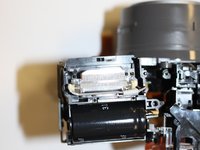
After that you can lift up the capacitor housing by using your finger nail, or other small object, to lift it up around the edges.
-
-
-
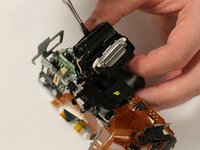
Use a spudger, or other thin object, to remove the capacitor from the housing. (Image 2)
-
To remove the red and yellow wires connected to the capacitor, use a soldering iron to heat up the solder and a vacuum to suck up the solder. Any other methods you know of will also work.
-
Take the capacitor to you local electronics store or order another capacitor online by reading the capacity off of the side of the capacitor. It should be in microFarads (µF).
-
Once you have a new capacitor, solder on the red and yellow wires to the same place as the old capacitor.
-
-




To reassemble your device, follow these instructions in reverse order.

Team

University of Memphis, Team 3-2, Kim Fall 2015 Member of University of Memphis, Team 3-2, Kim Fall 2015
UM-KIM-F15S3G2
4 Members
60 Guides authored
1 Guide Comment
Better discharge that cap,so you don't suffer a 250V shock.
