
Canon PowerShot ELPH 300HS Back Panel Button Replacement

Kristin Brusso and 4 other contributors
Last updated on Aug 8, 2019
Views: 1.3K
View statistics:
- Past 24 Hours:
- 2
- Past 7 Days:
- 18
- Past 30 Days:
- 99
- All Time:
- 1,343
Comments: 1
1 comment on steps.
Completed: 1 2
1 person has marked this guide "completed." Will you be next?
2 people have marked this guide "completed." Including you — great job!
Favorites: 1 2
1 person has favorited (and subscribed to) this guide. Will you be next?
2 people have favorited (and subscribed to) this guide — including you!
Action Shots
Be an action hero! This guide needs images that better demonstrate how to perform specific actions.
Needs Better Images
Better photos will improve this guide. Help out by taking, editing, or uploading new ones!
Markup Mishap
This guide needs better markups. Help out by correcting or making some markup annotations.
Introduction
Go to step 1 ↓In this guide you will learn how to replace broken buttons on the Back Panel of your Canon PowerShot ELPH 300HS. Replacing these buttons is usually a simple and inexpensive alternative to having you camera repaired at a shop or replaced.
What you need
Tools
-
-
1x White Printer PaperOptional
-


-
-
-
Turn off your camera.
-
Remove the battery to prevent risk of shock.
 Ask FixBot
-
-
-
Turn off your camera by pressing the power button, located on the top-center of the device.
-
Locate the battery door on the bottom right area of the camera case.
-
Place your finger firmly on the black rubber pad on the battery door and slide the door to the right to open it.
-
Locate the orange battery release button beneath the battery door.
-
Slide the battery release button downward to release the battery.
-
-
-
Remove the two screws located on the left side of the camera case, using the Phillips screwdriver #00 (2.0 mm).
-
-
-
Remove the two screws on the bottom of the camera located near the battery door (Phillips #00 screwdriver) (4.0 mm).
-
-
-
Remove the screw located on the lower right side of the camera case (Phillips #00 screwdriver) (4.0 mm).
-
Remove the HDMI A/V out port cover located on the upper right side of the camera.
-
Remove the screw located just beneath the port cover removed in step 2. (Phillips #00 screwdriver) (2.0 mm).
-
-
-
Remove the back portion of the camera case to reveal the screw located on the top of the case.
-
Remove the screw from the top of camera case, located next to the shutter button (Phillips #00 screwdriver) (1.5 mm).
-
-
-
-
Carefully pry the case apart at the seem, using your fingers.
-
-
-
-
-
Now that you have followed the steps to remove the case, you can remove the back panel of your camera and replace it with your new panel.
-
-
-
Now that you have replaced your back panel buttons, you can reassemble the device in reverse order of the instructions in the Camera Case Replacement guide.
-
-


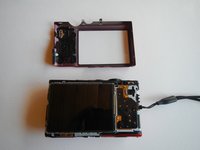
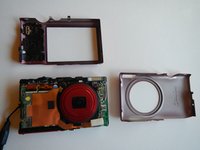
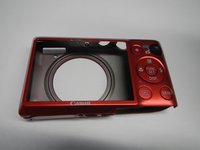


To reassemble your device, follow these instructions in reverse order.
Cancel: I did not complete this guide.
One other person completed this guide.

Team

Michigan Tech, Team 5-6, Lauer Spring 2014 Member of Michigan Tech, Team 5-6, Lauer Spring 2014
MTU-LAUER-S14S5G6
3 Members
72 Guides authored
