
Free Shipping on Domestic Orders $75+

Canon PowerShot A200 Motherboard Replacement

What you need

  1. Canon PowerShot A200 Motherboard Replacement, Canon PowerShot A200: step 1, image 1 of 1
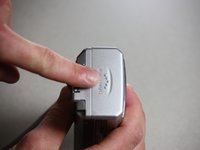
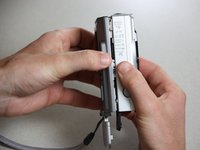
    • Use a Phillips #00 screwdriver to remove the two screws located at the bottom of the camera.

  2. Canon PowerShot A200 Motherboard Replacement: step 2, image 1 of 2 Canon PowerShot A200 Motherboard Replacement: step 2, image 2 of 2
    • Locate the screw and the rubber covering on the left side of the camera. Slide the rubber covering to expose a second screw.

    • Remove the two screws with the Phillips #00 screwdriver.

  3. Canon PowerShot A200 Motherboard Replacement: step 3, image 1 of 2 Canon PowerShot A200 Motherboard Replacement: step 3, image 2 of 2
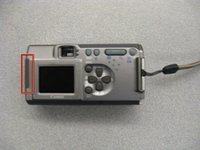
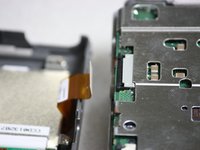
    • Open the battery compartment on the right side of the camera by pushing slightly in the direction of the arrow.

    • Be sure to remove the memory card.

    • Remove the two screws by the memory card slot using the Phillips #00 screwdriver.

  4. Canon PowerShot A200 Motherboard Replacement: step 4, image 1 of 2 Canon PowerShot A200 Motherboard Replacement: step 4, image 2 of 2
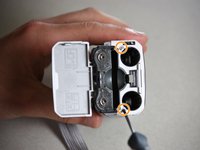
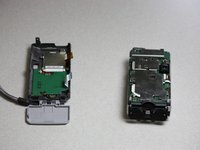
    • Pull the grey tab towards the back of the camera. Lift the black cover to expose the battery slots.

    • Remove the two visible screws with the Phillips #00 screwdriver.

    • During reassembly, the holes for these screws must align properly with the interior of the camera body. Then the black battery cover must lie flat and be held in place by the grey tab.

  5. Canon PowerShot A200 Motherboard Replacement: step 5, image 1 of 2 Canon PowerShot A200 Motherboard Replacement: step 5, image 2 of 2
    • Remove the screen battery located to the left of the screen.

    • Set the screen battery aside for reassembly

  6. Canon PowerShot A200 Motherboard Replacement: step 6, image 1 of 2 Canon PowerShot A200 Motherboard Replacement: step 6, image 2 of 2
    • Gently pull the camera apart from the top.

    • Be careful. The two halves are still attached by two short ribbons at the bottom of the camera.

  7. Canon PowerShot A200 Motherboard Replacement: step 7, image 1 of 2 Canon PowerShot A200 Motherboard Replacement: step 7, image 2 of 2
    Tool used on this step:
    Tweezers
    $4.99
    Buy
    • Locate the black tabs on either side of the white ribbon.

    • Use the metal tweezers to gently move these tabs to the outside edges of the ribbon.

    • Gently pull the white ribbon out from its connection.

  8. Canon PowerShot A200 Motherboard Replacement: step 8, image 1 of 3 Canon PowerShot A200 Motherboard Replacement: step 8, image 2 of 3 Canon PowerShot A200 Motherboard Replacement: step 8, image 3 of 3
    • Locate the black tabs on either side of the orange ribbon.

    • Use the metal tweezers to gently move these tabs to the outside edges of the ribbon.

    • Gently pull the orange ribbon out of its connection.

    • Your camera will now be in two separate pieces.

  9. Canon PowerShot A200 Motherboard Replacement, LCD Display: step 9, image 1 of 1
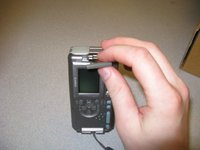
    • Use a Phillips head screwdriver to remove the four screws from the corners of the LCD.

  10. Canon PowerShot A200 Motherboard Replacement: step 10, image 1 of 1
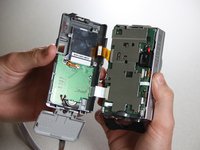
    • Use the iFixit plastic opening tool to lift the LCD away from the back case.

    • The LCD will still be attached to the back of the camera case by an orange strip.

  11. Canon PowerShot A200 Motherboard Replacement: step 11, image 1 of 1
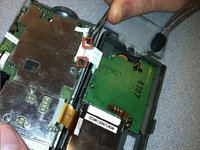
    • Use a soldering iron to remove the LCD from the orange cable connected to the back of the camera.

    • Use the soldering iron to attach your new LCD in place.

    • Caution: When soldering, allow enough slack in the orange cable, so the LCD will lie flat. The white bar will lie parallel with the electronic components embedded in the motherboard.

  12. Canon PowerShot A200 Motherboard Replacement, Motherboard: step 12, image 1 of 3 Canon PowerShot A200 Motherboard Replacement, Motherboard: step 12, image 2 of 3 Canon PowerShot A200 Motherboard Replacement, Motherboard: step 12, image 3 of 3
    • Follow the prerequisite instructions for Disassembling the Canon PowerShot A200 Case and for the Canon PowerShot A200 LCD Display Replacement.

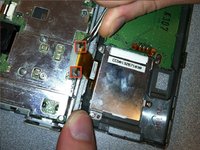
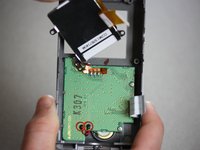
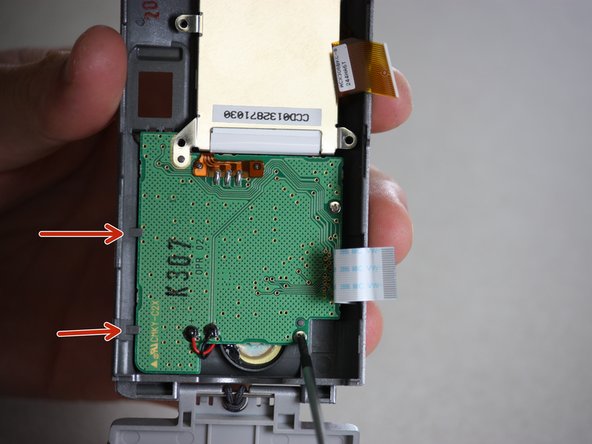
    • Once the LCD Display has been removed, use the soldering kit to desolder the red and black connections attached to the green motherboard.

    • Use the Phillips head screwdriver to remove the two screws in the motherboard. Set the screws aside.

  13. Canon PowerShot A200 Motherboard Replacement: step 13, image 1 of 2 Canon PowerShot A200 Motherboard Replacement: step 13, image 2 of 2
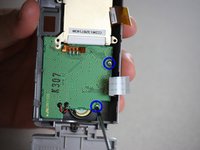
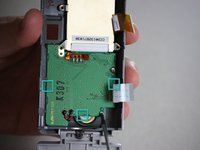
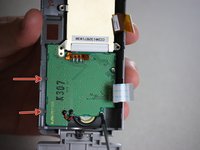
    • Use the plastic opening tool to carefully pry the motherboard out of its place, proceeding from the indicated points. Pull gently, as to not destroy any of the other internal parts of the camera.

    • Pull gently, as to not destroy any of the other internal parts of the camera.

    • Insert the new green motherboard in place, making sure it fits snugly under the grey tabs at the edge of the camera case.

    • Reassemble the camera following these instructions in reverse order, as well as the instructions in the prerequisite guides.

Conclusion

To reassemble your device, follow these instructions in reverse order.

Ellen Chambers

Member since: 01/05/11

231 Reputation

2 Guides authored

Team

Cal Poly, Team 7-37, Regan Winter 2011 Member of Cal Poly, Team 7-37, Regan Winter 2011

CPSU-REGAN-W11S7G37

4 Members

10 Guides authored

0 Guide Comments

Add Comment

View Statistics:

Past 24 Hours: 4

Past 7 Days: 13

Past 30 Days: 42

All Time: 1,922