Free Shipping on Domestic Orders $75+

Canon EOS 30 LCD Screen Replacement

Views: 6.4K

View statistics:

Past 24 Hours:
2
Past 7 Days:
28
Past 30 Days:
123
All Time:
6,379
Comments: 4

2 comments on steps, 2 guide comments.

Go to guide comments
Completed: 4

4 people have marked this guide "completed." Will you be next?

Favorites: 2

2 people have favorited (and subscribed to) this guide. Will you be next?

Time Required: 15 minutes
Difficulty: Moderate
Inconsistent Images

Updating the images on this guide to be more consistent with the prerequisites would increase its awesomeness.

Canon EOS 30 LCD Screen Replacement

Introduction

Go to step 1 ↓

This guide will show you how to access, remove, and replace the LCD screen. The process is safe and uncomplicated.

What you need

Tools

    1. Canon EOS 30 LCD Screen Replacement, Front Panel: step 1, image 1 of 1
      • Remove the two 4.8 mm black screws above the lens on the front of the camera.

      Ask FixBot

      Add Comment

    2. Canon EOS 30 LCD Screen Replacement: step 2, image 1 of 1
      • Remove the 4.3 mm black screw under the lens ring, and the 4.8 mm black screw under the camera.

      Ask FixBot

      Add Comment

    3. Canon EOS 30 LCD Screen Replacement: step 3, image 1 of 1
      • Remove the 4.8 mm black screw on the left side of the camera.

      Ask FixBot

      Add Comment

    4. Canon EOS 30 LCD Screen Replacement: step 4, image 1 of 1
      • Remove the front panel by lifting it away from the camera's body.

      Ask FixBot

      Add Comment

    1. Canon EOS 30 LCD Screen Replacement, Top Panel: step 5, image 1 of 1
      • Slide the outer eyepiece upward to remove it.

      Ask FixBot

      Add Comment

    2. Canon EOS 30 LCD Screen Replacement: step 6, image 1 of 1
      • Remove the two 4.75 mm black screws located on the top of the camera.

      Ask FixBot

      Add Comment

    3. Canon EOS 30 LCD Screen Replacement: step 7, image 1 of 1
      • Remove the four 4.3 mm black screws near the bottom corners of the eyepiece at the back of the camera.

      Ask FixBot

      Add Comment

    4. Canon EOS 30 LCD Screen Replacement: step 8, image 1 of 2 Canon EOS 30 LCD Screen Replacement: step 8, image 2 of 2
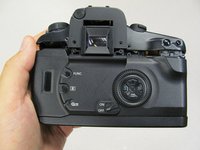
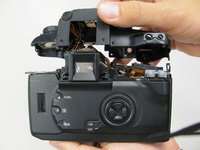
      • Slowly separate the top panel from the camera by pushing it upward.

      • Separating the top panel too far or quickly can damage the ribbon cable and connecting wires that are still attached to the top panel of the camera.

      Ask FixBot

      Add Comment

    1. Canon EOS 30 LCD Screen Replacement, LCD Screen: step 9, image 1 of 1
      • To unclip gold connector push the edge up and away from the lcd screen. A plastic opening tool is recommended.

      • The gold connector can fall into the camera, but it will remain attached and can be pulled back up.

      Ask FixBot

      Add Comment

    2. Canon EOS 30 LCD Screen Replacement: step 10, image 1 of 1
      • Lift LCD screen out of mount.

      Ask FixBot

      Add Comment

Conclusion

To reassemble your device, follow these instructions in reverse order.

Cancel: I did not complete this guide.

4 other people completed this guide.

Sterling Vinson

Member since: 04/17/11

314 Reputation

5 Guides authored

Team

Cal Poly, Team 8-8, Regan Spring 2011 Member of Cal Poly, Team 8-8, Regan Spring 2011

CPSU-REGAN-S11S8G8

5 Members

132 Guides authored

2 Guide Comments

Thank's , your tutorial nice ... gracias

fajar - Reply Share

Where do you find replacement lcd screen if the one on the camera is cracked?

Jasmine - Reply Share

Add Comment

View Statistics:

Past 24 Hours: 2

Past 7 Days: 28

Past 30 Days: 123

All Time: 6,379