Free Shipping on Domestic Orders $75+

CR-10S Pro Noctua Fan Upgrade

What you need

  1. CR-10S Pro Noctua Fan Upgrade, Included kit parts: step 1, image 1 of 2 CR-10S Pro Noctua Fan Upgrade, Included kit parts: step 1, image 2 of 2
    • Labeled bags are used in the following steps

    • Hardware

    • Power Supply Fan (Step 4)

    • Rear Case Exhaust Fan(Step 5)

    • Control Board Fan Assembly (Step 6)

    Ask FixBot

    Add Comment

  2. CR-10S Pro Noctua Fan Upgrade, Bottom cover and PSU mounting screws: step 2, image 1 of 3 CR-10S Pro Noctua Fan Upgrade, Bottom cover and PSU mounting screws: step 2, image 2 of 3 CR-10S Pro Noctua Fan Upgrade, Bottom cover and PSU mounting screws: step 2, image 3 of 3
    • Using a #1 Phillips screwdriver, remove the 11 screws on the bottom and 2 screws on each side for a total of 15

    • Next, remove the bottom cover

    • With the bottom cover removed, turn the printer sideways and remove the power supple unit (PSU) screws while holding the PSU in place ribbon cable side up

    Ask FixBot

    Add Comment

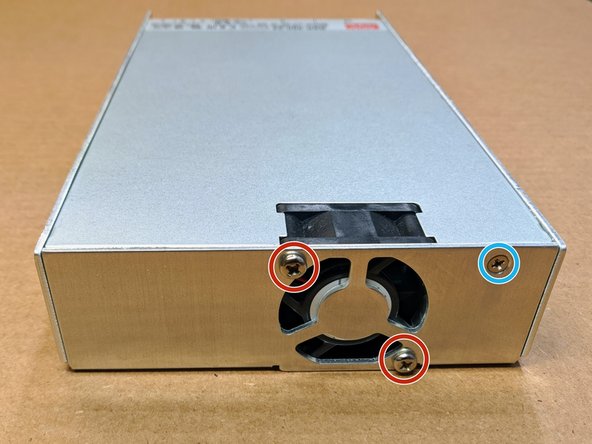
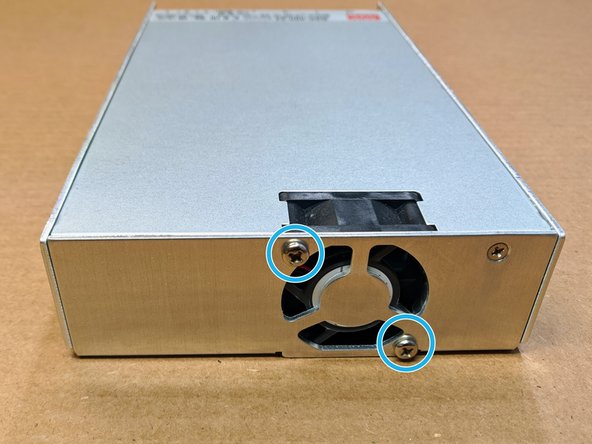
  3. CR-10S Pro Noctua Fan Upgrade, Removing the PSU Fan: step 3, image 1 of 3 CR-10S Pro Noctua Fan Upgrade, Removing the PSU Fan: step 3, image 2 of 3 CR-10S Pro Noctua Fan Upgrade, Removing the PSU Fan: step 3, image 3 of 3
    • Remove the 6 PSU screws securing the cover (circled in blue)

    • Next, remove the 2 screws securing the original 4020 Fan (circled in red)

    Ask FixBot

    Add Comment

  4. CR-10S Pro Noctua Fan Upgrade, Installing PSU Fan: step 4, image 1 of 3 CR-10S Pro Noctua Fan Upgrade, Installing PSU Fan: step 4, image 2 of 3 CR-10S Pro Noctua Fan Upgrade, Installing PSU Fan: step 4, image 3 of 3
    • Unplug the original fan cable

    • Original fan cable is glued down. Gently, pull up on the cable to remove after you unplug the connector

    • Route the new fan cable under the white wires

    • Plug in new fan cable

    • Mount fan with Self tapping screws included in the kit

    • Pay attention to the fan orientation and wire placement

    • Follow step 2 in reverse for reinstallation of the PSU cover

    Ask FixBot

    Add Comment

  5. CR-10S Pro Noctua Fan Upgrade: step 5, image 1 of 2 CR-10S Pro Noctua Fan Upgrade: step 5, image 2 of 2
    • Remove M3 Screw holding stock fan and replace the fan with the new 4010 fan using the included M3x12 socket head screws

    • Fork connector for the red(+V) and black(-V) wire are mounted to there respect screw terminals on the PSU

    Ask FixBot

    Add Comment

  6. CR-10S Pro Noctua Fan Upgrade, Control Fan Assembly Installation: step 6, image 1 of 3 CR-10S Pro Noctua Fan Upgrade, Control Fan Assembly Installation: step 6, image 2 of 3 CR-10S Pro Noctua Fan Upgrade, Control Fan Assembly Installation: step 6, image 3 of 3
    • Remove original motherboard mounting screws and save for future step

    • Included Nylon standoffs replace control board mounting screws

    • Make sure SD card slot and USB cable slot maintain alignment with the frame cutouts

    • Place the Control Fan Assembly as shown

    • Use the previously remove M3 screws to secure the 3D printed fan mount to the standoffs.

    • Plug in Fan adapter cable

    Ask FixBot

    Add Comment

Conclusion

To reassemble your device, follow these instructions in reverse order.

Cancel: I did not complete this guide.

AJ Pereira

Member since: 05/29/20

2,744 Reputation

16 Guides authored

Team

Tiny Machines 3D Member of Tiny Machines 3D

Community

5 Members

41 Guides authored

9 Guide Comments

So where do you get the parts kit? I don’t see that in the post anywhere.

Tim Gray - Reply Share

I would like to know where the parts kit can be purchased as well, either that or a list of part numbers.

lauriecrabb - Reply Share

You can email us at support@tinymachines3d.com to order a kit

AJ Pereira - Reply Share

Does this apply to v2

Jack Gillson - Reply Share

Yes, it does apply to the CR10S Pro V2 as well

AJ Pereira - Reply Share

Add Comment

View Statistics:

Past 24 Hours: 3

Past 7 Days: 11

Past 30 Days: 45

All Time: 9,082