
CHI Original Hinge Spring Replacement

Jaidy Hernandez-Sanchez and 4 other contributors
Last updated on May 7, 2024
Views: 2.7K
View statistics:
- Past 24 Hours:
- 4
- Past 7 Days:
- 20
- Past 30 Days:
- 115
- All Time:
- 2,666
Comments: 4
3 comments on steps, 1 guide comment.
Go to guide commentsCompleted: 6 7
6 people have marked this guide "completed." Will you be next?
7 people have marked this guide "completed." Including you — great job!
Favorites: 0 1
No one has favorited (and subscribed to) this guide. Will you be the first?
1 person has favorited (and subscribed to) this guide — and that's you!
Introduction
Go to step 1 ↓This guide will show how to replace the hinge spring of your CHI Original.
What you need
Tools


-
-
-
Insert a nylon or metal spudger under the plastic CHI spring covers. Pry them up to pop them off. Do this for each side.
 Ask FixBot
-
-
-
Tool used on this step:Tweezers$4.99
-
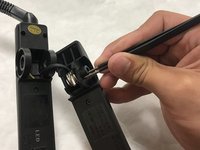
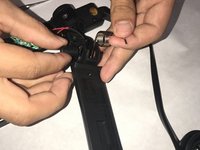
Remove the spring pin with a pair of pliers or tweezers.
-
Remove the spring.
-
-


To reassemble your device, follow these instructions in reverse order.
Cancel: I did not complete this guide.
6 other people completed this guide.

Team

IUPUI, Team S1-G2, Freund Fall 2017 Member of IUPUI, Team S1-G2, Freund Fall 2017
IUPUI-FREUND-F17S1G2
4 Members
36 Guides authored
1 Guide Comment
Falta agregar la reparación del eliminador o adaptador de corriente que va en la clavija
