
Free Shipping on Domestic Orders $75+

CAT S22 Flip Touch Screen Replacement

What you need

  1. CAT S22 Flip Touch Screen Replacement, Back Screen: step 1, image 1 of 3 CAT S22 Flip Touch Screen Replacement, Back Screen: step 1, image 2 of 3 CAT S22 Flip Touch Screen Replacement, Back Screen: step 1, image 3 of 3
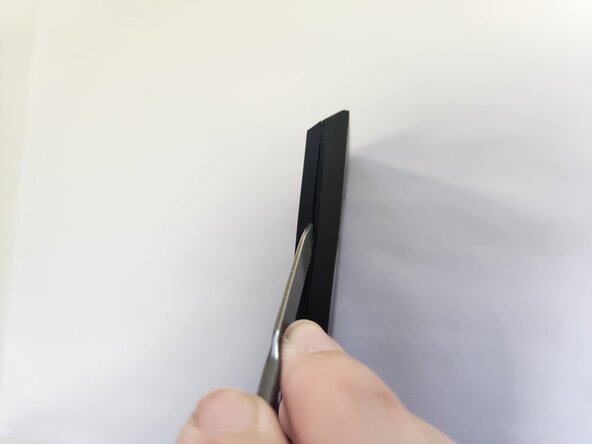
    • Insert a metal spudger into the seam of the phone frame.

    • Apply a downward force on the metal spudger to create a gap.

  2. CAT S22 Flip Touch Screen Replacement: step 2, image 1 of 1
    • Insert a jimmy into the gap.

    • Use the jimmy to wedge the front panel free from the frame.

    • There is adhesive binding the front panel to the frame, so you will have to apply a moderate amount of force to get them apart.

  3. CAT S22 Flip Touch Screen Replacement: step 3, image 1 of 1
    • Use a J00 JIS screwdriver to remove the four wide 3.3 mm-long screws.

    • Use a J00 JIS screwdriver to remove the four narrow 3.3 mm-long screws.

  4. CAT S22 Flip Touch Screen Replacement: step 4, image 1 of 2 CAT S22 Flip Touch Screen Replacement: step 4, image 2 of 2
    • Use a metal spudger to dislodge the lip holding the frame together.

  5. CAT S22 Flip Touch Screen Replacement: step 5, image 1 of 1
    • Use the flat end of a spudger to gently disconnect the back screen press connector.

  6. CAT S22 Flip Touch Screen Replacement: step 6, image 1 of 1
    • Gently remove the back screen.

  7. CAT S22 Flip Touch Screen Replacement, Daughterboard: step 7, image 1 of 1
    • Disconnect the two touch-screen press connectors with the flat end of a spudger.

    • This only take a light force. To much force may damage the daughtboard components. This applies to all the ribbon cables of the CAT S22 daughterboard.

  8. CAT S22 Flip Touch Screen Replacement: step 8, image 1 of 1
    • Disconnect the front-facing camera ribbon cable using the spudger.

  9. CAT S22 Flip Touch Screen Replacement: step 9, image 1 of 1
    • Use a pair of tweezers to gently remove the front-facing camera.

  10. CAT S22 Flip Touch Screen Replacement: step 10, image 1 of 1
    • Use the spudger to remove the back-facing camera press connector.

  11. CAT S22 Flip Touch Screen Replacement: step 11, image 1 of 3 CAT S22 Flip Touch Screen Replacement: step 11, image 2 of 3 CAT S22 Flip Touch Screen Replacement: step 11, image 3 of 3
    • Place the spudger at one side of the metallic connector of the motherboard ribbon and apply a light upward force.

    • Repeat the previous action across the sides of the connector.

  12. CAT S22 Flip Touch Screen Replacement: step 12, image 1 of 1
    • Remove the red rubber seal connected to the motherboard ribbon cable.

  13. CAT S22 Flip Touch Screen Replacement: step 13, image 1 of 3 CAT S22 Flip Touch Screen Replacement: step 13, image 2 of 3 CAT S22 Flip Touch Screen Replacement: step 13, image 3 of 3
    • Insert an opening pick between the frame and the top of the daughterboard. This spot should be where you removed the motherboard ribbon cable and should have the least amount of adhesive.

    • Move the opening pick down, slicing through the adhesive.

    • While moving the pick down, apply a ligh upward pressure to fully seperate the the daughterboard from the frame.

  14. CAT S22 Flip Touch Screen Replacement: step 14, image 1 of 3 CAT S22 Flip Touch Screen Replacement: step 14, image 2 of 3 CAT S22 Flip Touch Screen Replacement: step 14, image 3 of 3
    • Insert the opening pick between the frame and the top right of the daughterboard. There may be some resistence inserting the pick.

    • Move the opening pick down, slicing through the adhesive.

    • While moving the pick down, apply a ligh upward pressure to fully seperate the the daughterboard from the frame.

  15. CAT S22 Flip Touch Screen Replacement, Touch Screen: step 15, image 1 of 1
    • Warm up the iFixit iOpener.

    • Place the iFixit iOpener at the top of the screen to soften the adhesive.

    • You may need to reapply the iOpener if the adhesive solidifies again during the screen removal.

    • Prolonged interaction with the iOpener may damage the phone components or cause minor burns.

  16. CAT S22 Flip Touch Screen Replacement: step 16, image 1 of 2 CAT S22 Flip Touch Screen Replacement: step 16, image 2 of 2
    • Insert the Jimmy into the crease between the touch screen and the top of the frame.

    • Turn the Jimmy by 90 degrees to insert it under the screen.

  17. CAT S22 Flip Touch Screen Replacement: step 17, image 1 of 1
    • Place an opening pick under the inserted Jimmy.

  18. CAT S22 Flip Touch Screen Replacement: step 18, image 1 of 1
    • Using the inserted JImmy, slice along the side of the touch screen.

  19. CAT S22 Flip Touch Screen Replacement: step 19, image 1 of 1
    • Add another opening pick in the gap between the first pick and the jimmy.

  20. CAT S22 Flip Touch Screen Replacement: step 20, image 1 of 1
    • Insert the Jimmy to the left of the first pick.

  21. CAT S22 Flip Touch Screen Replacement: step 21, image 1 of 1
    • Place a opening pick under the inserted Jimmy. There should now be two opening picks at the top of the frame.

  22. CAT S22 Flip Touch Screen Replacement: step 22, image 1 of 3 CAT S22 Flip Touch Screen Replacement: step 22, image 2 of 3 CAT S22 Flip Touch Screen Replacement: step 22, image 3 of 3
    • Move the Jimmy to the opposite side of the touch screen.

    • Create a new incision between the leftside of the screen and the the frame.

    • Turn the Jimmy by 90 degrees to insert it under the screen.

    • Use the Jimmy to slice with a downwards motion. The screen should full seperate from the frame with the exception of the bottom.

    • As the touch screen and frame pull apart, the opening pick may fall out.

  23. CAT S22 Flip Touch Screen Replacement: step 23, image 1 of 2 CAT S22 Flip Touch Screen Replacement: step 23, image 2 of 2
    • As the touch screen is falls out, make sure to guide the two touch screen ribbon cables through the frame.

Conclusion

To reassemble your device, follow these instructions in reverse order. You may want to reapply adhesive to where the daughterboard and screen meet the frame.

0 Guide Comments

Add Comment

View Statistics:

Past 24 Hours: 1

Past 7 Days: 4

Past 30 Days: 17

All Time: 94