Free Shipping on Domestic Orders $75+

Bose SoundLink Color Button Pad Replacement

Views: 12K

View statistics:

Past 24 Hours:
4
Past 7 Days:
26
Past 30 Days:
145
All Time:
11,766
Comments: 48

45 comments on steps, 3 guide comments.

Go to guide comments
Completed: 8

8 people have marked this guide "completed." Will you be next?

Favorites: 0

No one has favorited (and subscribed to) this guide. Will you be the first?

Time Required: 30 minutes
Difficulty: Difficult
Bose SoundLink Color  Button Pad Replacement

Introduction

Go to step 1 ↓

When one or all of the buttons stop working on a device, it can be a frightening thing. Use this guide to help.

What you need

Parts

Tools

    1. Bose SoundLink Color  Button Pad Replacement, Outer Casing: step 1, image 1 of 2 Bose SoundLink Color  Button Pad Replacement, Outer Casing: step 1, image 2 of 2
      • Four round, plastic plugs are located on the back of the device.

      • Using a metal spudger, carefully pry up the plastic covers.

      • The covers are all glued on, so be careful not to scar the casing when prying them off. If possible, use a spudger or plastic opening tool to remove them.

      Ask FixBot

      Add Comment

    2. Bose SoundLink Color  Button Pad Replacement: step 2, image 1 of 2 Bose SoundLink Color  Button Pad Replacement: step 2, image 2 of 2
      • Remove the four 1.8 cm-long T15 Torx Security screws from the outer case.

      • Some of these use T15 "Star" 5-point Torx security screws instead of the more common 6-point ones.

      Ask FixBot

      Add Comment

    3. Bose SoundLink Color  Button Pad Replacement: step 3, image 1 of 2 Bose SoundLink Color  Button Pad Replacement: step 3, image 2 of 2
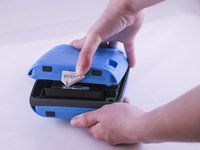
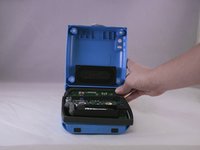
      • Carefully open up the casing.

      • The top button pad may need to be re-glued upon installing the new casing.

      Ask FixBot

      Add Comment

    1. Bose SoundLink Color  Button Pad Replacement, Button Pad: step 4, image 1 of 2 Bose SoundLink Color  Button Pad Replacement, Button Pad: step 4, image 2 of 2
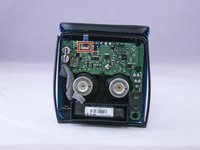
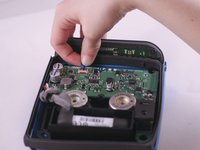
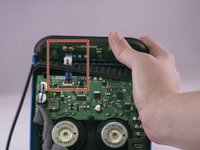
      • Lift up the retaining flap on the button cable ZIF connector.

      • Pull the button cable straight out of the connector.

      Ask FixBot

      Add Comment

    2. Bose SoundLink Color  Button Pad Replacement: step 5, image 1 of 2 Bose SoundLink Color  Button Pad Replacement: step 5, image 2 of 2
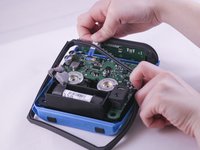
      • Carefully pull the ribbon cable through the rubber gasket that runs around the device.

      Ask FixBot

      Add Comment

    3. Bose SoundLink Color  Button Pad Replacement: step 6, image 1 of 1
      • To remove the old rubber button pad, carefully peel it off of the blue casing.

      Ask FixBot

      Add Comment

Conclusion

To reassemble your device, follow these instructions in reverse order, starting from Step 6.

Cancel: I did not complete this guide.

8 other people completed this guide.

3 Guide Comments

Great guide, and I think I can manage this. But, where can I get the Replacement Bose SoundLink Color Button Pad??

Fred

Fred Fish - Reply Share

I’m wondering the same thing. Where do you get the replacement Bose Soundlink Color button pad? We just bought a new charger because we thought that was the problem. But that didn’t make any difference. We still can’t turn the speaker on!

Lynn Wilson - Reply Share

I got the bose soundlink color button panel only with bose India authorised service center in South Mumbai . That cost me in Indian RS. 2360. Including approx $35 USD.

nrirehan - Reply Share

Add Comment

View Statistics:

Past 24 Hours: 4

Past 7 Days: 26

Past 30 Days: 145

All Time: 11,766