
Blocked extruder

Cameron Nicholson and one other contributor
Last updated on Jul 7, 2026
Views: 188
View statistics:
- Past 24 Hours:
- 3
- Past 7 Days:
- 13
- Past 30 Days:
- 69
- All Time:
- 188
Comments: 0
No one has left comments on this guide. Will you be first?
Go to guide commentsCompleted: 1 2
1 person has marked this guide "completed." Will you be next?
2 people have marked this guide "completed." Including you — great job!
Favorites: 0 1
No one has favorited (and subscribed to) this guide. Will you be the first?
1 person has favorited (and subscribed to) this guide — and that's you!
Community-Contributed Guide
An awesome member of our community made this guide. It was not created by iFixit staff.
Introduction
Go to step 1 ↓Has your Wanhao i3 Duplicator 3d printer suddenly stopped printing your models halfway through the print? Then you probably have a blocked extruder. That or you have gotten some funky code and may need to download a different model.
What you need
Tools
-
Tweezers4.9
-


-
-
-
Your first and mostly obvious step is to unplug your 3d printer and to assure the extruder (The metal pointy thing almost touching the base plate) is cool enough to touch. You can tell if it's cool enough when it stops leaving 3rd degree burns on your finger. (DON'T TEST THAT)
 Ask FixBot
-
-
-
Cut the filament off as low as you possibly can, you can do this by holding down the lever below where the filament goes in which will show more of the filament wire. (Be careful not to cut off any wires in the process)
-
-
-
Using a hex key, (Ignore the fact that im not using the one in the photo) Hold onto the fan and heatsink to the point where if it suddenly fell off (which it will) it would not fall and lose any screws. Carefully remove the the two screws going through the fan and heatsink and place them in a safe dry area.
-
Unplugging this fan is ideal but not necessary.
-
-
-
As you can see in the first image you can see your source of the clogging.
-
(Move to image 2) Gently lift the the stepper motor upwards, you should be able to feel a tug on the bottom. That should be the filament. Cut it down at much as you can and gently push in into the extruder a tiny bit. Then, unplug the stepper motor and place in onto your clean, dry workbench.
-
-
-
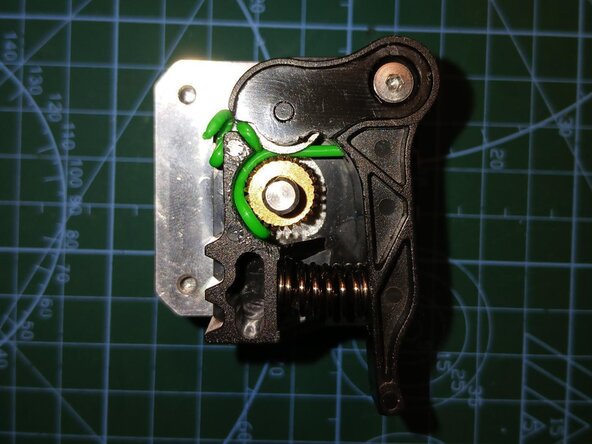
(First + Scecond image) Remove the screw on the top right using a small hex-key or screwdriver and disassemble, be careful not lose the screw or spring.
-
(Third Image) Remove as much filament as you buy do not try to force anything that won't move, I'll come back for that in the next step.
-
Be careful not to damage the mechanism or teeth of the servo motor gear.
-
-
-
(First image) If the filament is still stuck and wont move unscrew the screw on the bottom right of the image again with a screwdriver or hex-key. If the clog is cleaned go to the next step.
-
Unscrewing this will remove the black cover and any filament you cannot reach will pop out.
-
-
-
-
You heard the title, time to reassemble the mechanism. Do everything you did in the past two steps in reverse.
-
Ensure that everything fits correctly and plug in the fan or stepper motor if you unplugged them earlier.
-
-
-
I'll keep this one short because you have probably done this before but just in case you haven't or need a reminder; turn on the 3d printer and change the extruder temperature to 210 degrees celsius.
-
Once the extruder has heated up, hold down the black lever (The one form before and insert the new line of filament, you should feel a gentle press when it has penetrated the extruder and you should feel and see the new filament coming through.
-
-
-
This should have solved your clogging problem, If your 3d printer clogs again, It may be because of aged/damaged filament, a broken fan(The one beside the heatsink) or faulty model code that needs to be downloaded again or use a different model.
-
Good luck printing anything between useful contraptions or projects, to those articulated animals you sell at comic-con.
-
-




To reassemble your device, follow these instructions in reverse order.
Cancel: I did not complete this guide.
One other person completed this guide.

