Introduction
This guide provides step-by-step instructions on how to replace the microphone in the Blink Outdoor 4. The Blink Outdoor 4 includes a built-in microphone with two-way audio, allowing the user to hear, speak, and record audio through the Blink app. To use the microphone in your Blink Outdoor 4, go into the Blink app and find the Live View button for any of your available cameras before tapping on it. Once you’ve tapped on the Live View button, press the “Tap to unmute” button, which will turn blue upon being pressed. You’ll know you’ve pressed the button when an animation appears above your button, showing that the mobile device’s microphone is active. When you’re done speaking through the microphone, press the “Tap to mute” button, and in five minutes, the Live View will stop, making you go back to the home screen.
A common issue with using the microphone of the Blink Outdoor 4 is the production of echo, feedback, or sudden, repeated squeal noises. Feedback, a repeating sound that increases in pitch and volume, is usually caused by the device picking up sounds from the Blink app, which are then transmitted back to the Blink app. To fix these noises, ensure that your mobile device is at least 10 feet away from your Blink camera or tap the mute button to silence the camera’s speaker. Before getting started, it is important to know what you are looking for. To purchase the new individual front-facing camera piece, you must contact Blink support directly. Click here.
If your device has been purchased within the same year, you are eligible for the one-year limited warranty that includes repair or replacement for broken parts
If the device is mounted, you will need to remove the device from the mount before you begin. Once you have done so, feel free to take the device indoors or to a flat surface.
What you need
-
-
-
Remove the device from the mount on the back if necessary.
-
Flip the camera upside down.
-
Insert the swivel multi-tool that was included in the Blink Outdoor 4 box into the small notch located inside the silver circle in the center of the device.
-
Twist to the left until you hear a click.
 Ask FixBot
-
-
-
Use a spudger to gently pry the back casing off the device.
-
Remove the two AA batteries and place them aside.
-
-
-
Use a Phillips #1 screwdriver to remove four screws near the battery compartments.
-
-
-
-
Turn the device on its side shown above.
-
Use a plastic spudger to gently pry off the front cover of the device.
-
-
-
Use a Phillips #00 screwdriver to remove the two small black screws in the upper right corner of the board.
-
-
-
Gently lift the motherboard out of the device by its edges.
-
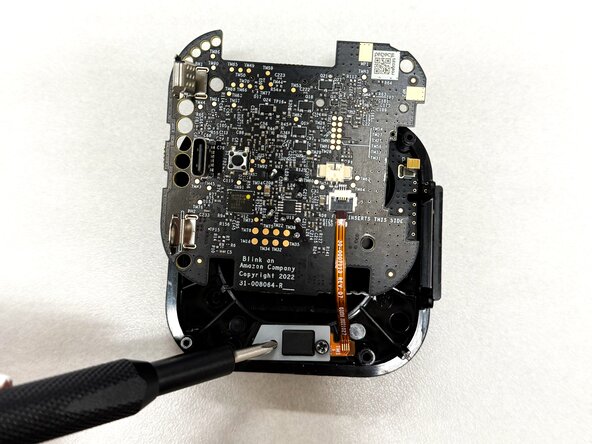
Use a Phillips #0 screwdriver to remove two screws from the white bracket.
-
-
-
Remove the black and then the white covering at the bottom.
-
Use a spudger or a clean fingernail to flip up the black locking flap—this is the unlocked position.
-
Gently pull the orange microphone cable out of its motherboard socket using tweezers or your fingers to remove the microphone.
-
-




To reassemble your device, follow these instructions in reverse order. Take your e-waste to an R2 or e-Stewards certified recycler.

Team

Texas Tech, Team 11-5, Weston Spring 2026 Member of Texas Tech, Team 11-5, Weston Spring 2026
TTU-WESTON-S26S11G5
5 Members
60 Guides authored
