Free Shipping on Domestic Orders $75+

Blackview BV9200: Motherboard Replacement

What you need

  1. Blackview BV9200: Motherboard Replacement, Heating the LCD: step 1, image 1 of 1
    • Begin by heating the LCD. I use a heating pad set to 100 Celsius, and let it heat for 3-5 minutes.

    • If you don't have such a tool, you should be able to use a heat gun. Just heat the edges of the screen.

    • I would not recommend trying to get the screen off without heating the glue.

    Ask FixBot
    • Consider using a more appropriate tool than a part of a box cutter blade to initially separate the LCD from the frame. (I would've tried using iFixit's Jimmy, but I haven't got it yet)

    • Be very careful if you use a part of box cutter blade. You could easily tear the LCD's cables or scratch the underside.

    • Be careful not to separate the LCD and touch panel. When removing the glue with a plastic card, either go underneath the LCD as well or only on the edges of the touch panel.

    • The video is sped up to fit within the 30 second limit. Do it slower and more carefully.

    Ask FixBot
  2. Blackview BV9200: Motherboard Replacement, LCD's connector: step 3, image 1 of 3 Blackview BV9200: Motherboard Replacement, LCD's connector: step 3, image 2 of 3 Blackview BV9200: Motherboard Replacement, LCD's connector: step 3, image 3 of 3
    • Unscrew the screw, remove the tab, unplug the LCD and pull it off.

    • I use tweezers to get the little tab that covers the connector out.

    Ask FixBot
  3. Blackview BV9200: Motherboard Replacement, Screeeeeeeews.: step 4, image 1 of 2 Blackview BV9200: Motherboard Replacement, Screeeeeeeews.: step 4, image 2 of 2
    • Many screws.

    • Ones circled in red are all the same size, and ones circled in yellow are the same size as the one which held the tab that covered the LCD connector.

    • After you remove the screws, get leverage on the bottom. You will see a small indent where you can squeeze a tool in.

    Ask FixBot
  4. Blackview BV9200: Motherboard Replacement, Removing the battery: step 5, image 1 of 3 Blackview BV9200: Motherboard Replacement, Removing the battery: step 5, image 2 of 3 Blackview BV9200: Motherboard Replacement, Removing the battery: step 5, image 3 of 3
    • Remove the cover.

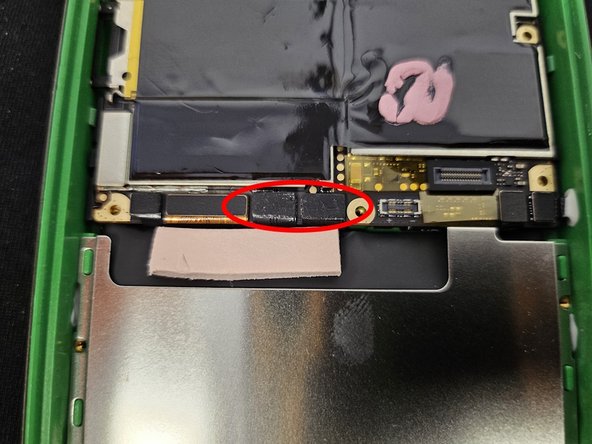
    • Remove the cable. Connectors are pointed at by arrows.

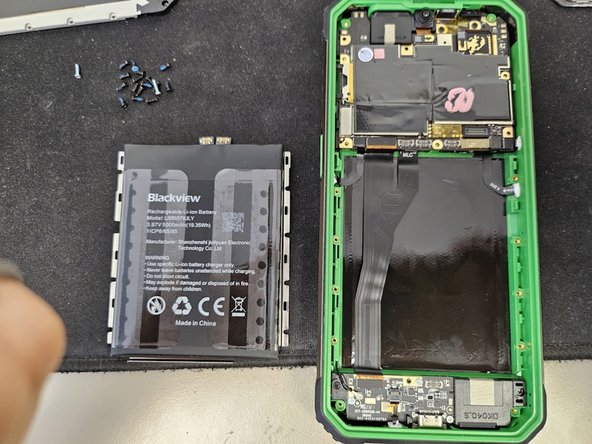
    • Disconnect and remove the battery.

    • The battery is not glued or screwed in. Simply grab a hold of it and lightly pull it out.

    Ask FixBot
  5. Blackview BV9200: Motherboard Replacement, Cat: step 6, image 1 of 1
    • Meow.

    Ask FixBot
  6. Blackview BV9200: Motherboard Replacement, Removing peripherals off the motherboard: step 7, image 1 of 1
    • Remove the connectors, the cameras and the screws that are pointed to.

    • Tweezers or plastic cards work well for removing connectors here.

    Ask FixBot
  7. Blackview BV9200: Motherboard Replacement, Removing the motherboard from the case: step 8, image 1 of 3 Blackview BV9200: Motherboard Replacement, Removing the motherboard from the case: step 8, image 2 of 3 Blackview BV9200: Motherboard Replacement, Removing the motherboard from the case: step 8, image 3 of 3
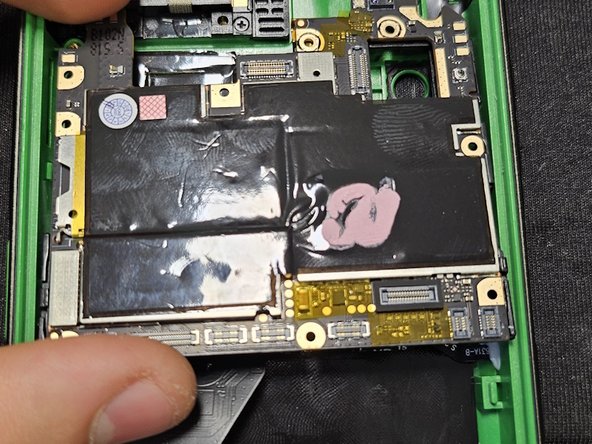
    • The motherboard assembly is held in place by 2 latches. Get it unlatched.

    • Once you have it unlatched, pull it slightly towards you, then bend it over so you can see the underside.

    • Disconnect the data cable.

    • Be careful when doing this, as these cables are fragile and it is very easy to tear their heads off.

    Ask FixBot
  8. Blackview BV9200: Motherboard Replacement, Taking off the housing: step 9, image 1 of 2 Blackview BV9200: Motherboard Replacement, Taking off the housing: step 9, image 2 of 2
    • The plastic housing is held in place by 2 latches and a screw we removed in step 1.

    • After you get it apart, remove the cameras from the motherboard.

    Ask FixBot
  9. Blackview BV9200: Motherboard Replacement, Reassembling the motherboard assembly: step 10, image 1 of 2 Blackview BV9200: Motherboard Replacement, Reassembling the motherboard assembly: step 10, image 2 of 2
    • Take the connector off the auxiliary PCBA that is found on the housing.

    • Attach the MB side on the new motherboard, then attach the cameras.

    Ask FixBot
  10. Blackview BV9200: Motherboard Replacement, Prepping motherboard to put back into the case: step 11, image 1 of 2 Blackview BV9200: Motherboard Replacement, Prepping motherboard to put back into the case: step 11, image 2 of 2
    • Reattach the connector on the auxiliary PCBA.

    • Attach the data cable.

    • This wasn't outlined in the previous steps, but detach the data cable from the USB board to make these and following steps easier.

    Ask FixBot
  11. Blackview BV9200: Motherboard Replacement, Backpacks are good chairs.: step 12, image 1 of 1
    • Meow.

    Ask FixBot
  12. Blackview BV9200: Motherboard Replacement, Reinserting the motherboard: step 13, image 1 of 3 Blackview BV9200: Motherboard Replacement, Reinserting the motherboard: step 13, image 2 of 3 Blackview BV9200: Motherboard Replacement, Reinserting the motherboard: step 13, image 3 of 3
    • Move the cables out of the way.

    • Attach the bottom part of the cable that is connected to the USB board.

    • Attach the top part of the cable.

    Ask FixBot
  13. Blackview BV9200: Motherboard Replacement, Reassembly: step 14, image 1 of 3 Blackview BV9200: Motherboard Replacement, Reassembly: step 14, image 2 of 3 Blackview BV9200: Motherboard Replacement, Reassembly: step 14, image 3 of 3
    • Screw in the screws.

    • Attach all the connectors, and the cameras. Then, insert the battery and attach it. Lastly, add the final connector between the USB board and motherboard.

    • Do not forget to re-attach the data cable.

    Ask FixBot
  14. Blackview BV9200: Motherboard Replacement, Final steps: step 15, image 1 of 3 Blackview BV9200: Motherboard Replacement, Final steps: step 15, image 2 of 3 Blackview BV9200: Motherboard Replacement, Final steps: step 15, image 3 of 3
    • Reinsert the cover panel, and screw in the screws.

    • Attach the LCD connector and cover it with the tab.

    • Glue the screen to the case.

    Ask FixBot
Conclusion

Make sure to use good glue to preserve waterproofness and dustproofness of the product.

DegenFixer

Member since: 09/18/24

5,521 Reputation

24 Guides authored

0 Guide Comments

Add Comment

View Statistics:

Past 24 Hours: 4

Past 7 Days: 12

Past 30 Days: 79

All Time: 808