
Bissell PowerFresh Steam Valve Replacement

Parker Tips and 4 other contributors
Last updated on Jan 7, 2026
Views: 456
View statistics:
- Past 24 Hours:
- 1
- Past 7 Days:
- 14
- Past 30 Days:
- 77
- All Time:
- 456
Comments: 1
1 guide comment.
Go to guide commentsCompleted: 0 1
No one has marked this guide "completed." Will you be the first?
1 person has marked this guide "completed." It's you — great job!
Favorites: 0 1
No one has favorited (and subscribed to) this guide. Will you be the first?
1 person has favorited (and subscribed to) this guide — and that's you!
Action Shots
Be an action hero! This guide needs images that better demonstrate how to perform specific actions.
Needs More Images
A few more images would make this guide's procedures crystal clear.
Introduction
Go to step 1 ↓Is the valve of your Bissell PowerFresh Steam Mop wearing down, damaged, or have excess mineral buildup? This can cause leaking in the mop or improper steam flow. This guide will show you how to replace the valve in your Bissell PowerFresh Steam Mop.
Before beginning this replacement, make sure to empty the tank and unplug the mop from the wall.
What you need
Tools


-
-
-
-
Push down on the latch to release the mop head.
-
Pull the mop head off the body machine.
-
-
-
-
-
Use a Phillips #2 screwdriver to remove the 40 mm screw from the handle.
-
Slide the handle out.
-
-
-
Use a Phillips #2 screwdriver to remove the two 16 mm screws on the bottom of the unit.
-
Slide the cover off.
-
-
-
Use a Phillips #2 screwdriver to remove the ten 14 mm screws from the back of the unit.
-
-
-
Insert an opening tool into the seam between the front and back sections. Slide it around the perimeter to release the clips securing the casing.
-
Gently separate them.
-
Use a Phillips #2 screwdriver to remove two 14 mm screws from inside the unit.
-
-
-
-
Use a Phillips #2 screwdriver to remove the four 14 mm screws securing the pump.
-
Remove the two 14mm PH2 screws securing the valve.
-
-
-
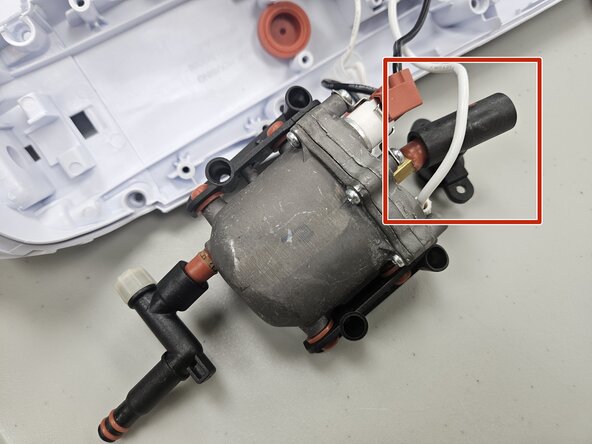
Lift the heater with the valve at a slight angle and pull it out of the mop body.
-
-


 Ask FixBot


To reassemble your device, follow these instructions in reverse order. Take your e-waste to an R2 or e-Stewards certified recycler.

Team

University of North Texas, Team 5-3, Kilpatrick Fall 2025 Member of University of North Texas, Team 5-3, Kilpatrick Fall 2025
UNT-KILPATRICK-F25S5G3
4 Members
60 Guides authored
1 Guide Comment
Thank u but I have and extra piece and no idea where it goes
