Free Shipping on Domestic Orders $75+

Bell and Howell DNV16HDZ Front Lens Replacement

What you need

  1. Bell and Howell DNV16HDZ Front Lens Replacement, Lens Assembly: step 1, image 1 of 2 Bell and Howell DNV16HDZ Front Lens Replacement, Lens Assembly: step 1, image 2 of 2
    • Remove the five 30mm Phillips #0 screws on the bottom of the camera.

    Ask FixBot

    Add Comment

  2. Bell and Howell DNV16HDZ Front Lens Replacement: step 2, image 1 of 1
    • Use a plastic opening tool to disconnect the internal hinges that snaps the camera into place.

    • Using a plastic opening tool is important since a metal one will scratch or damage the thin plastic hinges that hold the camera together.

    Ask FixBot

    Add Comment

  3. Bell and Howell DNV16HDZ Front Lens Replacement: step 3, image 1 of 1
    • It will still be connected by a plastic film. This can also be disconnected by pulling up the white part where it connects to the light circuit board.

    Ask FixBot

    Add Comment

  4. Bell and Howell DNV16HDZ Front Lens Replacement, Front Lens: step 4, image 1 of 1
    • Take out the two 20 mm screws that attach it to the shutter.

    Ask FixBot

    Add Comment

  5. Bell and Howell DNV16HDZ Front Lens Replacement: step 5, image 1 of 1
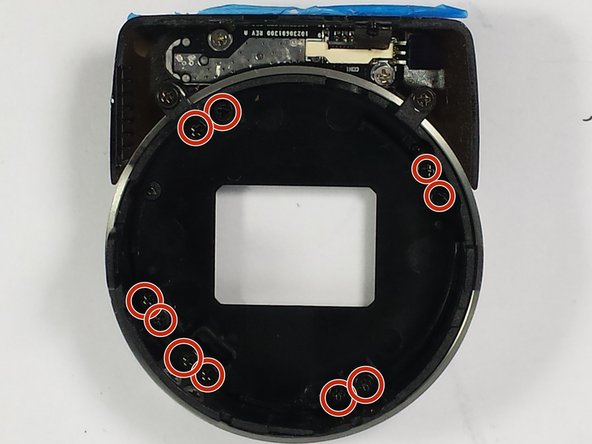
    • Remove the ten 30 mm Phillips #0 screws from the front lens.

    Ask FixBot

    Add Comment

  6. Bell and Howell DNV16HDZ Front Lens Replacement: step 6, image 1 of 1
    • Take the shutter screen parts out of the lens.

    • Now push out the front lens.

    • Slowly take out the shutter screen parts and lens, adding too much force will break them.

    Ask FixBot

    Add Comment

Conclusion

To reassemble your device, follow these instructions in reverse order.

Cancel: I did not complete this guide.

Jerry Hadjah

Member since: 03/04/16

525 Reputation

5 Guides authored

Team

0 Guide Comments

Add Comment

View Statistics:

Past 24 Hours: 0

Past 7 Days: 3

Past 30 Days: 22

All Time: 846