Free Shipping on Domestic Orders $75+

Battery replacement Philips BT3080 with 18650 Cell

What you need

  1. Battery replacement Philips BT3080 with 18650 Cell, Device presentation: step 1, image 1 of 3 Battery replacement Philips BT3080 with 18650 Cell, Device presentation: step 1, image 2 of 3 Battery replacement Philips BT3080 with 18650 Cell, Device presentation: step 1, image 3 of 3
    • This is the Philips BT3080B Bluetooth Speaker.

    • The top of the device hosts the different buttons used to control it.

    • On the bottom we have the battery compartment.

    • On the back there is a headphone jack and the USB charging port.

    Ask FixBot

    Add Comment

  2. Battery replacement Philips BT3080 with 18650 Cell, Removing the old battery: step 2, image 1 of 2 Battery replacement Philips BT3080 with 18650 Cell, Removing the old battery: step 2, image 2 of 2
    • On the bottom of the device, start by removing the screw that is hidden underneath the sticker.

    • Remove the lid, and you should see a rectangular battery. You can unplug it and remove it.

    Ask FixBot

    Add Comment

  3. Battery replacement Philips BT3080 with 18650 Cell, Remove the front cover: step 3, image 1 of 3 Battery replacement Philips BT3080 with 18650 Cell, Remove the front cover: step 3, image 2 of 3 Battery replacement Philips BT3080 with 18650 Cell, Remove the front cover: step 3, image 3 of 3
    • On the bottom of the device, insert a spludger between the front cover and the bottom plastic housing.

    • Move from one edge to the other, do not insert your spludger too far, as there are plastic tabs that you will bump on.

    • Lift gently your spludger to avoid deforming the cover.

    • 3 tabs are maintaining the front cover.

    Ask FixBot

    Add Comment

  4. Battery replacement Philips BT3080 with 18650 Cell, Removing the top cover: step 4, image 1 of 3 Battery replacement Philips BT3080 with 18650 Cell, Removing the top cover: step 4, image 2 of 3 Battery replacement Philips BT3080 with 18650 Cell, Removing the top cover: step 4, image 3 of 3
    • Moving to the top of the device, insert a mediator between the top cover and the back plastic housing.

    • Same as before, lift it gently to avoid deforming the cover.

    • 3 tabs are maintaining the top cover.

    Ask FixBot

    Add Comment

  5. Battery replacement Philips BT3080 with 18650 Cell, Removing the top cover (cont.): step 5, image 1 of 3 Battery replacement Philips BT3080 with 18650 Cell, Removing the top cover (cont.): step 5, image 2 of 3 Battery replacement Philips BT3080 with 18650 Cell, Removing the top cover (cont.): step 5, image 3 of 3
    • The top cover is still cliped on the front edge.

    • Gently insert a spludger on the edge to lift the top cover.

    • With the spludger inserted, insert a mediator between the cover and the buttons panel.

    • 3 more tabs later, the panel should come right off.

    Ask FixBot

    Add Comment

  6. Battery replacement Philips BT3080 with 18650 Cell, Unscrewing the front part: step 6, image 1 of 1
    • Remove the 8 philips head screws.

    Ask FixBot

    Add Comment

  7. Battery replacement Philips BT3080 with 18650 Cell, Separating the front part: step 7, image 1 of 3 Battery replacement Philips BT3080 with 18650 Cell, Separating the front part: step 7, image 2 of 3 Battery replacement Philips BT3080 with 18650 Cell, Separating the front part: step 7, image 3 of 3
    • Tilt the front part.

    • Be really careful not putting to much stress on the cables will tilting the front part.

    • Alternatively, you could probably remove the 2 screws to avoid putting stress on the cables.

    • Your speaker should be opened.

    Ask FixBot

    Add Comment

  8. Battery replacement Philips BT3080 with 18650 Cell, Unpluging the battery cable: step 8, image 1 of 1
    • Unplug the battery cable from the mainboard.

    Ask FixBot

    Add Comment

  9. Battery replacement Philips BT3080 with 18650 Cell, Removing the old battery compartment: step 9, image 1 of 1
    • Unscrew the 4 philips screws that maintain the battery compartment.

    • Keep these screws as they will be used later to fix the new compartment.

    • Remove the compartement by sliding it towards the speakers.

    Ask FixBot

    Add Comment

  10. Battery replacement Philips BT3080 with 18650 Cell, Removing the battery connector board: step 10, image 1 of 1
    • Unscrew the 2 philips head to remove the battery connector from the compartment.

    Ask FixBot

    Add Comment

  11. Battery replacement Philips BT3080 with 18650 Cell, Preparing the 3D printed compartment: step 11, image 1 of 2 Battery replacement Philips BT3080 with 18650 Cell, Preparing the 3D printed compartment: step 11, image 2 of 2
    • 3D print this part (available at https://www.thingiverse.com/thing:717819...). The design provided have been modified to avoid cuts that you see here. This was an early prototype.

    • Slide the connector you unscrewed from the previous step in the opening, by putting the mainboard connector first.

    Ask FixBot

    Add Comment

  12. Battery replacement Philips BT3080 with 18650 Cell, Installing the compartment: step 12, image 1 of 1
    • Slide the 3D printed compartement in the speaker.

    • Put back the 4 philips screws you got from step 9.

    Ask FixBot

    Add Comment

  13. Battery replacement Philips BT3080 with 18650 Cell, Connecting back the battery connector: step 13, image 1 of 1
    • Plug back the battery connector on the mainboard.

    Ask FixBot

    Add Comment

  14. Battery replacement Philips BT3080 with 18650 Cell, Putting back the front panel: step 14, image 1 of 3 Battery replacement Philips BT3080 with 18650 Cell, Putting back the front panel: step 14, image 2 of 3 Battery replacement Philips BT3080 with 18650 Cell, Putting back the front panel: step 14, image 3 of 3
    • Put back the front part (this picture is with the hold compartment).

    • The four tubes that maintain the screws might collide with the rest of the speaker. Do not hesitate to put a bit or strength here. Keep in mind the wires from the microphone and diodes that are at the front.

    • Put back the 8 philips head screws from step 6.

    • While you are here, verify that all the screws are tightened (also on the buttons panel).

    Ask FixBot

    Add Comment

  15. Battery replacement Philips BT3080 with 18650 Cell, Putting back the cover: step 15, image 1 of 1
    • Put back the cover.

    • First, clip the top part around the buttons panel.

    • Then clip the front part at the bottom of the speaker.

    Ask FixBot

    Add Comment

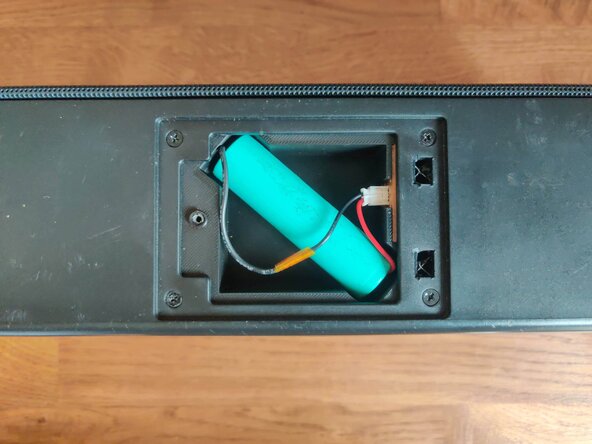
  16. Battery replacement Philips BT3080 with 18650 Cell, Installing the 18650 cell: step 16, image 1 of 2 Battery replacement Philips BT3080 with 18650 Cell, Installing the 18650 cell: step 16, image 2 of 2
    • Solder the connector of the old battery to a 18650 cell.

    • Plug in the battery.

    • Screw back the battery panel.

    Ask FixBot

    Add Comment

  17. Battery replacement Philips BT3080 with 18650 Cell, Making sure everything works: step 17, image 1 of 2 Battery replacement Philips BT3080 with 18650 Cell, Making sure everything works: step 17, image 2 of 2
    • Make sure that the speaker can still turn on (if it does not, make sure that all the connectors you can see in the previous steps are plugged in ).

    • Also, check the 18650 cell voltage.

    • If it does, congratulations, you have a speaker with an easy to find battery !

    Ask FixBot

    Add Comment

Finish Line

Cancel: I did not complete this guide.

yellowjellyfish

Member since: 10/01/21

734 Reputation

2 Guides authored

0 Guide Comments

Add Comment

View Statistics:

Past 24 Hours: 5

Past 7 Days: 11

Past 30 Days: 38

All Time: 225