Introduction
After determining the problem on the Troubleshooting guide, the Back Panel guide will show you how to remove the back of the laptop. This guide will be used as a precursor to the hard drive, keyboard, and RAM removal.
What you need
-
-
-
Flip the laptop upside down. Locate the two latches on both sides of the battery.
-
-
-
-
Slide the latch on the right outwards, releasing the lock. The latch stays unlocked once moved.
-
Simultaneously slide the latch on the left outwards while pulling the battery towards you.
-
-
-
-
Remove the single captive screw on the back panel with your Phillips #1 screwdriver.
-
-
-
Pry the removal tab up. You will feel and hear the first clip release, popping up slightly.
-
Work your way around the border of the panel, releasing the rest of the clips.
-
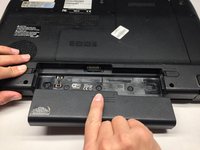
Once all clips are released, lift the cover up and pull towards you.
-
-

 Ask FixBot




To replace the back panel, follow the steps in reverse.
Cancel: I did not complete this guide.
2 other people completed this guide.

Team

UC Davis, Team 2-2, Oliver Fall 2016 Member of UC Davis, Team 2-2, Oliver Fall 2016
UCD-OLIVER-F16S2G2
5 Members
108 Guides authored
