
Free Shipping on Domestic Orders $75+

BLU Dash JR D140 Microphone Replacement

What you need

  1. BLU Dash JR D140 Microphone Replacement, Battery: step 1, image 1 of 1
    • Turn off the phone first. Press the power button continuously for 2-3 seconds to shut down the phone.

    • Using a plastic opening tool, pry open the back cover from the slit on the bottom right corner of the phone.

    Ask FixBot

    Add Comment

  2. BLU Dash JR D140 Microphone Replacement: step 2, image 1 of 1
    • Using a plastic opening tool or finger, pull out the battery.

    Ask FixBot

    Add Comment

  3. BLU Dash JR D140 Microphone Replacement, Microphone: step 3, image 1 of 1
    • Remove the four 4.0mm Phillips #1 screws.

    Ask FixBot

    Add Comment

  4. BLU Dash JR D140 Microphone Replacement: step 4, image 1 of 2 BLU Dash JR D140 Microphone Replacement: step 4, image 2 of 2
    • Starting from a corner, separate the panel from the frame using the plastic opening tool.

    • The volume button will pop out.

    Ask FixBot

    Add Comment

  5. BLU Dash JR D140 Microphone Replacement: step 5, image 1 of 1
    • Unscrew the 3.6mm Phillips #0 screw from the motherboard.

    Ask FixBot

    Add Comment

  6. BLU Dash JR D140 Microphone Replacement: step 6, image 1 of 1
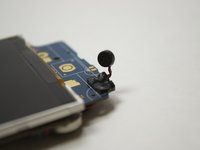
    • Using a spudger, lift the black ZIF connector at the top left corner of the phone.

    Ask FixBot

    Add Comment

  7. BLU Dash JR D140 Microphone Replacement: step 7, image 1 of 1
    • Pull the ribbon cable out of the ZIF connector.

    Ask FixBot

    Add Comment

  8. BLU Dash JR D140 Microphone Replacement: step 8, image 1 of 1
    • When the ribbon cable is removed from the ZIF connector, peel off the power sticky button using a plastic opening tool.

    Ask FixBot

    Add Comment

  9. BLU Dash JR D140 Microphone Replacement: step 9, image 1 of 1
    • Peel off the volume sticky button.

    Ask FixBot

    Add Comment

  10. BLU Dash JR D140 Microphone Replacement: step 10, image 1 of 1
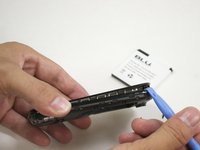
    • Separate the screen cover from the motherboard using the plastic opening tool.

    • Make sure that the LCD screen stays attached to the motherboard while doing this.

    Ask FixBot

    Add Comment

  11. BLU Dash JR D140 Microphone Replacement: step 11, image 1 of 3 BLU Dash JR D140 Microphone Replacement: step 11, image 2 of 3 BLU Dash JR D140 Microphone Replacement: step 11, image 3 of 3
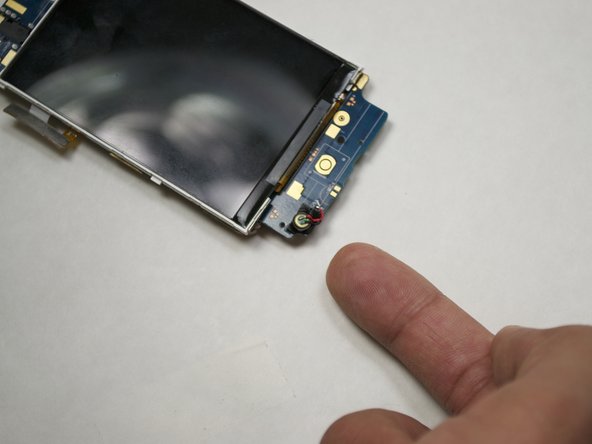
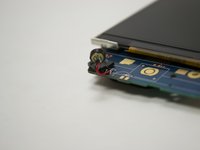
    • The microphone is at the bottom left corner of the phone.

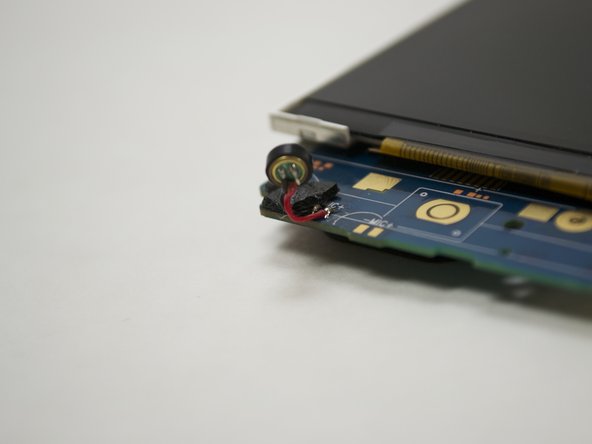
    • Lift the microphone very carefully. Unsolder the two lower wires (one red wire and one black wire).

    • If you don't feel comfortable with this step I recommend looking at Ifixit's solder guide here.

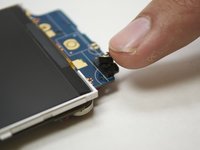
    • Solder the new microphone in the same spot. The black wire will go in the left spot and the red wire in the right spot.

    Ask FixBot

    Add Comment

Conclusion

To reassemble your device, follow these instructions in reverse order.

Cancel: I did not complete this guide.

2 other people completed this guide.

Saravpreet singh

Member since: 07/08/15

179 Reputation

1 Guide authored

Team

UW Tacoma, Team 1-4, Liner SU 2015 Member of UW Tacoma, Team 1-4, Liner SU 2015

UWT-LINER-SU15S1G4

4 Members

2 Guides authored

0 Guide Comments

Add Comment

View Statistics:

Past 24 Hours: 1

Past 7 Days: 8

Past 30 Days: 31

All Time: 741