Introduction
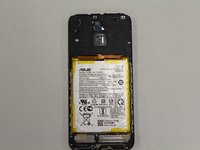
If your Asus ZenFone 5 has lost its ability to hold a charge, you most likely have a dead battery, which requires replacement.
A functional battery provides power to your cellphone. Eventually, cellphone batteries will rapidly drain after going through a repeated amount of charge cycles. If you notice that your charged battery is draining more quickly than usual, consider calibrating your battery to determine an accurate charging capacity. If you continue to notice significant drops in battery percentage, you should replace your battery.
Make sure to power down your device before you begin. Use ESD safe tools when accessing the battery. ESD safe tools greatly reduce the risk puncturing the battery. A punctured battery can cause a dangerous fire. If your battery is swollen, take appropriate precautions.
What you need
-
-
Insert a SIM card removal tool or the end of a paperclip into the small hole on the lefthand side of the phone to release the SIM card.
-
Pull out the SIM card tray.
 Ask FixBot
-
-
-
Use a plastic opening pick to pry into the crease between the back cover and the midframe of the phone.
-
Move all the way around the phone until the back cover is separated from the rest of the phone.
-
-
-
-
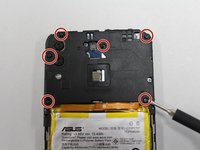
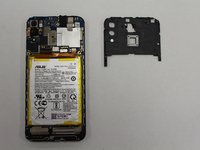
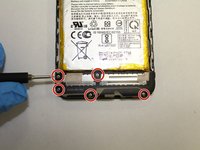
Using a Phillips #00 screwdriver, remove the six screws across the top mid frame and gently lift the top assembly piece. It should detach easily and can be set aside.
-
-
-
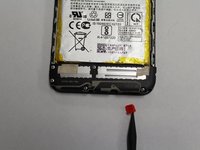
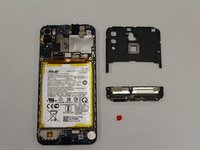
Use a plastic opening tool to release the red square that is holding the bottom assembly piece from the frame.
-
Using a Phillips #00 screwdriver, remove the five screws from the bottom midframe.
-
Gently remove the bottom midframe.
-
-
Tool used on this step:Halberd Spudger$2.99
-
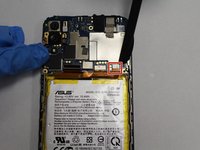
Use a halberd spudger to pry up the battery's press fit connector from the motherboard.
-
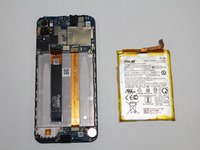
Gently pry the battery out of the case, taking care not to bend or puncture the battery.
-


To reassemble your device, follow these instructions in reverse order.
Cancel: I did not complete this guide.
One other person completed this guide.

Team

The Citadel Military College of South Carolina, Team S3-G20, Eggleston Fall 2020 Member of The Citadel Military College of South Carolina, Team S3-G20, Eggleston Fall 2020
CMCSC-EGGLESTON-F20S3G20
3 Members
6 Guides authored
1 Guide Comment
Wait, Asus Zenfone 5 (ZE620KL, ZF620KL) has only 3300 mAh battery capacity. Why in the image above the battery label say it's 4000 mAh?